In this tutorial you use the AWS S3 Java API in a Spring Boot application. Amazon’s S3 is an object storage service that offers a low-cost storage solution in the AWS cloud. It provides unlimited storage for organizations regardless of an organization’s size. It should not be confused with a fully-featured database, as it only offers storage for objects identified by a key. The structure of S3 consists of buckets and objects. An account can have up to 100 buckets and a bucket can have an unlimited number of objects. Objects are identified by a key. Both the bucket name and object keys must be globally unique. If working with S3 is unfamiliar, refer to the Getting Started with Amazon Simple Storage Service guide before attempting to work with the AWS S3 Java API in this tutorial.
In this tutorial we explore creating, reading, updating, listing, and deleting objects and buckets stored in S3 storage using the AWS S3 Java API SDK 2.0 to access Amazon’s Simple Storage Service (S3).
First we perform the following tasks with objects:
- write an object to a bucket,
- update an object in a bucket,
- read an object in a bucket,
- list objects in a bucket,
- and delete an object in a bucket.
After working with objects, we then use the Java SDK to work with buckets, and perform the following tasks:
- create a bucket,
- list buckets,
- and delete a bucket.
This tutorial uses the AWS SDK for Java 2.0. The SDK changed considerably since 1.X and the code here will not work with older versions of the API. In particular, this tutorial uses the 2.5.25 version of the API.
Do not let using Spring Boot deter you from this tutorial. Even if you have no interest in Spring or Spring Boot, this tutorial remains useful. Simply ignore the Spring part of the tutorial and focus on the AWS S3 code. The AWS code is valid regardless of the type of Java program written and the Spring Boot code is minimal and should not be problematic.
And finally, you might question why this tutorial creates a Rest API as Amazon also exposes S3 functionality as a REST API, which we will explore in a later tutorial. Suspend disbelief and ignore that we are wrapping a Rest API in another Rest API. Here the focus is programmatically accessing the API using the Java SDK. The tutorial should prove useful even if you are a Java developer with no interest in Spring Boot.
- The AWS Java 2.0 API Developers Guide is available here.
Prerequisites
Before attempting this tutorial on the AWS S3 Java API you should have a basic knowledge of the Amazon AWS S3 service. You need an AWS developer account. You can create a free account on Amazon here. For more information on creating an AWS account refer to Amazon’s website.
The Spring Boot version used in this tutorial is 2.0.5 while the AWS Java SDK version is 2.5.25. In this tutorial we use Eclipse and Maven, so you should have a rudimentary knowledge of using Maven with Eclipse. And we use Postman to make rest calls. But, provided you know how to build using Maven and know Rest fundamentals, you should be okay using your own toolset.

Creating A Bucket – Console
Amazon continually improves the AWS console. For convenience, we create a user and bucket here; however, you should consult the AWS documentation if the console appears different than the images and steps presented. These images and steps are valid as of April 2019. For more information on creating a bucket and creating a user, refer to Amazon’s documentation.
Let’s create a bucket to use in this tutorial.
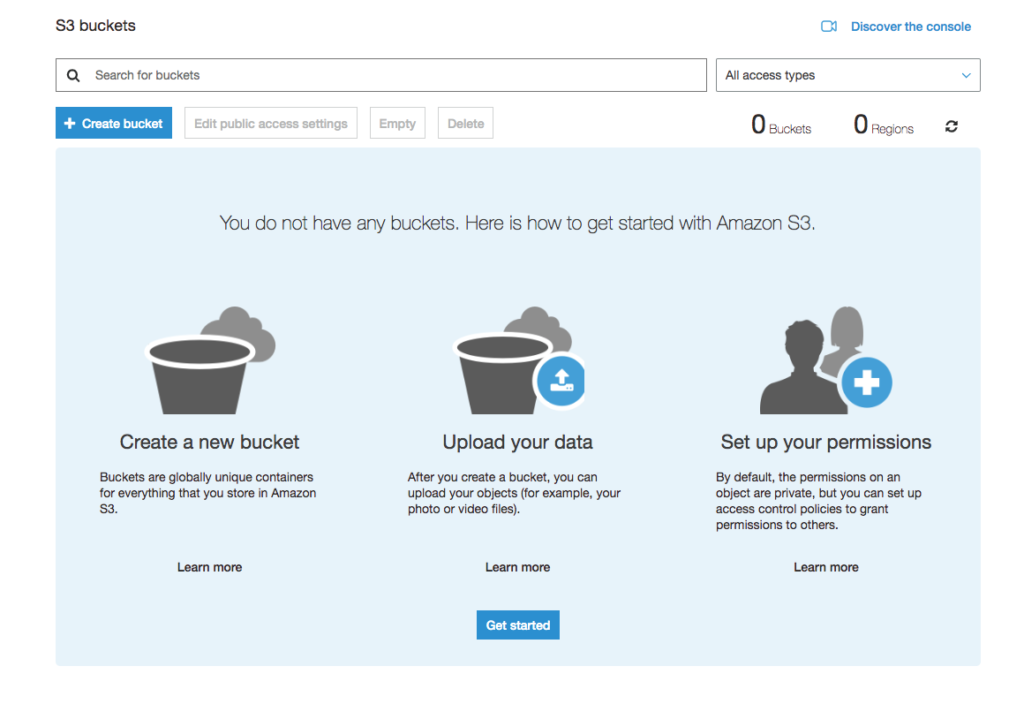
- Log into your account and go to the S3 Console and create a new bucket.
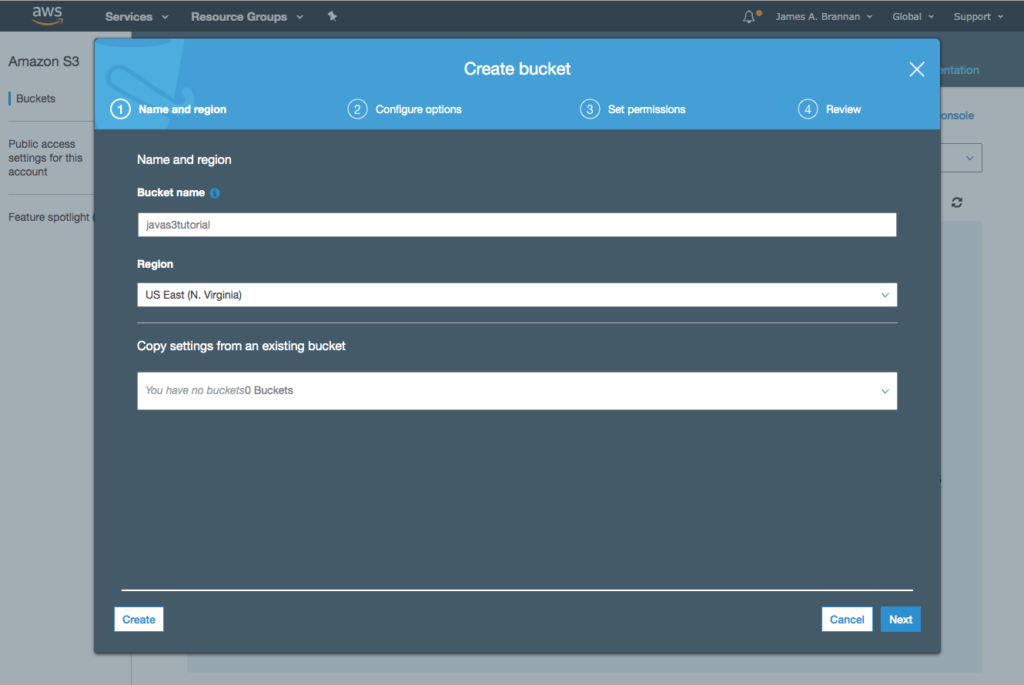
- Name the bucket javas3tutorial * and assign it to your region. Here, as I am located in Frederick Maryland, I assigned it to the US East region (N. Virginia).
- Accept the default values on the next two screens and click Create bucket to create the bucket.
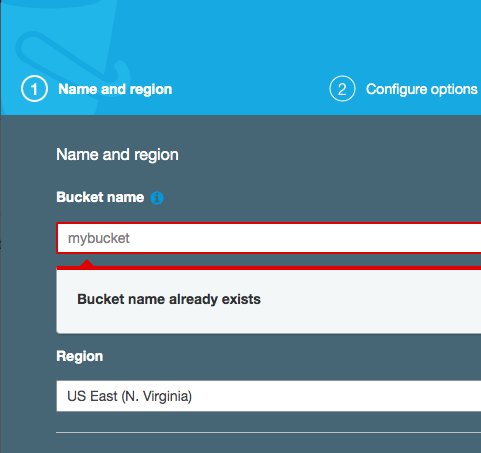
Note that in this tutorial I direct you to create buckets and objects of certain names. In actuality, create your own names. Bucket names must be globally unique, A name such as mybucket was used long ago.

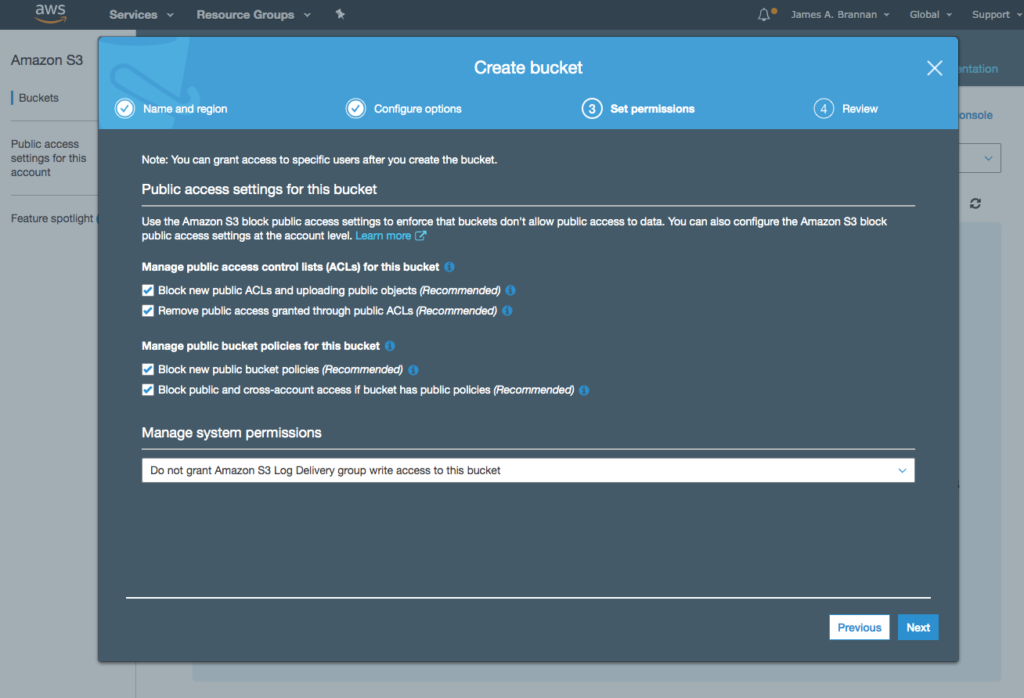
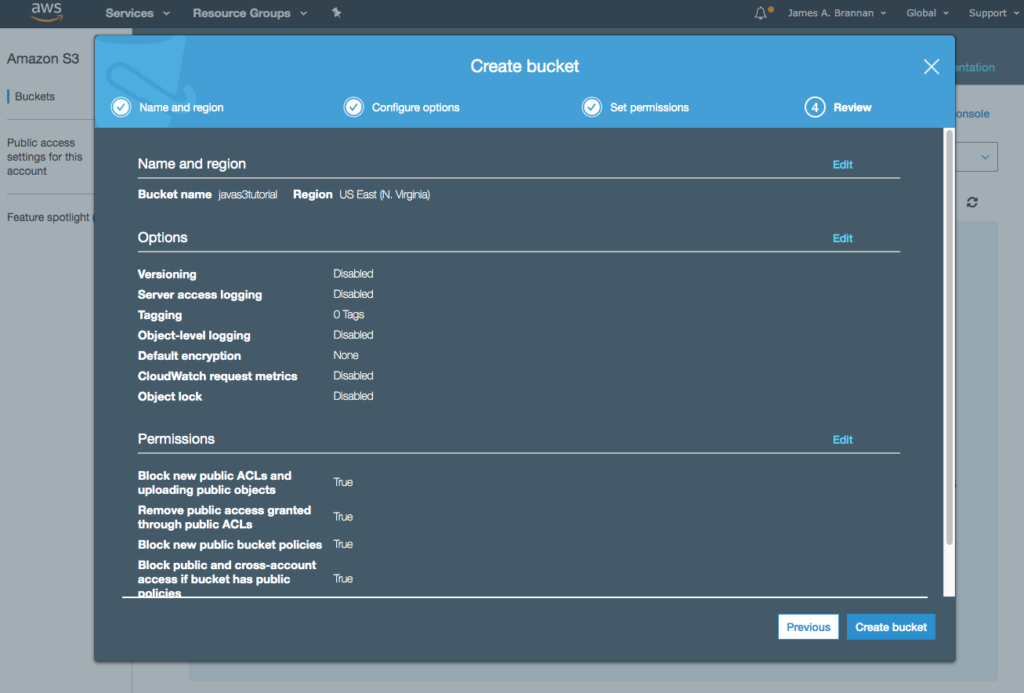
After creating the bucket you should see the bucket listed in your console. Now we must create a user to programmatically access S3 using the Java SDK.

Creating an S3 User – Console
As with creating a bucket, the instructions here are not intended as comprehensive. More detailed instructions are provided on the AWS website. To access S3 from the Java API we must create a user with programmatic access to the S3 Service. That user is then used by our program as the principal performing AWS tasks.
- Navigate to the Identity and Access Management (IAM) panel.
- Click on Users and create a new user.
- Provide the user with Programmatic access.
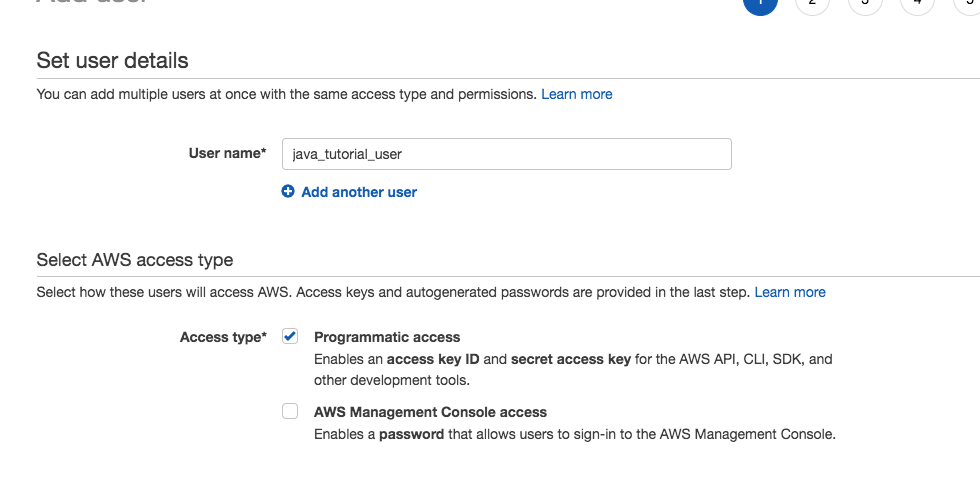
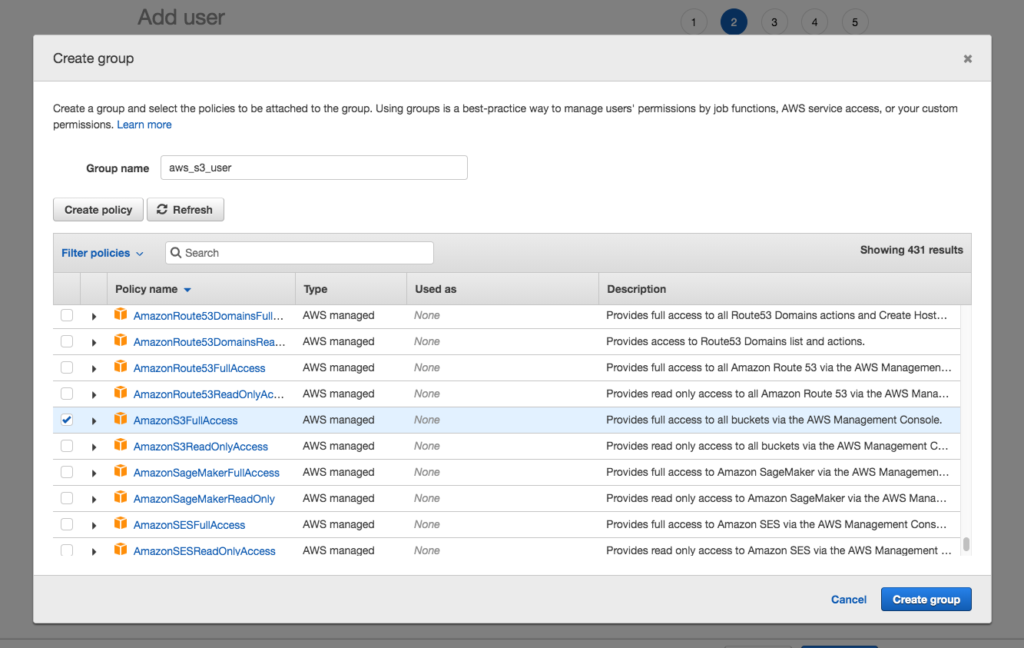
- After creating the user, create a group.
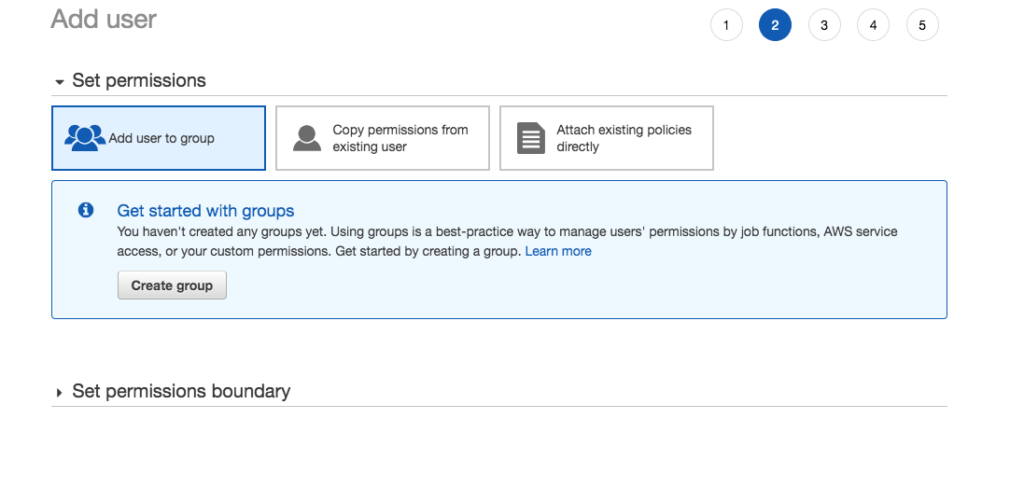
- Assign the AmazonS3FullAccess policy to the group.
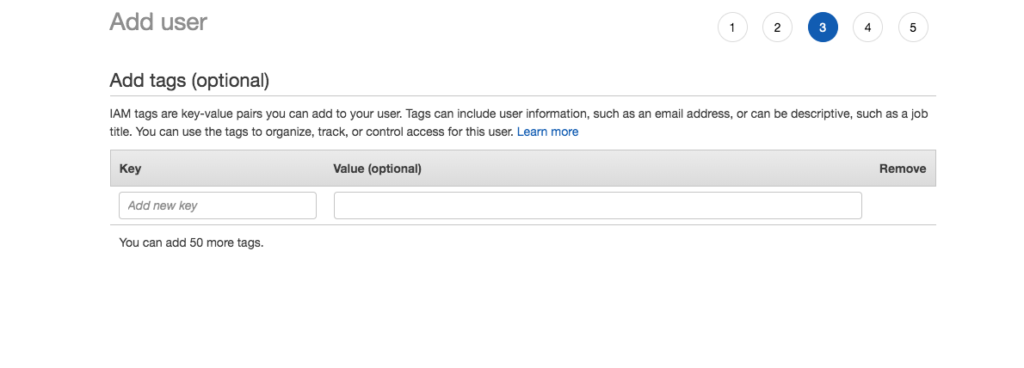
- Navigate past create tags, accepting the default of no tags.
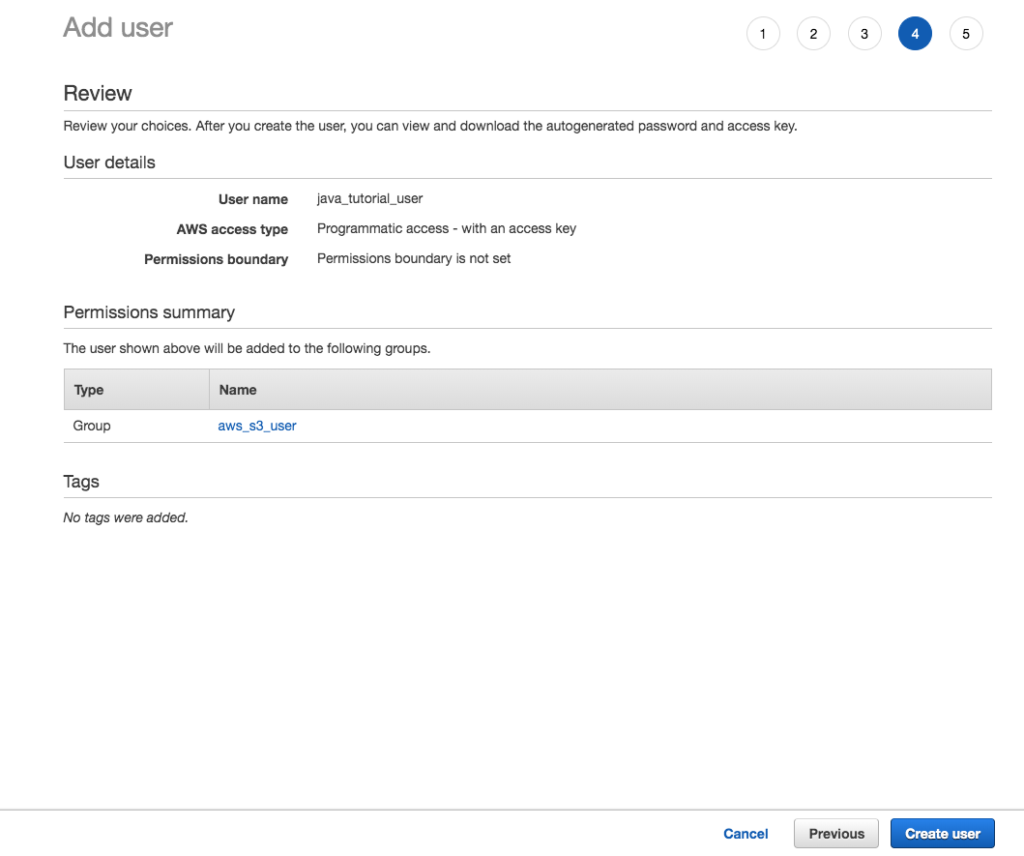
- Review the user’s details and click Create user to create the user.
- On the success screen note the Download .csv button. You must download the file and store in a safe place, otherwise you will be required to create new credentials for the user.
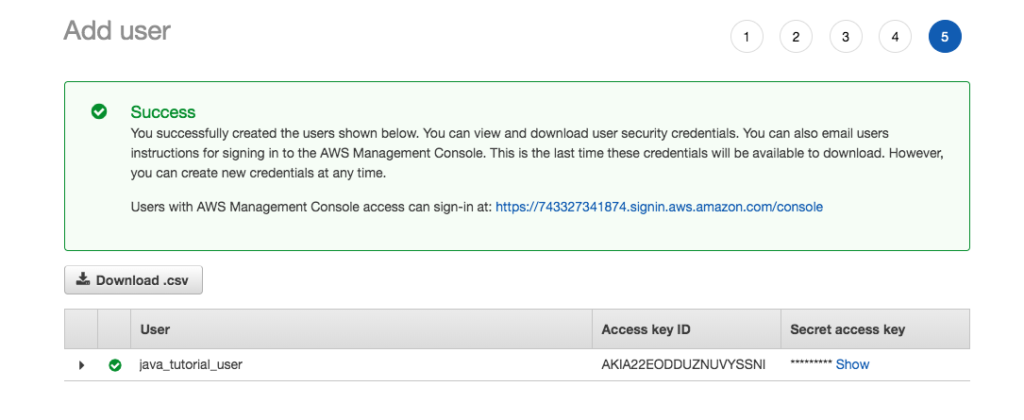
The content of the credentials.csv will appear something like the following. Keep this file guarded, as it contains the user’s secret key and provides full programatic access to your S3 account.
Note: I deleted this user and group prior to publishing this tutorial.
User name,Password,Access key ID,Secret access key,Console login link
java_tutorial_user,,XXXXXXXXXXX,oaUl6jJ3QTdoQ8ikRHVa23wNvEYQh5n0T5lfz1uw,https://xxxxxxxx.signin.aws.amazon.com/console
After creating the bucket and the user, we can now write our Java application.
Java Application – Spring Boot
We use Spring boot to demonstrate using the AWS Java SDK. If you are unfamiliar with Spring Boot, refer to this tutorial to get started with Spring Boot and Rest.
Project Setup
We setup the project as a Maven project in Eclipse.
Maven Pom
- Add the Spring Boot dependencies to the pom file.
- Add the AWS Maven Bill of Materials (BOM) to the pom file.
  <dependencyManagement>
    <dependencies>
      <dependency>
	<groupId>software.amazon.awssdk</groupId>
	<artifactId>bom</artifactId>
	<version>2.5.25</version>
	<type>pom</type>
	<scope>import</scope>
      </dependency>
    </dependencies>
  </dependencyManagement>
A BOM is a POM that manages the project dependencies. Using a BOM frees developers from worrying that a library’s dependencies are the correct version. You place a BOM dependency in a dependencyManagement, then when you define your project’s dependencies that are also in the BOM, you omit the version tag, as the BOM manages the version.
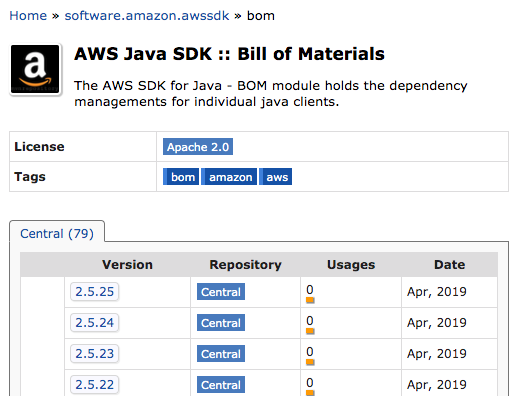
To better understand a BOM, navigate to the BOM and review its contents.
- Navigate to the Maven repository for the BOM.
https://mvnrepository.com/artifact/software.amazon.awssdk/bom- Click on the latest version (2.5.25 as of the tutorial).
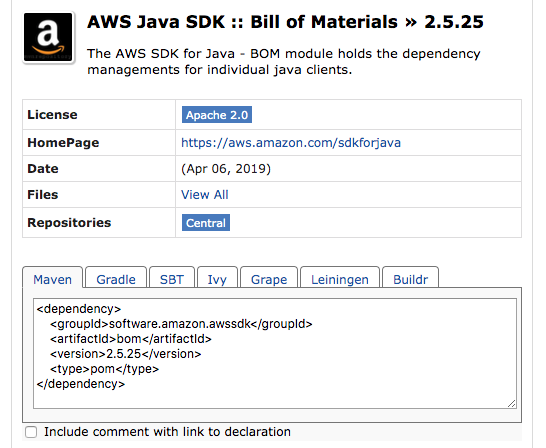
- Click on the View All link.
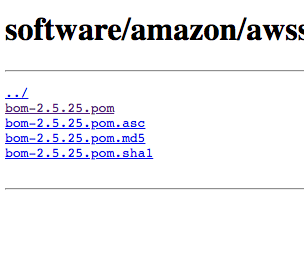
- Click the link to the pom and the BOM appears. This is useful, as it lists the AWS modules.
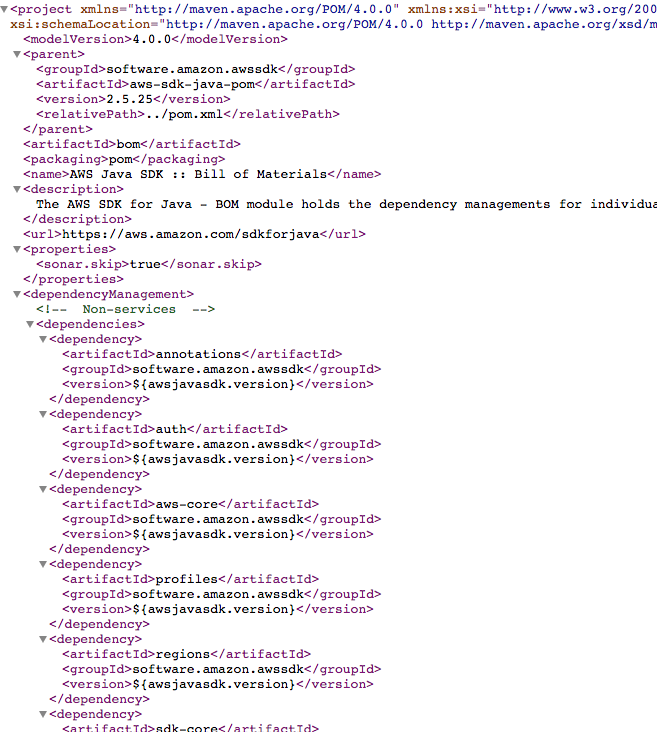
- Add the auth, aws–core, and s3 artifacts to the pom. Note that we do not require specifying the version, as the BOM handles selecting the correct version for us.
- Add the spring dependencies to the pom.
- The complete pom should appear as follows.
<?xml version="1.0" encoding="UTF-8"?>
<project xmlns="http://maven.apache.org/POM/4.0.0"
	xmlns:xsi="http://www.w3.org/2001/XMLSchema-instance"
	xsi:schemaLocation="http://maven.apache.org/POM/4.0.0 http://maven.apache.org/xsd/maven-4.0.0.xsd">
  <modelVersion>4.0.0</modelVersion>
  <groupId>com.tutorial.aws</groupId>
  <artifactId>tutorial-aws</artifactId>
  <version>0.0.1-SNAPSHOT</version>
  <name>TutorialAWS</name>
  <parent>
    <groupId>org.springframework.boot</groupId>
    <artifactId>spring-boot-starter-parent</artifactId>
    <version>2.0.5.RELEASE</version>
  </parent>
  <properties>
    <java.version>1.8</java.version>
  </properties>
  <dependencyManagement>
    <dependencies>
      <dependency>
	<groupId>software.amazon.awssdk</groupId>
	<artifactId>bom</artifactId>
	<version>2.5.25</version>
	<type>pom</type>
	<scope>import</scope>
      </dependency>
    </dependencies>
  </dependencyManagement>
  <dependencies>
    <dependency>
      <artifactId>auth</artifactId>
      <groupId>software.amazon.awssdk</groupId>
    </dependency>
    <dependency>
      <artifactId>aws-core</artifactId>
      <groupId>software.amazon.awssdk</groupId>
    </dependency>
    <dependency>
      <artifactId>s3</artifactId>
      <groupId>software.amazon.awssdk</groupId>
    </dependency>
    <dependency>
      <groupId>org.springframework.boot</groupId>
      <artifactId>spring-boot-starter-web</artifactId>
    </dependency>
    <dependency>
      <groupId>org.springframework.boot</groupId>
      <artifactId>spring-boot-starter-test</artifactId>
      <scope>test</scope>
    </dependency>
    <dependency>
      <groupId>software.amazon.awssdk</groupId>
      <artifactId>auth</artifactId>
    </dependency>
  </dependencies>
  <build>
    <plugins>
      <plugin>
	<groupId>org.springframework.boot</groupId>
	<artifactId>spring-boot-maven-plugin</artifactId>
      </plugin>
      <plugin>
	<groupId>org.apache.maven.plugins</groupId>
	<artifactId>maven-jar-plugin</artifactId>
	<version>3.1.1</version>
	<executions>
          <execution>
	  <phase>package</phase>
	  <goals>
	    <goal>jar</goal>
	  </goals>
	  <configuration>
	    <classifier>client</classifier>
	    <includes>
	      <include>**/factory/*</include>
	    </includes>
	  </configuration>
	</execution>
      </executions>
      </plugin>
    </plugins>
  </build>
</project>
After creating the POM you might want to try building the project to ensure the POM is correct and you setup the project correctly. After that, we need to add the AWS user credentials to your project.
AWS Credentials
When your application communicates with AWS, it must authenticate itself by sending a user’s credentials. The credentials consists of the access key and secret access key you saved when creating the user. There are several ways you might provide these credentials to the SDK, for example, you can put the credentials file in a users home directory, as follows, and they will be automatically detected and used by your application.
~/.aws/credentials C:\Users\<username>\.aws\credentialsFor more information on the alternative ways of setting an application’s user credentials, refer to the Developer’s Guide. But here we are going to manually load the credentials from the Spring boot application.properties file
- If you did not start with a bare-bones Spring Boot project, create a new folder named resources and create an application.properties file in this folder.
- Refer to the credential file you saved and create the following two properties and assign the relevant values. Of course, replace the values with the values you downloaded when creating a programatic user.
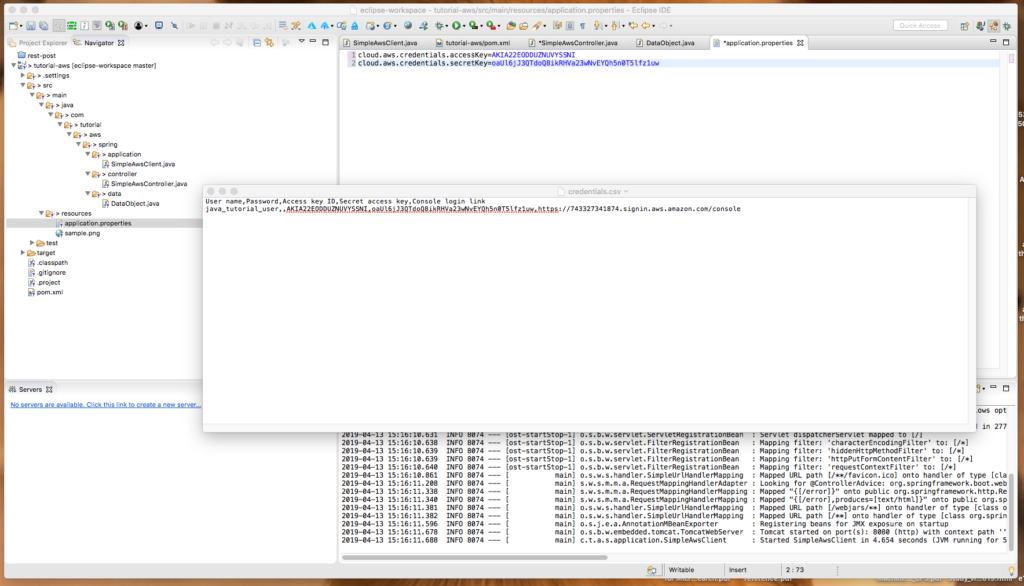
cloud.aws.credentials.accessKey=XXXXXXXXXXXXXXXXXXXX
cloud.aws.credentials.secretKey=XXXXXXXXXXXXXXXXXXXXXXXXXXXXX
cloud.aws.region.static=us-east-1
Binary File
- Add a small binary file to the resources folder. For example, here we use sample.png, a small image file.
Spring Boot Application
Now that we have the project structure, we can create the Spring Application to demonstrate working with the AWS S3 Java API.
- Create the com.tutorial.spring.application, com.tutorial.spring.controller, com.tutorial.spring.data, and the com.tutorial.spring.service packages.
- Create a new Spring application class named SimpleAwsClient in the application package.
package com.tutorial.aws.spring.application;

import org.springframework.boot.SpringApplication;
import org.springframework.boot.autoconfigure.SpringBootApplication;
import org.springframework.context.annotation.ComponentScan;

@SpringBootApplication
@ComponentScan({ "com.tutorial.aws.spring" })
public class SimpleAwsClient {
  public static void main(String[] args) {
    SpringApplication.run(SimpleAwsClient.class, args);
  }
}
Data Object (POJO)
- Create a simple data object named DataObject in the data package.
- Add the variable name and create the getter and setter for this property.
package com.tutorial.aws.spring.data;

public class DataObject {

	String name;

	public String getName() {
		return name;
	}

	public void setName(String name) {
		this.name = name;
	}
}- Ensure the program compiles.
We now have the project’s structure and can work with S3 using the SDK.
Writing Objects to S3
We implement the example application as a Spring Boot Rest application. The standard architecture of this application consists of a Controller, a Service, and a data access layer. In this tutorial there is no need for a data access layer, and so the application consists of a controller and service. Begin by creating a Service class that interacts with the AWS SDK.
Service
- Create a new class named SimpleAwsS3Service and annotate it with the @Service annotation.
- Create the key and secretKey properties and populate them from the application.properties file.
- Add an S3Client as a private variable.
- Create a method named initialize and annotate it with the @PostContstruct annotation.
- Create a method named uploadFile that takes a DataObject and writes the file to S3.
package com.tutorial.aws.spring.service;

import java.io.File;
import java.io.FileNotFoundException;
import java.net.URISyntaxException;

import org.springframework.beans.factory.annotation.Value;
import org.springframework.stereotype.Service;

import com.tutorial.aws.spring.data.DataObject;

import software.amazon.awssdk.auth.credentials.AwsBasicCredentials;
import software.amazon.awssdk.auth.credentials.StaticCredentialsProvider;
import software.amazon.awssdk.awscore.exception.AwsServiceException;
import software.amazon.awssdk.core.exception.SdkClientException;
import software.amazon.awssdk.core.sync.RequestBody;
import software.amazon.awssdk.regions.Region;
import software.amazon.awssdk.services.s3.S3Client;
import software.amazon.awssdk.services.s3.model.ObjectCannedACL;
import software.amazon.awssdk.services.s3.model.PutObjectRequest;
import software.amazon.awssdk.services.s3.model.S3Exception;

@Service
public class SimpleAwsS3Service {

  @Value("${cloud.aws.credentials.accessKey}")
  private String key;

  @Value("${cloud.aws.credentials.secretKey}")
  private String secretKey;

  private S3Client s3Client;

  @PostConstruct
  public void initialize() {
     AwsBasicCredentials awsCreds = AwsBasicCredentials.create(key, secretKey);

    s3Client = S3Client.builder().credentialsProvider(StaticCredentialsProvider
            .create(awsCreds)).region(Region.US_EAST_1).build();
  }

  public void uploadFile(DataObject dataObject) throws S3Exception,
    AwsServiceException, SdkClientException, URISyntaxException,
    FileNotFoundException {

    PutObjectRequest putObjectRequest = PutObjectRequest.builder()
        .bucket("javas3tutorial").key(dataObject.getName())
        .acl(ObjectCannedACL.PUBLIC_READ).build();

    File file = new File(getClass().getClassLoader()
        .getResource(dataObject.getName()).getFile());

    s3Client.putObject(putObjectRequest, RequestBody.fromFile(file));
  }
}
Rest Controller
- Create a new RestController named SimpleAwsController in the com.tutorial.aws.spring.controller package.
- Annotate the class with a /javas3tutorialbucket endpoint (or the name you desire).
- Create an endpoint named /addobject that takes a POST request.
- Create an endpoint named /fetchobject/{filename} that takes a GET request.
- Create an endpoint named /listobjects that takes a GET request.
- Create an endpoint named /updateobject that takes a PUT request.
- Create an endpoint named /deleteobject that takes a DELETE request.
- Create a class variable for the SimpleAwsService and annotate it with the @Autowired annotation.
package com.tutorial.aws.spring.controller;

import org.springframework.beans.factory.annotation.Autowired;
import org.springframework.web.bind.annotation.DeleteMapping;
import org.springframework.web.bind.annotation.PostMapping;
import org.springframework.web.bind.annotation.PutMapping;
import org.springframework.web.bind.annotation.RequestBody;
import org.springframework.web.bind.annotation.RequestMapping;
import org.springframework.web.bind.annotation.RestController;
import com.tutorial.aws.spring.data.DataObject;
import com.tutorial.aws.spring.service.SimpleAwsS3Service;

@RestController
@RequestMapping(value = "/javas3tutorialbucket")
public class SimpleAwsController {

  @Autowired
  SimpleAwsS3Service simpleAwsS3Service;

  @PostMapping("/addobject")
  public void createObject(@RequestBody DataObject dataObject) throws Exception {
    this.simpleAwsS3Service.uploadFile(dataObject);
  }

  @GetMapping("/fetchobject/{filename}")
  public void fetchObject(@PathVariable String filename){
  }

  @GetMapping("/listobjects")
  public List<String> listObjects() throws {
  }

  @PutMapping("/updateobject")
  public void updateObject(@RequestBody DataObject dataObject) {
  }

  @DeleteMapping("/deleteobject")
    public void deleteObject(@RequestBody DataObject dataObject) {
  }
}
There are many concepts in the preceding code. Let’s examine each in turn.
Builder Pattern and Fluent Interface
The fluent interface is a term created by Martin Fowler and Eric Evans. It refers to a programming style where the public methods (the API) can be chained together to perform a task. It is used by the AWS S3 Java API 2.x when using builders. The builder tasks perform tasks but then return an instance of the builder. This allows chaining methods together. For more information on the fluid interface and builders, refer to this blog post: Another builder pattern for Java.
AwsBasicCredentials
The AwsBasicCredentials class implements the AwsCredentials Interface and takes a key and secret key. These credentials are then used by an S3Client to securely authenticate to AWS.
- In a production application, you should use Amazon’s Security Token Service to get temporary credentials to access AWS services. Refer to the AWS documentation: Getting Temporary Credentials with AWS STS.
S3Client
The S3Client class is a client for accessing AWS. As with most the API, it uses a builder to construct itself. The builder uses the credentials and region to create the S3Client. The S3Client is then used for all communication between a client application and AWS.
PutObjectRequestR
The PutObjectRequest is for uploading objects to S3. You create and configure the class using its associated builder, PutObjectRequest.Builder interface. We provide the bucket name, the object name, and although not required, we pass an access control list specifying the public has read access of the resource.
PutObjectRequest putObjectRequest = PutObjectRequest.builder()
    .bucket("javas3tutorial").key(dataObject.getName())
    .acl(ObjectCannedACL.PUBLIC_READ).build();
The ObjectCannedACL provides, well, a pre-canned access control list. Valid values are:
AUTHENTICATED_READ,
AWS_EXEC_READ,
BUCKET_OWNER_FULL_CONTROL,
BUCKET_OWNER_READ,
PRIVATE,
PUBLIC_READ,
PUBLIC_READ_WRITE, and
UNKNOWN_TO_SDK_VERSION.
The S3Client then uses the PutObjectRequest to upload the object to S3.
Running The Program
- Compile, and run the Spring Application.
- Send the request using Postman or curl and note the error response. S3 denied access.
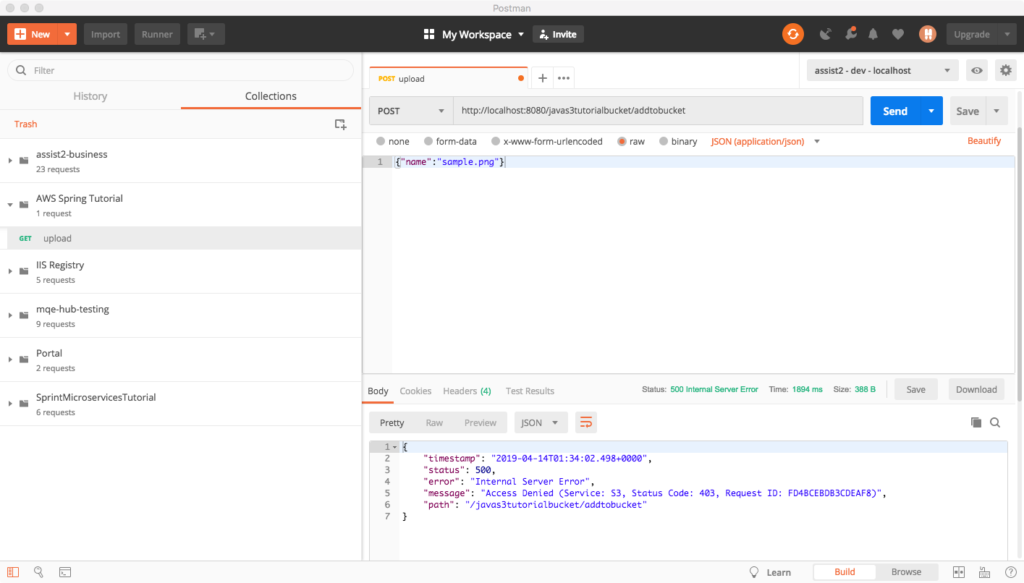
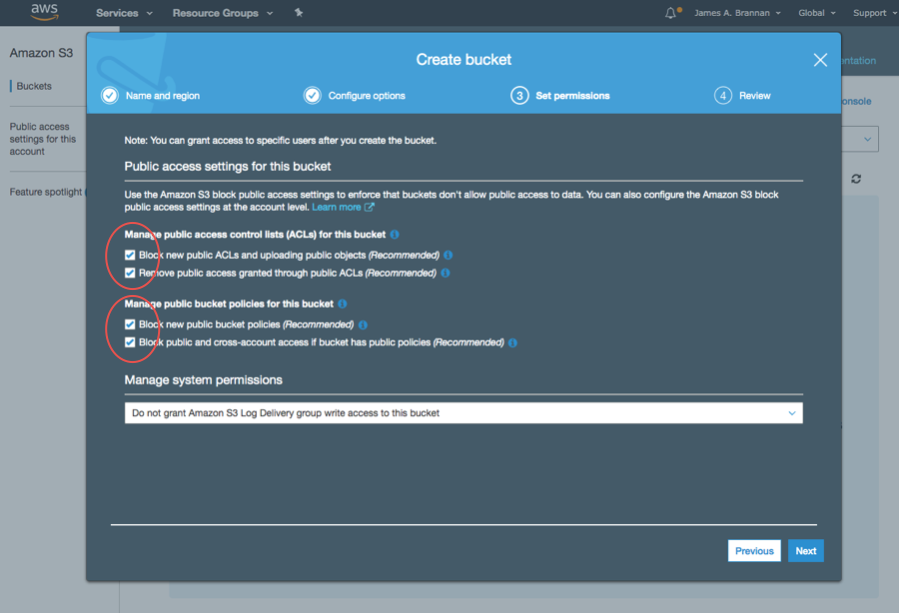
The failure is because of the ACL we attempted to set. We wished to grant public read access. But, when creating the bucket, we failed to allow for this. We need to return to the bucket configuration and explicitly allow public access.
Object Visibility
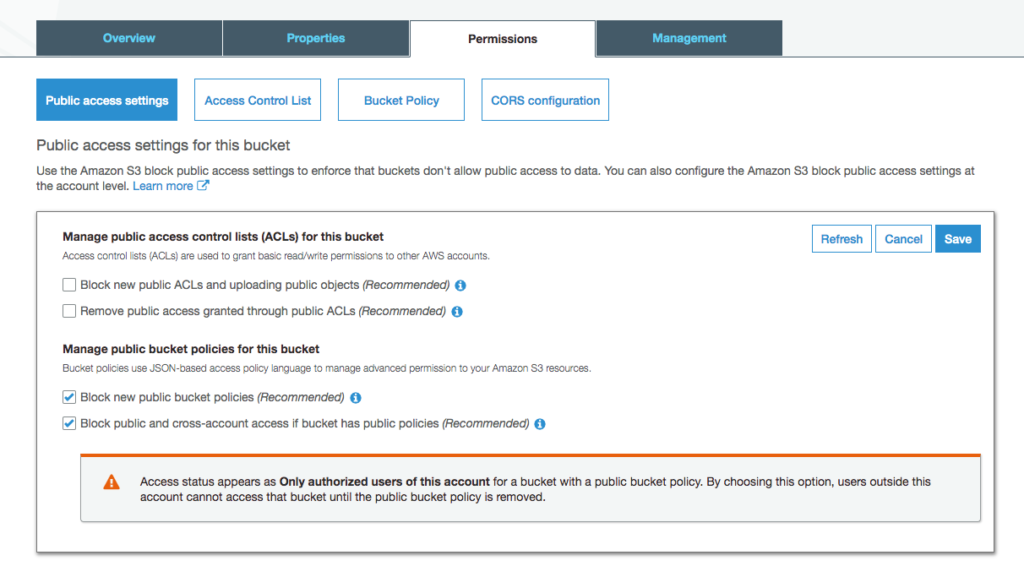
- Sign into the AWS Console and navigate to the bucket. Note that neither the bucket nor the objects are public.

- Click on the bucket and the following popup should appear.
- Click on the Permissions link.
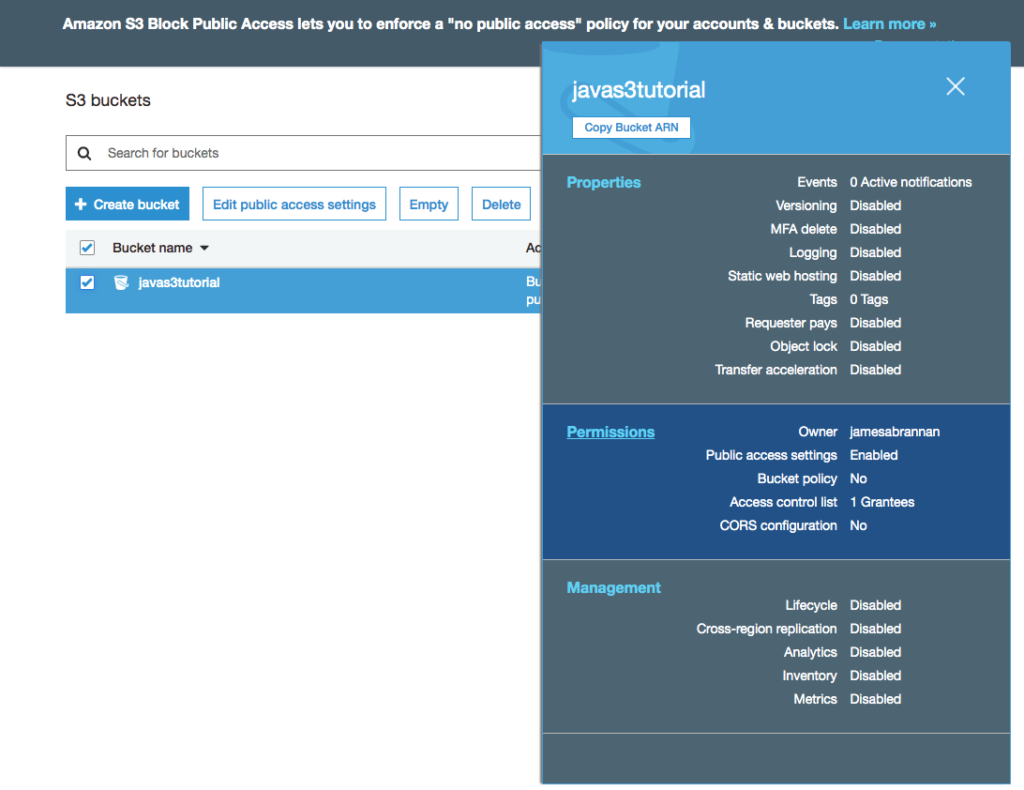
- Un-check the two checkboxes under the Manage public access… heading. By unchecking them we are allowing new ACLs and uploading public objects.
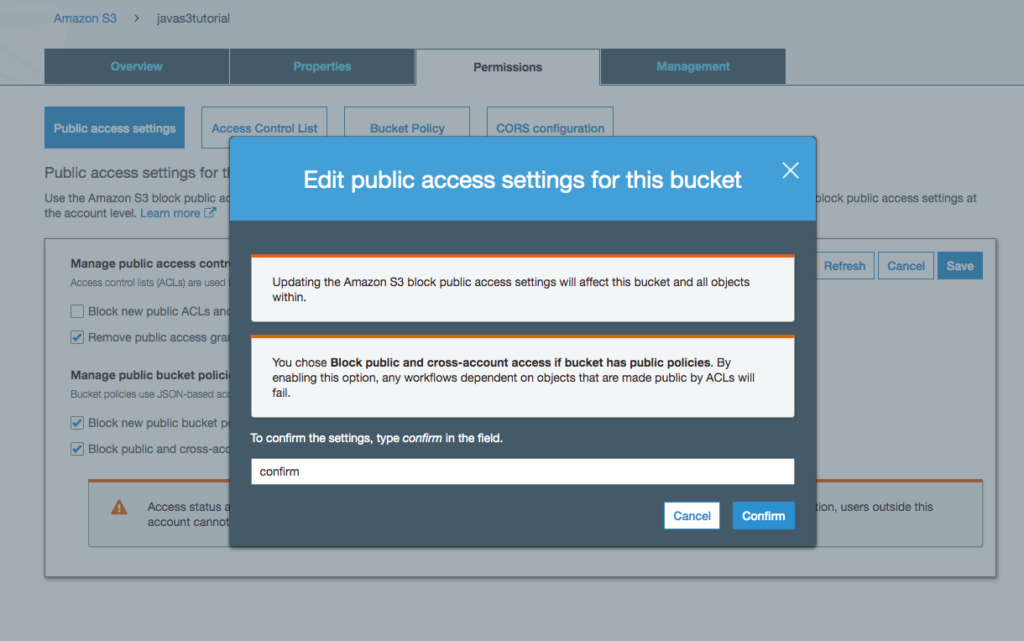
- A new popup appears just to be sure that we wish to do this. What this is telling you, of course, is this is generally not a good idea unless you truly wish making the objects in a bucket public.
- Type confirm and click the Confirm button.
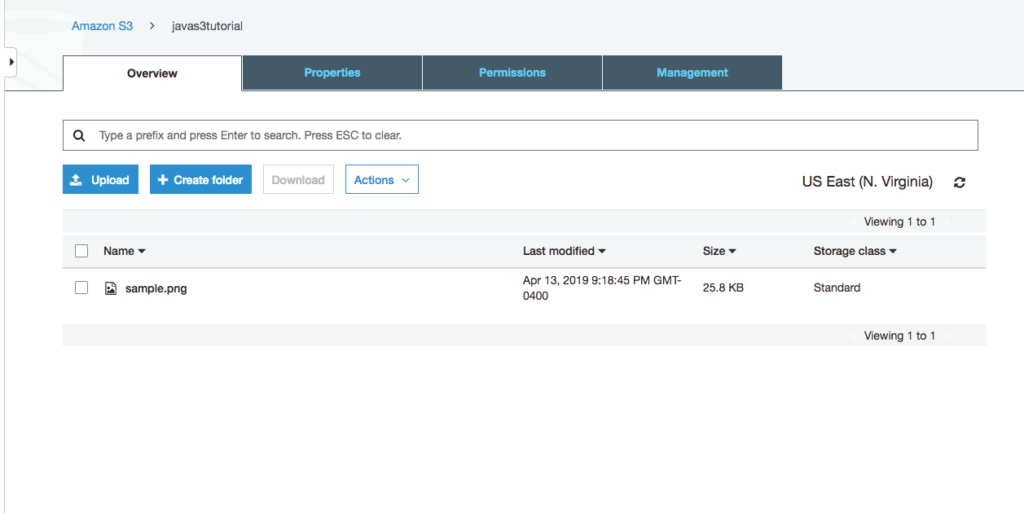
- Return to Postman and try again. Postman should receive a 200 Success HTTP Code.
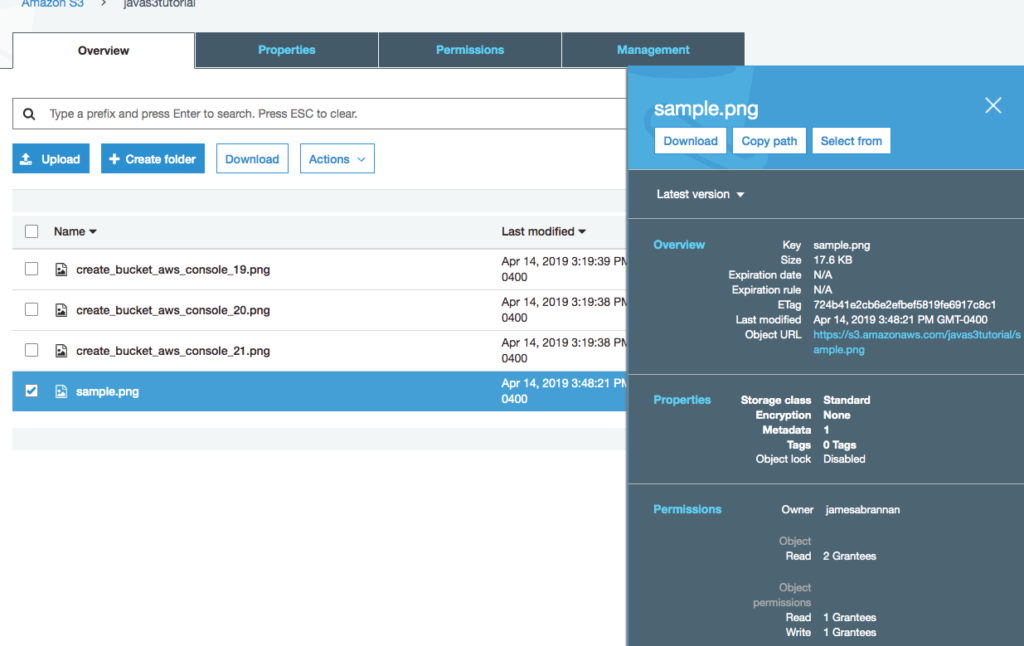
- Refresh the bucket screen in AWS and the file should appear.
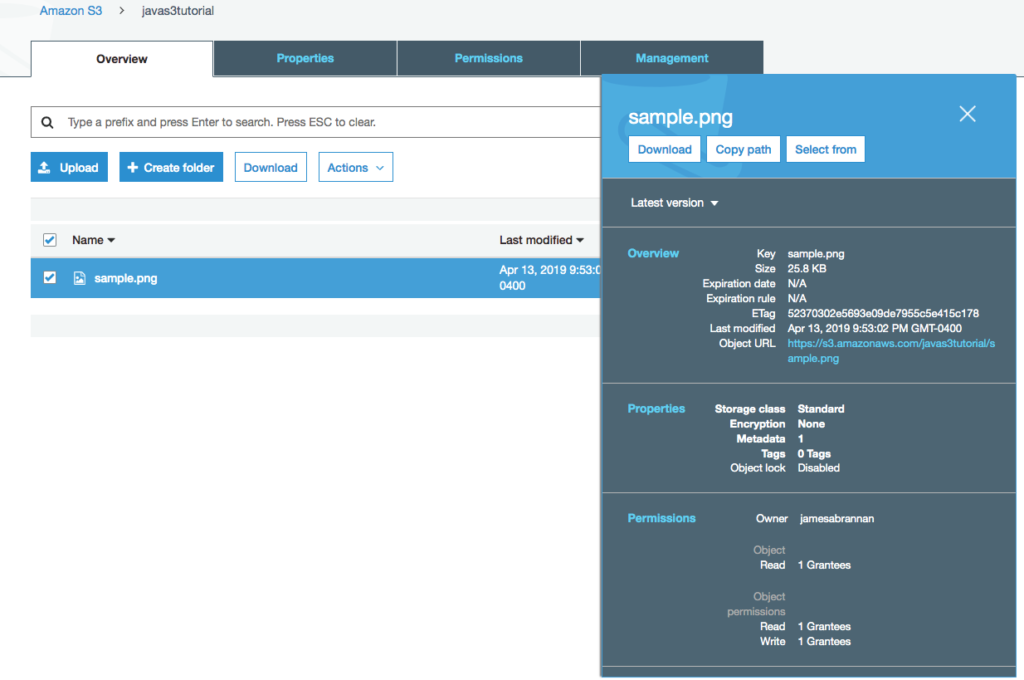
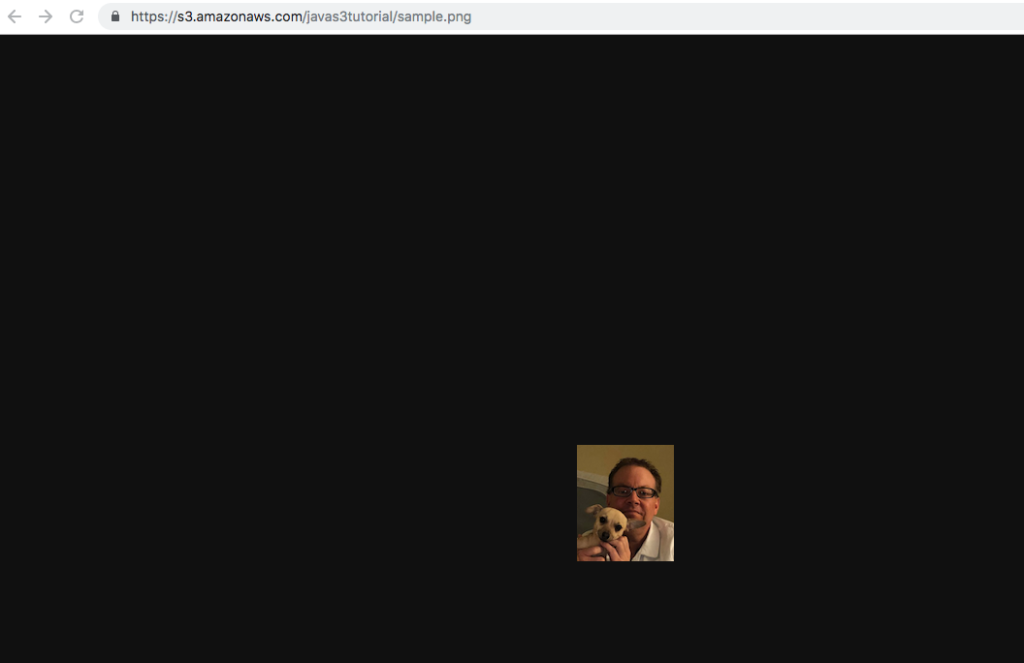
- Click on the file and in the resulting popup, click on the object’s URL and the object should load in a browser. If not, copy and paste the url into a browser.
Downloading Objects On S3
Downloading an object involves creating a GetObjectRequest and then passing it to an S3Client to obtain the object. Here we download it directly to a file, although note you can work with the object as it is downloading.
Service
- Implement the downloadFile method as follows in the SimpleAwsService class.
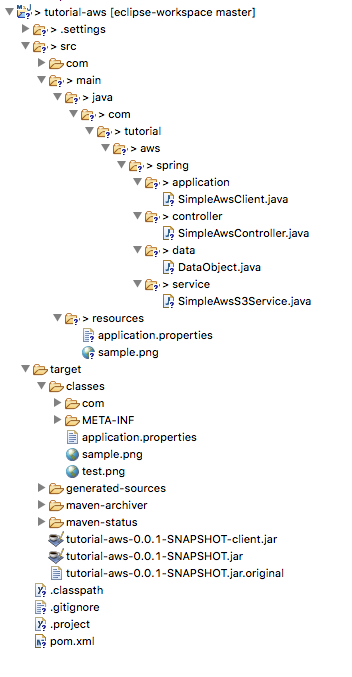
- Create a GetObjectRequest, get the classpath to the resources folder, and then use s3Client to download sample.png and save it as test.png.
public void downloadFile(DataObject dataObject) throws NoSuchKeyException, S3Exception, AwsServiceException, SdkClientException, IOException {

  GetObjectRequest getObjectRequest = GetObjectRequest.builder()
      .bucket("javas3tutorial").key(dataObject.getName()).build();

  Resource resource = new ClassPathResource(".");
  s3Client.getObject(getObjectRequest,Paths.get(resource.getURL()
      .getPath()+"/test.png"));
}
The builder uses the bucket name and the object key to build a GetObjectRequest. We then use the S3Client to get the object, downloading it directly to the file path passed.
Rest Controller
- Implement the fetchobject endpoint in the SimpleAwsController class.
@GetMapping("/fetchobject/{filename}")
public void fetchObject(@PathVariable String filename) throws Exception {
  DataObject dataObject = new DataObject();
  dataObject.setName(filename);
  this.simpleAwsS3Service.downloadFile(dataObject);
}
Running the Program
- Create a request in Postman (or curl) and fetch the file.

- Navigate to the resources folder in the project target folder and you should see the downloaded file.
Listing Objects On S3
The steps to list files in a bucket should prove familiar by now: use a builder to build a request object, which is passed to the S3Client which uses the request to interact with AWS. However, here we work with the response as well.
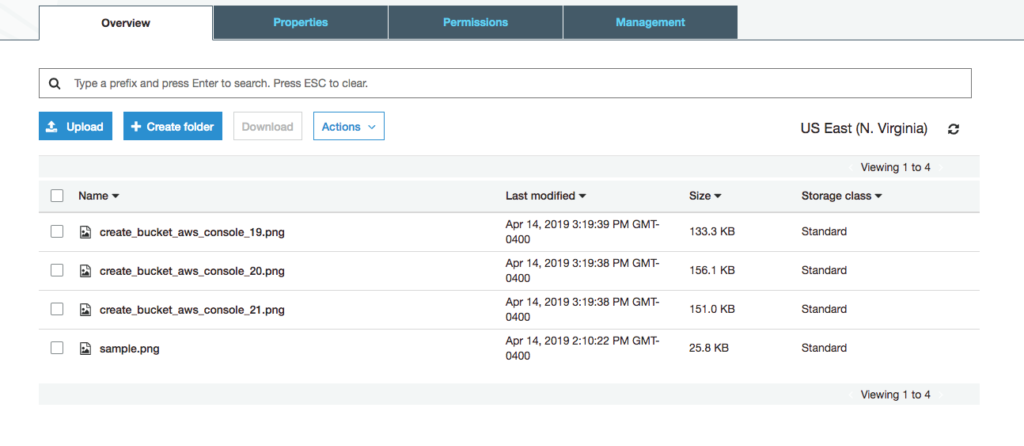
Add Files
- Navigate to the bucket on the AWS console.
- Upload a few files to the bucket.
Service
- Modify SimpleAwsService to implement a method named listObjects that returns a list of strings.
- Create a ListObjectsRequest and have the s3Client use the request to fetch the objects.
- Copy the object keys to the returned list.
public List<String> listObjects() {

  List<String> names = new ArrayList<>();

  ListObjectsRequest listObjectsRequest =
  ListObjectsRequest.builder().bucket("javas3tutorial").build();

  ListObjectsResponse listObjectsResponse = s3Client
      .listObjects(listObjectsRequest);

  listObjectsResponse.contents().stream()
      .forEach(x -> names.add(x.key()));
  return names;
}
We first use a builder to create a ListObjectsRequest. The S3Client then requests the list of objects in the bucket and returns a ListObjectResponse. We then iterate through each object in the response and put the key in an ArrayList.
Rest Controller
- Modify SimpleAwsController to implement the listObjects method.
@GetMapping("/listobjects")
public List<String> listObjects() throws Exception {
  return this.simpleAwsS3Service.listObjects();
}
Running the Program
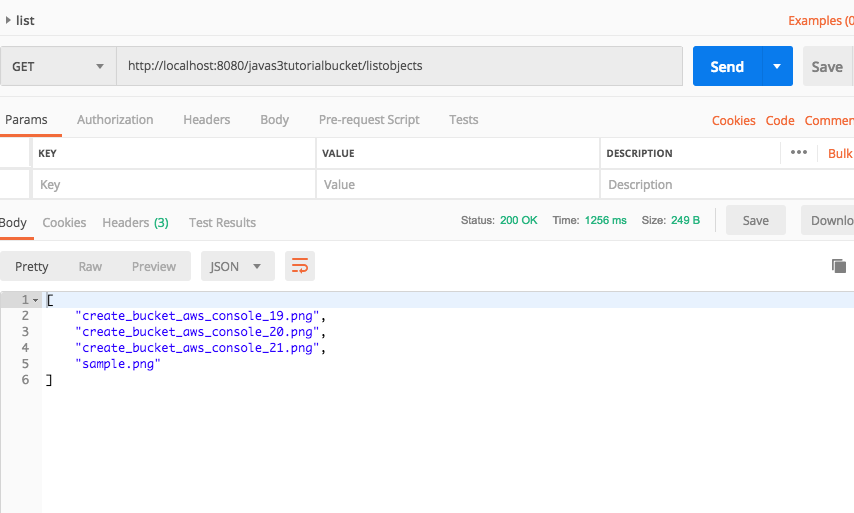
- Create a new request in Postman and list the objects in the bucket.
Modifying Objects
Technically speaking, you cannot modify an object in an S3 bucket. You can replace the object with a new object, and that is what we do here.
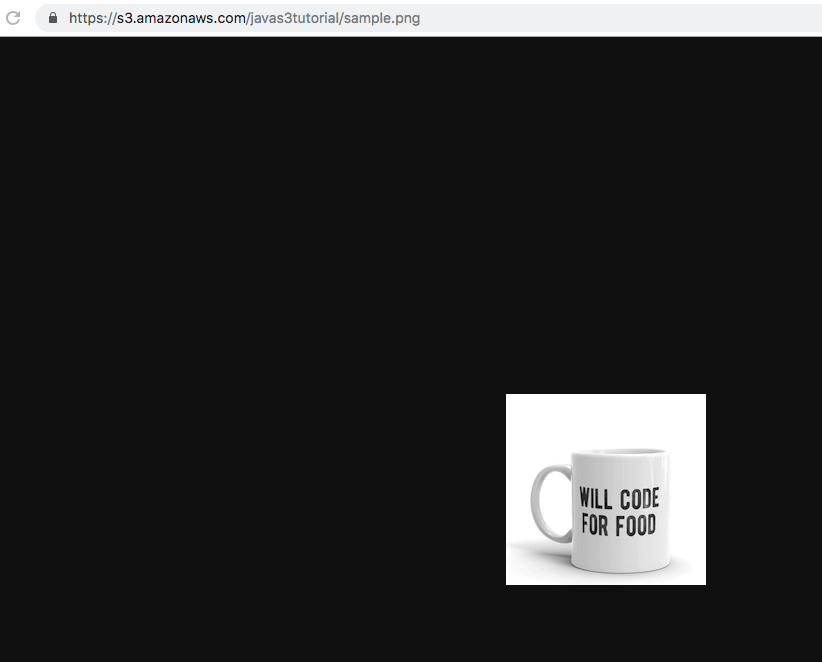
- Replace the file used in your project with a different file. For instance, I changed sample.png with a different png file. Now sample.png in the project differs from the sample.png file in the AWS bucket.
Rest Controller
- Modify the SimpleAwsController class so that the uploadObject method calls the uploadFile method in the SimpleAwsService class.
@PutMapping("/updateobject")
public void updateObject(@RequestBody DataObject dataObject) throws Exception {
  this.simpleAwsS3Service.uploadFile(dataObject);
}
Running the Application
- Compile the program and create a new request in Postman.
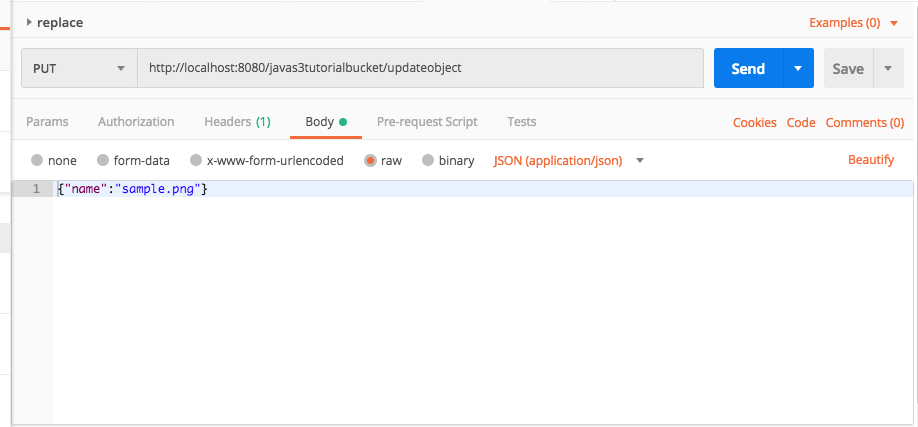
- Go to the file in the AWS bucket and click the Object URL and the object should have been replaced.
Deleting Objects
Deleting objects follows the same pattern: build a request, pass that request to the S3Client, and the S3Client uses it to delete the object.
Service
- Modify the SimpleAwsService to implement the deleteFile method.
- Create a DeleteObjectRequest and have the s3Client use the request to delete the object.
public void deleteFile(DataObject dataObject) {
  DeleteObjectRequest deleteObjectRequest = DeleteObjectRequest.builder()
      .bucket("javas3tutorial").key(dataObject.getName()).build();
  s3Client.deleteObject(deleteObjectRequest);
}
Rest Controller
- Modify the SimpleAwsController to implement the deleteObject method.
@DeleteMapping("/deleteobject")
public void deleteObject(@RequestBody DataObject dataObject) {
  this.simpleAwsS3Service.deleteFile(dataObject);
}
Running The Application
- Compile the program and create a DELETE request in Postman and delete the object.
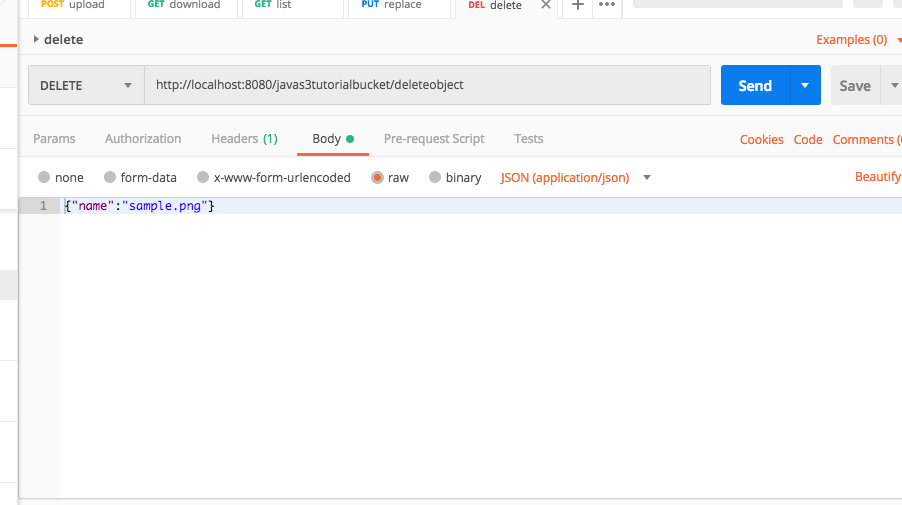
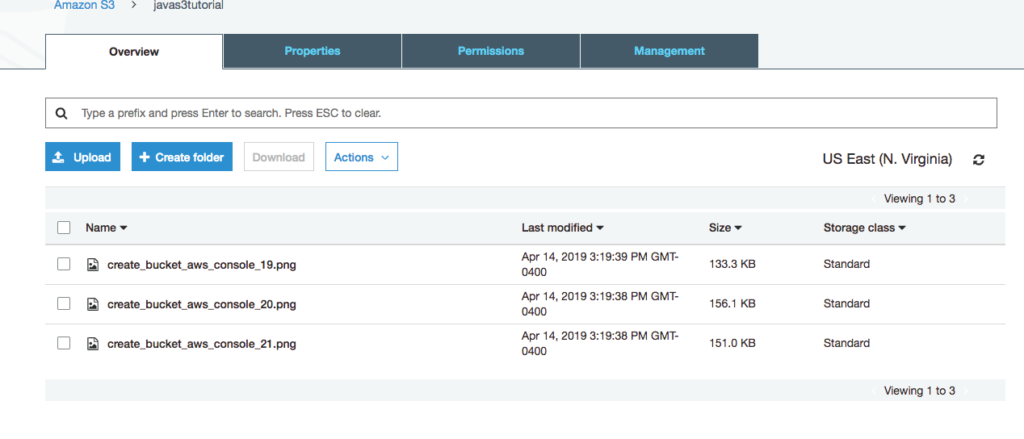
- Navigate to the bucket on the AWS Console and the object should no longer exist.
Buckets
By this point, if you worked through the tutorial, you should be able to guess the workflow and relevant classes needed for creating, listing, and deleting buckets. The CreateBucketRequest, ListBucketRequest, and DeleteBucketRequest are the relevant request classes and each request has a corresponding builder to build the request. The S3Client then uses the request to perform the desired action. Let’s examine each in turn.
Creating Buckets
Creating a bucket consists of creating a CreateBucketRequest using a builder. Because bucket names must be globally unique, we append the current milliseconds to the bucket name to ensure it is unique.
Service
- Create a method named addBucket to the AwsSimpleService class.
public DataObject addBucket(DataObject dataObject) {
  dataObject.setName(dataObject.getName() + System.currentTimeMillis());

  CreateBucketRequest createBucketRequest = CreateBucketRequest
	       .builder()
	       .bucket(dataObject.getName()).build();

  s3Client.createBucket(createBucketRequest);
  return dataObject;
}
Rest Controller
- Create a createBucket method in AwsSimpleRestController with a /addbucket mapping.
@PostMapping("/addbucket")
public DataObject createBucket(@RequestBody DataObject dataObject) {
  return this.simpleAwsS3Service.addBucket(dataObject);
}
Listing Buckets
Listing buckets follows the same pattern as listing objects. Build a ListBucketsRequest, pass that to the S3Client, and then get the bucket names by iterating over the ListBucketsResponse.
Service
- Create a new method called listBuckets that returns a list of strings to SimpleAwsService.
public List<String> listBuckets() {
  List<String> names = new ArrayList<>();
  ListBucketsRequest listBucketsRequest = ListBucketsRequest
      .builder().build();
  ListBucketsResponse listBucketsResponse = s3Client
      .listBuckets(listBucketsRequest);
  listBucketsResponse.buckets().stream()
      .forEach(x -> names.add(x.name()));
  return names;
}
The listBucketsResponse contains a List of Bucket objects. A Bucket has a name method that returns the bucket’s name.
Rest Controller
- Add a /listbuckets endpoint to SimpleAwsController.
@GetMapping("/listbuckets")
public List<String> listBuckets() {
  return this.simpleAwsS3Service.listBuckets();
}
Deleting Buckets
Before you can delete a bucket you must delete it’s contents. Here we assume non-versioned resources. Now, you might be tempted to try the following, but consider the scalability.
for each item in bucket delete.This is fine for a few objects in a sample project like in this tutorial, but it will quickly prove untenable, as the program will block as it makes the http connection to the S3 storage, deletes the object, and returns success. It could quickly go from minutes, to hours, to years, to decades, depending upon the number of objects stored. Remember, each call is making an HTTP request to an AWS server over the Internet.
Of course, Amazon thought of this, and provides a means of deleting multiple objects at once. The following code will not win any elegance awards for its iteration style, but it demonstrates a scalable way to delete buckets containing many objects.
Service
- Add a method called deleteBucket that takes a bucket’s name as a String.
- Get the keys of the objects in the bucket and iterate over the keys.
- With each iteration, build an ObjectIdentifier and add it to an array of identifiers.
- Every thousand keys, delete the objects from the bucket.
- After iterating over all the keys, delete any remaining objects.
- Delete the bucket.
public void deleteBucket(String bucket) {

  List<String> keys = this.listObjects(bucket);
  List<ObjectIdentifier> identifiers = new ArrayList<>();

  int iteration = 0;

  for(String key : keys) {
    ObjectIdentifier objIdentifier = ObjectIdentifier.builder()
        .key(key).build();
    identifiers.add(objIdentifier);
    iteration++;

    if(iteration == 1000){
      iteration = 0;
      DeleteObjectsRequest delReq = DeleteObjectsRequest.builder()
          .bucket(bucket).delete(Delete.builder()
          .objects(identifiers).build()).build();
      s3Client.deleteObjects(deleteObjectsRequest);
      identifiers.clear();
    }

  }

  if(identifiers.size() > 0) {
    DeleteObjectsRequest deleteObjectsRequest =
        DeleteObjectsRequest.builder().bucket(bucket)
        .delete(Delete.builder().objects(identifiers)
        .build()).build();
   s3Client.deleteObjects(deleteObjectsRequest);
  }

  DeleteBucketRequest deleteBucketRequest = DeleteBucketRequest.builder()
      .bucket(bucket).build();
  s3Client.deleteBucket(deleteBucketRequest);
}
Rest Controller
- Add a deletebucket endpoint to the SimpleAwsController.
@DeleteMapping("/deletebucket")
public void deleteBucket(@RequestBody DataObject dataObject) {
  this.simpleAwsS3Service.deleteBucket(dataObject.getName());
}
Conclusions
In this tutorial on the AWS S3 Java API we worked with objects and buckets in S3. We created an object, listed objects, downloaded an object, and deleted an object. We also created a bucket, listed buckets, and deleted a bucket. Although we used Spring Boot to implement the sample application, the ASW Java code remains relevant for other Java application types.
We did not upload an object using multiple parts. For a good example on accomplishing this task, refer to the SDK Developer Guide’s sample S3 code. Also, we assumed no versioning to keep the tutorial simple. If you must support versioning then consult the documentation.
The AWS S3 Java API wraps Amazon’s S3 Rest API with convenience classes. Here you used those classes to work with objects and buckets. In a future tutorial we will work with the Rest API directly.
Further Sources
- Amazon AWS S3 Java API Documentation available here.
- AWS SDK for Java 2.0 Developer’s Guide is available here.
- Amazon AWS SDK API is available here.

