Monthly Archives: March 2019

Spring Boot 2 Rest Security – Basic Authentication

The Spring Security framework provides declarative security for Spring applications. In this tutorial we secure a simple Rest API. We begin with a simple example, progress to using a custom UserDetailsService, and finish by adding method level security.

Spring Security is simple when it works, but can be confusing when it does not. There are differences between Spring and Spring Boot. In this tutorial we use Spring Boot 2.5 and the spring-boot-starter-parent, spring-boot-starter-web and the spring-boot-starter-security packages. These come pre-packaged with many of the dependencies for developers and frees us from worrying about dependencies in this tutorial. But a word of warning, you will find many different tutorials and many different ways to accomplish the same thing. Be certain you are using the technology discussed in the tutorial and not a variant. For instance, in this tutorial we use Spring Boot 2.5 with the Spring Boot starter jars.

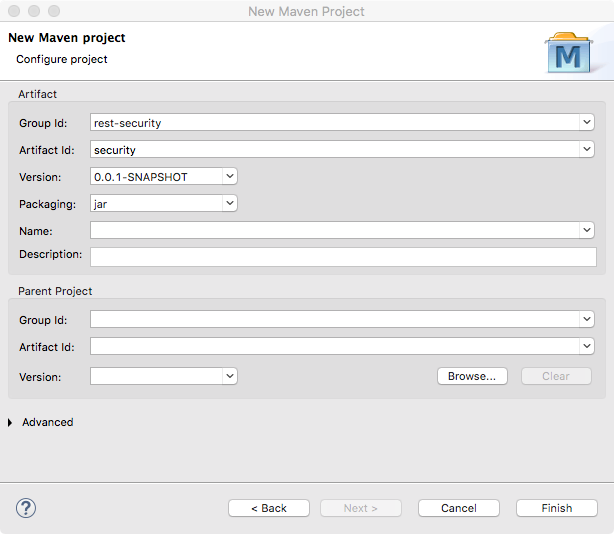
  1. Create a new Maven application with rest-security as the group id and security as the artifact id.
  1. Modify the pom.xml so it appears as follows. Note the addition of the spring-boot dependency and the spring boot starter dependencies (including security).
<project xmlns="http://maven.apache.org/POM/4.0.0"
xmlns:xsi="http://www.w3.org/2001/XMLSchema-instance"
xsi:schemaLocation="http://maven.apache.org/POM/4.0.0 
http://maven.apache.org/xsd/maven-4.0.0.xsd">
<modelVersion>4.0.0</modelVersion>
<groupId>com.tutorial</groupId>
<artifactId>rest-tutorial</artifactId>
<version>0.0.1-SNAPSHOT</version>
<parent>
<groupId>org.springframework.boot</groupId>
<artifactId>spring-boot-starter-parent</artifactId>
<version>2.0.5.RELEASE</version>
</parent>
<dependencies>
<dependency>
<groupId>org.springframework.boot</groupId>
<artifactId>spring-boot-starter-web</artifactId>
</dependency>
<dependency>
<groupId>org.springframework.boot</groupId>
<artifactId>spring-boot-starter-security</artifactId>
</dependency>
<dependency>
<groupId>org.springframework.boot</groupId>
<artifactId>spring-boot-starter-test</artifactId>
<scope>test</scope>
</dependency>
</dependencies>
<properties>
<java.version>1.8</java.version>
</properties>
<build>
<plugins>
<plugin>
<groupId>org.springframework.boot</groupId>
<artifactId>spring-boot-maven-plugin</artifactId>
</plugin>
</plugins>
</build>
</project>
  1. Create the packages, com.tutorial.spring.application and com.tutorial.spring.rest.
  2. In the com.tutorial.spring.rest package create the Hello class as follows.
package com.tutorial.spring.rest;

public class Hello {
  private String greeting;

  public String getGreeting() {
    return greeting;
  }

  public void setGreeting(String greeting) {
    this.greeting = greeting;
  }
}
  1. Create the controller class, HelloController in the com.tutorial.spring.rest package.
  2. Add one method named greeting and define it as a Rest endpoint.
package com.tutorial.spring.rest;

import org.springframework.web.bind.annotation.RequestMapping;
import org.springframework.web.bind.annotation.RequestMethod;
import org.springframework.web.bind.annotation.RestController;

@RestController
@RequestMapping(value = "/hello")
public class HelloController {

  @RequestMapping(value = "/greeting", method = RequestMethod.GET)
  public Hello greeting() {
    Hello hello = new Hello();
    hello.setGreeting("Hello there.");
    return hello;
  }
}
  1. Create the Spring Boot entry-point class in com.tutorial.spring.application package and name it TutorialApplication.
package com.tutorial.spring.application;

import org.springframework.boot.SpringApplication;
import org.springframework.boot.autoconfigure.SpringBootApplication;
import org.springframework.context.annotation.ComponentScan;

@SpringBootApplication
@ComponentScan({ "com.tutorial.spring.rest","com.tutorial.spring.application" })
public class TutorialApplication {
  public static void main(String[] args) {
    SpringApplication.run(TutorialApplication.class, args);
  }
}

If not familiar with the @SpringBootApplication or @ComponentScan annotations, refer to this tutorial, Spring Rest Using Spring Boot. This class is the runner for the application. For more on runners, refer to Spring Boot Runners.

  1. Create a class named TutorialSecurityConfiguration that extends WebSecurityConfigurerAdapter (Java Doc). Note that there is no @EnableWebSecurity (Java Doc) annotation on TutorialSecurityConfiguration. This annotation is not needed for Spring Boot applications, as it is automatically assumed. But if you are extrapolating this tutorial to a more traditional Spring application, caveat emptor.
  2. Add the configure, userDetailsService, and the passwordEncoder methods.
package com.tutorial.spring.application;

import org.springframework.context.annotation.Bean;
import org.springframework.context.annotation.Configuration;
import org.springframework.security.config.annotation.web.builders.HttpSecurity;
import org.springframework.security.config.annotation.web.configuration.WebSecurityConfigurerAdapter;
import org.springframework.security.core.userdetails.User;
import org.springframework.security.core.userdetails.UserDetailsService;
import org.springframework.security.crypto.bcrypt.BCryptPasswordEncoder;
import org.springframework.security.crypto.password.PasswordEncoder;
import org.springframework.security.provisioning.InMemoryUserDetailsManager;

@Configuration
public class TutorialSecurityConfiguration extends WebSecurityConfigurerAdapter {

  @Override
  protected void configure(HttpSecurity http) throws Exception {
    http.authorizeRequests().antMatchers("/**").authenticated()
      .and().httpBasic().and().csrf().disable();
  }

  @Bean
  public UserDetailsService userDetailsService() {
    InMemoryUserDetailsManager manager = new InMemoryUserDetailsManager();
    String encodedPassword = passwordEncoder().encode("password");
    manager.createUser(User.withUsername("james").password(encodedPassword)
      .roles("USER").build());
    return manager;
  }

  @Bean
  public PasswordEncoder passwordEncoder() {
    return new BCryptPasswordEncoder();
  }
}
  1. Start the application.
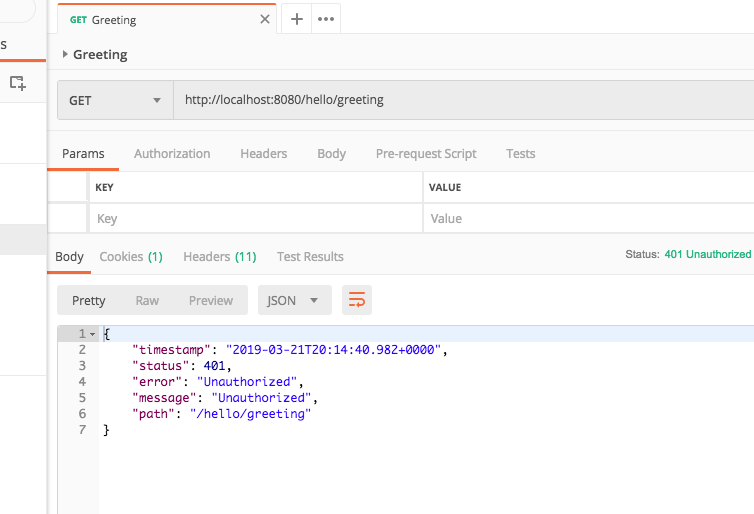
  2. Open Postman and create a request that makes a GET request.  Attempt to call the endpoint and you get an Unauthorized message. Notice the status is a 401 status code which means unauthorized.
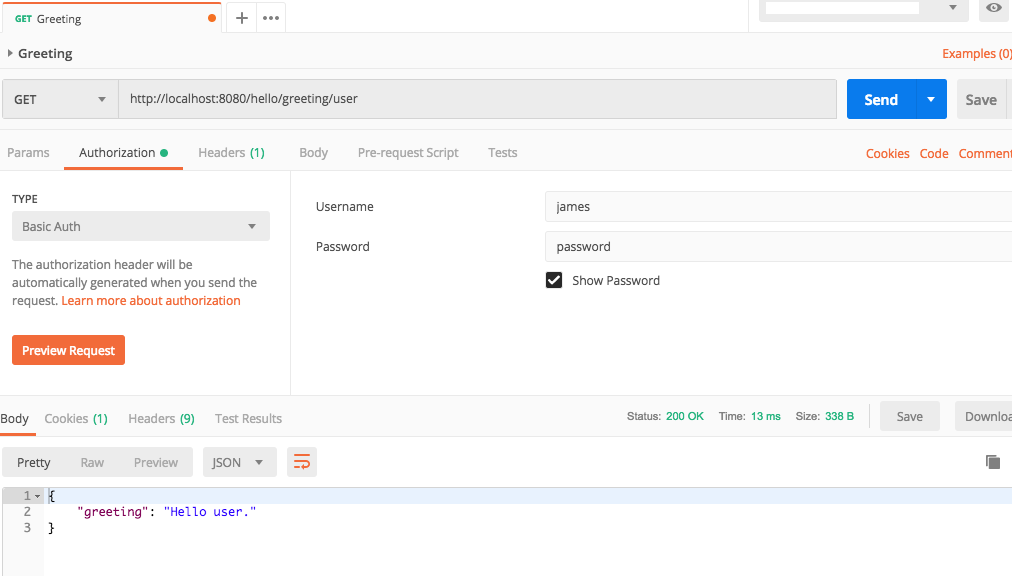
  1. Modify the Postman request by clicking the Authorization tab, selecting Basic Auth as the authorization type, and then adding the desired Username and Password.
  2. Call the endpoint and you should receive a valid response.
The TutorialSecurityConfiguration class extends Spring’s WebSecurityConfigurerAdapter class. This class is a base class that allows you to customize your security by overriding the configure(WebSecurity), configure(HttpSecurity), and configure(AuthenticationManagerBuilder) methods in your own custom class.

Http Configure

In TutorialSecurityConfiguration you override the configuration for how Http requests are secured. First, using authorizeRequests, we tell HttpSecurity (Java Doc) to allow restricting requests. We then restrict the requests to those matching the ant pattern. In TutorialSecurityConfiguration we are telling it to restrict it to all requests starting from the root path. We could have omitted antMatchers altogether if we wished. Next we tell HttpSecurity to use basic http authentication and finally to disable protection from cross-site requests (more on CSRF).

http.authorizeRequests().antMatchers("/**").authenticated()
.and().httpBasic().and().csrf().disable();

UserDetailsService

The UserDetailsService interface loads user-specific data (Java Doc). The InMemoryUserDetailsManager is a memory persistent class useful for testing and demonstration (Java Doc). It creates a map that constitute an application’s users. By adding it as a bean Spring security uses it to obtain the user to authenticate. When a user tries to log into the system, it searches for him or her using the user details service. That service can get users from a database, an LDAP server, a flat file, or in memory. See the api for more (implementations of UserDetailsService).

Modify One Endpoint

A Rest API where all endpoints have the same security restrictions is unrealistic. It is more probable that different endpoints are intended for different users. For instance, there might be a /greeting endpoint for the general public, a /greeting/user endpoint for users, and a /greeting/admin endpoint for administrators. Spring security allows adding different security restrictions on each endpoint.

  1. Modify HelloController to have two new Rest endpoints: /greeting/user and /greeting/admin implemented by the greetingUser and greetingAdmin methods respectively.
package com.tutorial.spring.rest;

import org.springframework.web.bind.annotation.RequestMapping;
import org.springframework.web.bind.annotation.RequestMethod;
import org.springframework.web.bind.annotation.RestController;

@RestController
@RequestMapping(value = "/hello")
public class HelloController {

  @RequestMapping(value = "/greeting", method = RequestMethod.GET)
  public Hello greeting() {
    Hello hello = new Hello();
    hello.setGreeting("Hello there.");
    return hello;
  }

  @RequestMapping(value = "/greeting/user", method = RequestMethod.GET)
  public Hello greetingUser() {
    Hello hello = new Hello();
    hello.setGreeting("Hello user.");
    return hello;
  }

  @RequestMapping(value = "/greeting/admin", method = RequestMethod.GET)
    public Hello greetingAdmin() {
      Hello hello = new Hello();
      hello.setGreeting("Hello administrator.");
      return hello;
  }
}
  1. Modify TutorialSecurityConfig to secure the two newly added endpoints.
  2. Add the newly created user to the userDetailsService method.
@Override
protected void configure(HttpSecurity http) throws Exception {
  http
  .authorizeRequests().antMatchers("/hello/greeting").permitAll()
  .antMatchers("/hello/greeting/admin").hasRole("ADMIN")
  .antMatchers("/hello/greeting/user").hasAnyRole("ADMIN","USER").and()
  .httpBasic().and().csrf().disable();
}

@Bean
public UserDetailsService userDetailsService() {
  InMemoryUserDetailsManager manager = new InMemoryUserDetailsManager();
  String encodedPassword = passwordEncoder().encode("password");
  manager.createUser(User.withUsername("james").password(encodedPassword)
    .roles("USER").build());
  manager.createUser(User.withUsername("john").password(encodedPassword)
    .roles("ADMIN").build());
  return manager;
}
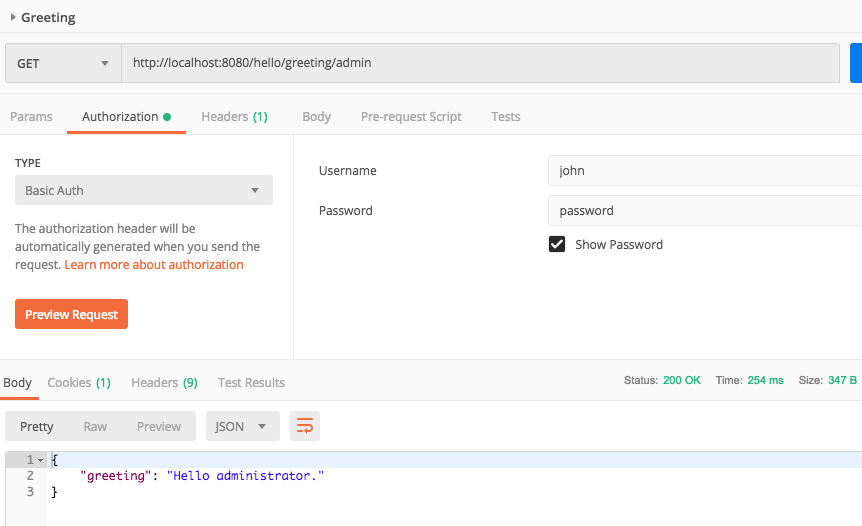
  1. Run the application. Attempt to access the admin rest endpoint with the john/password credentials and you receive the greeting.
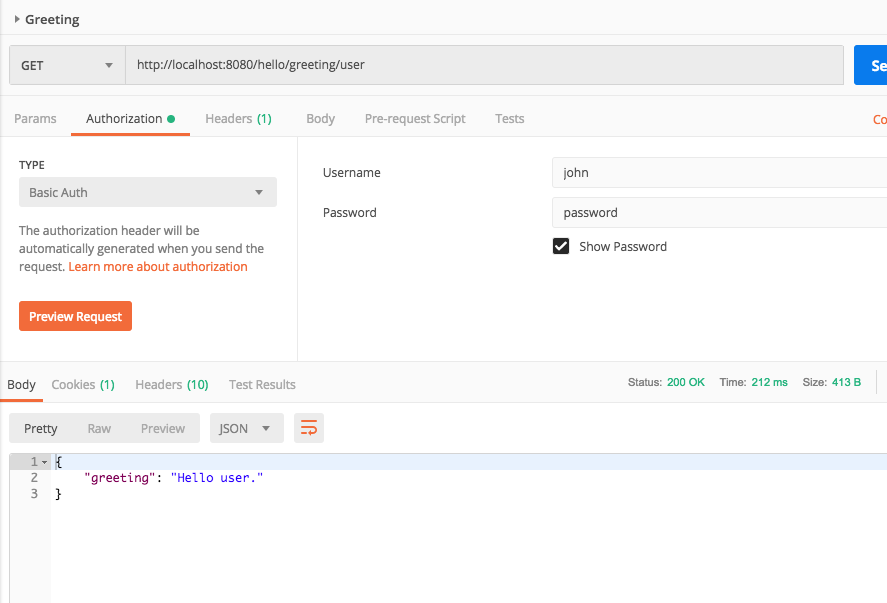
  1. Now access the user endpoint with john/password as the credentials and you receive the appropriate user greeting.
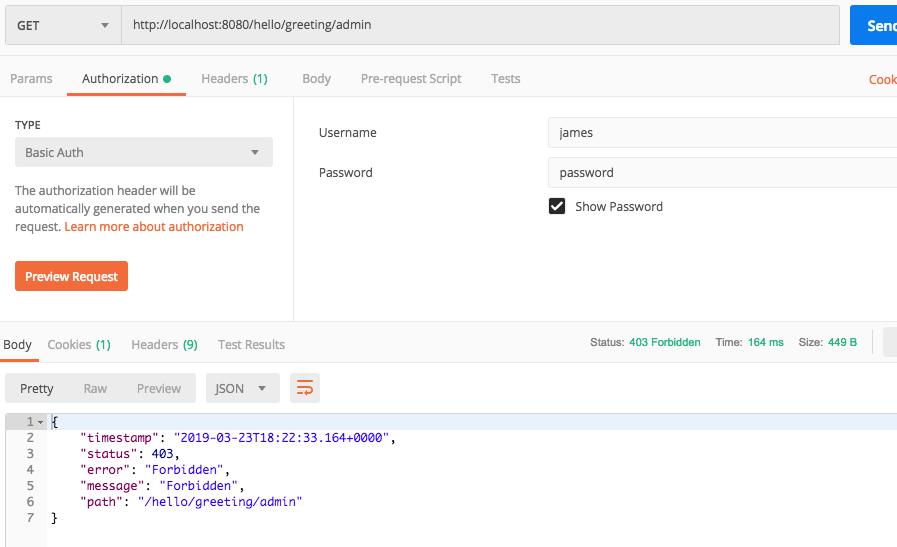
  1. Change the credentials to james/password and attempt to access the admin endpoint and you get a 403, Forbidden, status code.
Accessing User Information

After a user logs in there are many times you might wish to access details about that user. Spring Security offers an easy way to accomplish this through the UserDetails interface.

The easiest way to obtain a user’s details is through the SecurityContextHolder class. This class holds the security context, which includes the user’s details, or, to use security appropriate terminology: the principal. A principal is any entity that can be authenticated. For instance, another program could be a principal. A “user” need not be a physical person. Provided you realize user does not equal human, you can use the terms interchangeably.

UserDetails userDetails = (UserDetails) SecurityContextHolder.getContext()
  .getAuthentication().getPrincipal();

Through the SecurityContextHolder you get the context, then obtain the authenticated principal, which in turn allows you to obtain the UserDetails. The org.springframework.security.core.userdetails.UserDetails interface is implemented by a org.springframework.security.core.userdetails.User object, so you can cast the results to the UserDetails interface or the User implementation. Of course, you can create your own UserDetails implementation if you prefer, but that is outside this post’s scope.

User user = (User)SecurityContextHolder.getContext().getAuthentication()
  .getPrincipal();
  1. Modify HelloController‘s endpoints so that they append the username to the greetings. In the greetingUser method cast the results to a UserDetails interface. In the greetingAdmin method cast the results to the User class. (UserDetails and User JavaDocs).
package com.tutorial.spring.rest;

import org.springframework.security.core.context.SecurityContextHolder;
import org.springframework.security.core.userdetails.User;
import org.springframework.security.core.userdetails.UserDetails;
import org.springframework.web.bind.annotation.RequestMapping;
import org.springframework.web.bind.annotation.RequestMethod;
import org.springframework.web.bind.annotation.RestController;

@RestController
@RequestMapping(value = "/hello")
public class HelloController {

  @RequestMapping(value = "/greeting", method = RequestMethod.GET)
  public Hello greeting() {
    Hello hello = new Hello();
    hello.setGreeting("Hello there.");
    return hello;
  }

  @RequestMapping(value = "/greeting/user", method = RequestMethod.GET)
  public Hello greetingUser() {
    UserDetails userDetails = (UserDetails) SecurityContextHolder.getContext()
      .getAuthentication().getPrincipal();
    Hello hello = new Hello();
    hello.setGreeting("Hello user: " + userDetails.getUsername());
    return hello;
  }

  @RequestMapping(value = "/greeting/admin", method = RequestMethod.GET)
  public Hello greetingAdmin() {
    User user = (User)SecurityContextHolder.getContext().getAuthentication()
      .getPrincipal();
    Hello hello = new Hello();
    hello.setGreeting("Hello administrator: " + user.getUsername());
    return hello;
  }
}
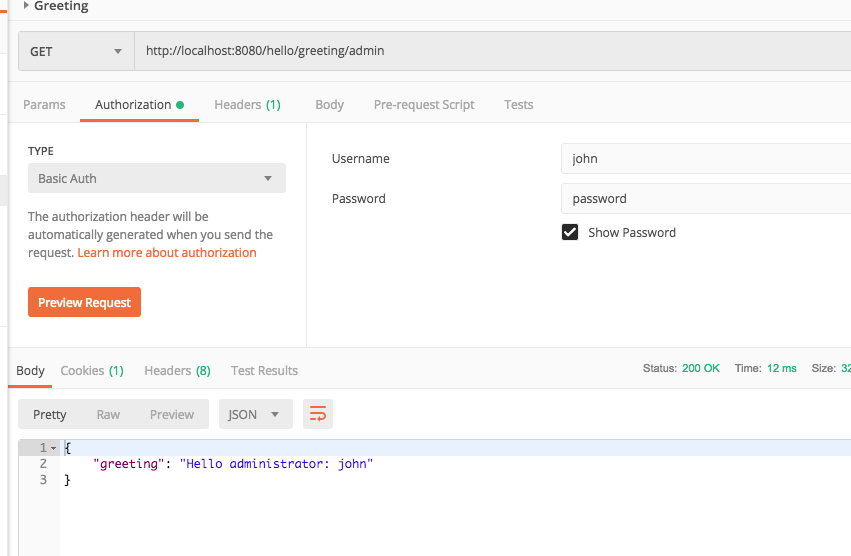
  1. Run the application and when you access the endpoint you should see the username in the JSON greeting.

Create a Custom UserDetailService

Creating a fully customized UserDetailService is outside the scope of this tutorial. Several of the Spring supplied implementations of this interface include JdbcDaoImpl (Java Doc) and LdapUserDetailsService (Java Doc), which provide ways to obtain user details via a Jdbc database source or an LDAP server, respectively. Here, however, we simply create a simple example for the sake of demonstration.

  1. Create a new class named UserDetailsServiceImpl implements the Spring UserDetailsService interface.
  2. Implement the loadByUserByUsername method so that it creates the user that accessed the endpoint.
package com.tutorial.spring.application;

import org.springframework.security.core.userdetails.User;
import org.springframework.security.core.userdetails.UserDetails;
import org.springframework.security.core.userdetails.UserDetailsService;
import org.springframework.security.core.userdetails.UsernameNotFoundException;
import org.springframework.security.crypto.bcrypt.BCryptPasswordEncoder;
import org.springframework.stereotype.Service;

@Service
public class UserDetailsServiceImpl implements UserDetailsService {

  public UserDetails loadUserByUsername(String username) throws 
    UsernameNotFoundException {
      BCryptPasswordEncoder encoder = new BCryptPasswordEncoder();
      if(username.equals("james")) {
        return User.withUsername("james").password(encoder.encode("password"))
          .roles("USER").build();
      } else if(username.equals("john")) {
        return User.withUsername("john").password(encoder.encode("password"))
          .roles("ADMIN").build();
      }
      else throw new UsernameNotFoundException("user not found"); 
  }
}
  1. Modify TutorialSecurityConfiguration to override the configure method that takes an AuthenticationMangerBuilder. Set the builder’s userDetailsService to a newly created instance of the UserDetailsServiceImpl class.
package com.tutorial.spring.application;

import org.springframework.context.annotation.Bean;
import org.springframework.context.annotation.Configuration;
import org.springframework.security.config.annotation.authentication.builders.AuthenticationManagerBuilder;
import org.springframework.security.config.annotation.web.builders.HttpSecurity;
import org.springframework.security.config.annotation.web.configuration.WebSecurityConfigurerAdapter;
import org.springframework.security.crypto.bcrypt.BCryptPasswordEncoder;
import org.springframework.security.crypto.password.PasswordEncoder;

@Configuration
public class TutorialSecurityConfiguration extends WebSecurityConfigurerAdapter {

  @Override
  protected void configure(HttpSecurity http) throws Exception {
    http.authorizeRequests().antMatchers("/hello/greeting").permitAll()
      .antMatchers("/hello/greeting/admin").hasRole("ADMIN")
      .antMatchers("/hello/greeting/user").hasAnyRole("ADMIN","USER").and()
      .httpBasic().and().csrf().disable();
}

  @Bean
  public PasswordEncoder passwordEncoder() {
    return new BCryptPasswordEncoder();
  }


  @Override
  public void configure(AuthenticationManagerBuilder builder) throws Exception {
    builder.userDetailsService(new UserDetailsServiceImpl());
  }
}
  1. Build and run the application and use Postman to access the endpoints.

Method Security

Modifying the security configuration’s configure method with every additional endpoint is error prone. Moreover, you cannot add security configuration to specific methods, but only paths. Another way to add security is through global method security.

  1. Modify TutorialSecurityConfiguration by adding the @EnableGlobalSecurity annotation.
@Configuration
@EnableGlobalMethodSecurity(prePostEnabled = true)
public class TutorialSecurityConfiguration extends WebSecurityConfigurerAdapter {
  1. Create a new endpoint with a method named greetingContractor in the HelloController for contractors.
  2. Add the @PreAuthorize annotation.
@RequestMapping(value = "/greeting/contractor", method = RequestMethod.GET)
@PreAuthorize("hasRole('CONTRACTOR')")
public Hello greetingContractor() {
  User user = (User)SecurityContextHolder.getContext().getAuthentication()
    .getPrincipal();
  Hello hello = new Hello();
  hello.setGreeting("Hello contractor: " + user.getUsername());
  return hello;
}
  1. Modify the loadUserByUsername method in UserDetailsServiceImpl to include a contractor.
public UserDetails loadUserByUsername(String username) throws 
  UsernameNotFoundException {
  BCryptPasswordEncoder encoder = new BCryptPasswordEncoder();
  if(username.equals("james")) {
    return User.withUsername("james").password(encoder.encode("password"))
      .roles("USER").build();
  } else if(username.equals("john")) {
    return User.withUsername("john").password(encoder.encode("password"))
      .roles("ADMIN").build();
  } else if(username.equals("lisa")) {
      return User.withUsername("lisa").password(encoder.encode("password"))
        .roles("CONTRACTOR").build();
  } else throw new UsernameNotFoundException("user not found"); 
}
  1. Run the application and access the contractor endpoint with the lisa/password credentials.
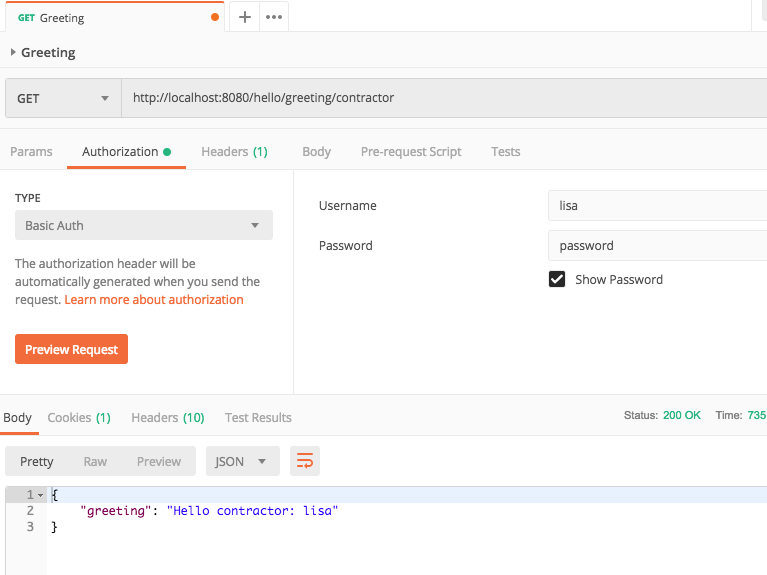
  1. Try accessing the contractor endpoint with the james/password credentials and you receive a 403, Forbidden, response code.

  1. Try accessing the contractor endpoint with the john/password credentials and you also get a 403 status code.

  1. Modify the greetingContractor method in HelloController so that it uses, hasAnyRole and includes the ADMIN role.
@RequestMapping(value = "/greeting/contractor", method = RequestMethod.GET)
@PreAuthorize("hasAnyRole('CONTRACTOR','ADMIN')")
public Hello greetingContractor() {
  1. Run the application and access the contractor endpoint with the john/password credentials and you receive the contractor greeting.

Conclusions

In this tutorial you created a simple Rest API secured by an in-memory map of users. It was purposely kept simple to illustrate basic Spring Security as it applies to Spring Boot 2.5 and Rest endpoints. Be advised there are many ways to do things in Spring Security. This tutorial showed one way to secure your API. For more information on Spring’s Security architecture, refer to Spring Security Architecture.

GitHub Repo

You can get the source code from here (Spring Boot 2 Rest Security Tutorial).

Spring Boot REST – Http Post

In a previous post, we created a simple Rest application using GET and Spring Boot. In this tutorial, we create a simple Rest application using POST. If you do not know the difference between GET and POST then you should review this material. In fact, you might wish to go through the W3Schools material prior to completing this simple tutorial. The W3School website is a venerable, yet very relevant, site that is a wealth of development material. Also, if you did not work through the previous tutorial using GET, then at least peruse that tutorial first. In this tutorial we use Spring Boot REST through Http Post.

  1. Create a new Maven project in Eclipse entitled rest-post.
  2. After creating the project replace the pom file with the following.
<project xmlns="http://maven.apache.org/POM/4.0.0" 
   xmlns:xsi="http://www.w3.org/2001/XMLSchema-instance" 
   xsi:schemaLocation="http://maven.apache.org/POM/4.0.0 
   http://maven.apache.org/xsd/maven-4.0.0.xsd">
<modelVersion>4.0.0</modelVersion>
<groupId>rest-post-tutorial</groupId>
<artifactId>rest-post</artifactId>
<version>0.0.1-SNAPSHOT</version>
<parent>
<groupId>org.springframework.boot</groupId>
<artifactId>spring-boot-starter-parent</artifactId>
<version>2.0.5.RELEASE</version>
</parent>

<dependencies>
<dependency>
<groupId>org.springframework.boot</groupId>
<artifactId>spring-boot-starter-web</artifactId>
</dependency>
<dependency>
<groupId>org.springframework.boot</groupId>
<artifactId>spring-boot-starter-test</artifactId>
<scope>test</scope>
</dependency>
<dependency>
<groupId>com.jayway.jsonpath</groupId>
<artifactId>json-path</artifactId>
<scope>test</scope>
</dependency>
</dependencies>
<properties>
<java.version>1.8</java.version>
</properties>
<build>
<plugins>
<plugin>
<groupId>org.springframework.boot</groupId>
<artifactId>spring-boot-maven-plugin</artifactId>
</plugin>
</plugins>
</build>
</project>
  1. Create the com.tutorial.spring.application and com.tutorial.spring.rest and com.tutorial.spring.rest.factory packages.
  2. Create a new class named Facility and implement it as follows.
package com.tutorial.spring.rest.factory;

import com.fasterxml.jackson.core.JsonProcessingException;
import com.fasterxml.jackson.databind.ObjectMapper;

public class Facility {

  public enum Region {
    NORTH, SOUTH, WEST, EAST
  }

  private Long id;
  private String name;
  private Long workerCount;
  private Double capacity;
  private Region region;

  public Region getRegion() {
    return region;
  }
  public void setRegion(Region region) {
    this.region = region;
  }
  public Long getId() {
    return id;
  }
  public void setId(Long id) {
    this.id = id;
  }
  public String getName() {
    return name;
  }
  public void setName(String name) {
    this.name = name;
  }
  public Long getWorkerCount() {
    return workerCount;
  }
  public void setWorkerCount(Long workerCount) {
    this.workerCount = workerCount;
  }
  public Double getCapacity() {
    return capacity;
  }
  public void setCapacity(Double capacity) {
    this.capacity = capacity;
  }

  @Override
  public String toString() {
    try {
      ObjectMapper mapper = new ObjectMapper();
      String value = mapper.writerWithDefaultPrettyPrinter().
          writeValueAsString(this);
      return value;
    } catch (JsonProcessingException e) {
      e.printStackTrace();
    }
    return null;
  }
}

Notice the toString method and using the ObjectMapper class. ObjectMapper is from the Jackson library. Jackson is a library for parsing JSON and is included with Spring Boot (Jackson on Github).

The ObjectMapper converts the class to JSON and writes it as a String.

  1. Create a class named FactoryService and mark it as a Spring service by marking it with the @Service annotation.
  2. Create a createSampleFacility method and a saveFacility method. In a real project these methods would perform much more; however, suspend disbelief and implement them simplistically as in the following code.
package com.tutorial.spring.rest;

import org.springframework.stereotype.Service;
import com.tutorial.spring.rest.factory.Facility;
import com.tutorial.spring.rest.factory.Facility.Region;

@Service
public class FactoryService {

  public Facility createSampleFacility() {
    Facility sample = new Facility();
    sample.setCapacity(2222.22);
    sample.setId((long) 100);
    sample.setName("Sample Facility");
    sample.setRegion(Region.NORTH);
    sample.setWorkerCount((long)10000);
    return sample;
  }

  public void saveFacility(Facility facility) {
    System.out.println("saving a " + facility.toString());
  }
}
  1. Create the rest controller named FactoryController.
  2. Create two methods, getFacility and createFacility, and annotate them as in the following code.
package com.tutorial.spring.rest;

import org.springframework.beans.factory.annotation.Autowired;
import org.springframework.web.bind.annotation.GetMapping;
import org.springframework.web.bind.annotation.PostMapping;
import org.springframework.web.bind.annotation.RequestBody;
import org.springframework.web.bind.annotation.RequestMapping;
import org.springframework.web.bind.annotation.RestController;
import com.tutorial.spring.rest.factory.Facility;

@RestController
@RequestMapping(value = "/factory")
public class FactoryController {

  @Autowired
  protected FactoryService service;

  @GetMapping("/facility/sample")
  public Facility getFacility() {
    return service.createSampleFacility();
  }

  @PostMapping("/facility")
  public void createFacility(@RequestBody Facility facility) {
    service.saveFacility(facility);
  }
}

Note the @GetMapping and the @PostMapping annotations. In the last tutorial we used the @RequestMapping annotation and then specified that it was either GET or POST, as in the following.

@RequestMapping(value = "/Widget", method = RequestMethod.GET)

The @GetMapping and the @PostMapping annotations are shortcuts for the @RequestMapping annotation. Both methods call the associated service method in the FactoryService marked by the @Autowired annotation.

  1. Create a new Request in PostMan that requests a sample Facility.
  2. Run the method and copy the response.

  1. Modify the response as follows.
{
"id": 200,
"name": "Heather Ridge",
"workerCount": 54000,
"capacity": 99987.34,
"region": "WEST"
}
  1. Create a new Request, ensure the method is Post, and in the Body tab, click raw, and then enter the JSON from step nine.

  1. Ensure the type is JSON (application/json) as in the following image.

  1. Ensure the method is POST, the Body has the Json string, and the method is set to JSON.

  1. Click Submit and the Json is sent to the Rest endpoint. The following is printed to the server console.
saving as a {
"id" : 200,
"name" : "Heather Ridge",
"workerCount" : 54000,
"capacity" : 99987.34,
"region" : "WEST"
}

The only thing returned to Postman is the 200 Http response code that indicated the request succeeded (response codes).

Simple tutorial illustrating converting a Java object to and from JSON.

Some Java Interview Questions (Immutability, Polymorphism, etc.)

Interview questions are so bogus. If your retention span is as bad as mine, without Google you are sunk. But, here are some questions that you will see on many interviews.

String Immutability

Strings are immutable and final in Java. You cannot change the object, but you can change the reference. Consider the following code.

package com.tutorial.junk;

public class VariousThings {
  int size;
  public static void main(String[] args) 
  {
    String a = "abc";
    String c = a;
    c = "test";

    VariousThings x = new VariousThings();
    x.size = 11;

    VariousThings y = x;
    y.size = 22;

     System.out.println(a + " " + c + " " + x.size + " " + y.size);
  }
}

Which when printed results in the following.

ab test 22 22

The a variable refers to the space in memory containing “xyz” while b refers to the “123” space.  The c variable creates a new space in memory containing “xyz” and refers to the newly created space, not the space referred to by the a variable. When c is set equal to the “test” value, only c is changed, as c does not refer to the same space as the a variable.

Contrast String behavior to the simple class VariousThings. The x variable refers to a new instance of VariousThings. Its size is set to eleven. The variable y also refers to x which in turn refers to the particular instance of VariousThings that it refers to. And the value of size is eleven. As y refers to the same object instance as x, when size is changed for y it is also changed for x.

String/Array Reversal

If you are sneaky, just use a StringBuilder’s reverse method. Or, use the ArrayUtils.reverse method from Apache Commons. However, this is rarely what the interviewer is looking for. Instead, he or she is testing if you remembered programming 101.

In the following example, we first reverse a string array. We also determine if a String is a palindrome.

package com.tutorial.junk;

public class Palindrome {

  public static void main(String[] args) {

    String z[] = {"1","2","3","4","5","6","7"};
    int right = z.length-1;            
    int left = 0;

    for(;left < z.length/2;left++} {
      String temp = z[right];
      z[right--] = z[left];
      z[left] = temp;
    }

    for(int i = 0; i < z.length; i++) {
      System.out.print(z[i] + " ");
    }

    String a = "bxxxxb";
    System.out.println(Palindrome.isPalindrome(a));

    String b = "abc";
    System.out.println(Palindrome.isPalindrome(b));
  }

  public static boolean isPalindrome(String a) {
    char[] chars = a.toCharArray();
    int right = chars.length-1;  
    int left = 0;

    for(;left <= right;left++) {
      if(chars[left] != chars[right--]) return false;
    }
    return true;
  }
}

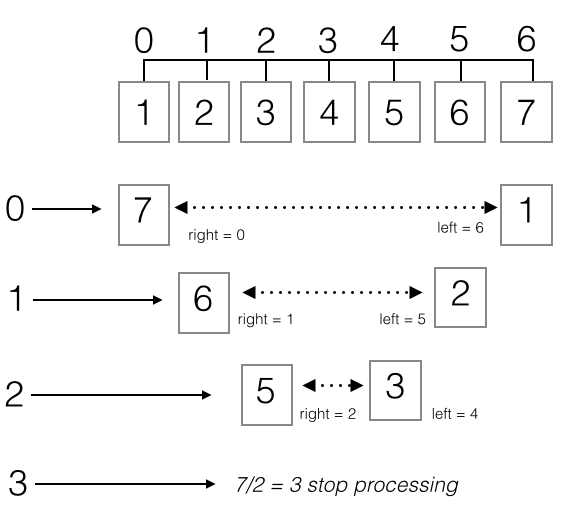
One solution to array reversal is to create a right and left index, where the right begins at the array’s length minus one while the left begins at zero. Then with each iteration, swap the value the two values at the right and left and then increment the left and decrement the right by one. Repeat until the left index reaches the array’s middle. If the array is an odd length, then the middle element remains in place, as it doesn’t switch. If even the middle two elements switch places.

A Stupid Static Question

Do not shoot the messenger. This example is the type of trivia not so skilled interviewers might ask to appear smarter than he or she really is. It’s the type of question I personally hate, but it might be asked.

package com.tutorial.junk;

public class WillCompile {

  public static String sayIt(){
    System.out.println("I compiled");
    return "test";
  }

  public static void main(String args[]){
    WillCompile objWillCompile = null;
    System.out.println(objWillCompile.sayIt());
  }
}

Which prints the following.

I compiled
Test

Why is this a trick question? The compiler sees that sayIt is a static method; therefore, it automagically the objWillCompile instance with the class WillCompile. And so the code compiles and runs even though the objWillCompile variable is null.

Polymorphism

Computer science defines polymorphism as when distinct objects can be accessed in the same way. There are two types of polymorphism, compile-time (static) and run-time (dynamic). Static polymorphism is achieved using method overloading. Dynamic polymorphism is achieved at runtime. This type of polymorphism is achieved through object inheritance. Consider each polymorphism type in turn.

Static Polymorphism

Consider a CommunicationWidget that is designed to send a simple message.

  1. Create a new class named CommunicationWidget.
  2. Create a method named communicate that takes a String.
  3. Create a method named communicate that takes a List of Strings.
  4. In the main method create a new CommunicationWidget class and call both communicate methods.
import java.util.Arrays;
import java.util.List;
import java.util.stream.Stream;

public class CommunicationWidget {
  public void communicate(String msg) {
    System.out.println(msg);
  }

  public void communicate(List<String> msgs) {
    Stream.of(msgs).forEach(x->System.out.println(x));
  }

  public static void main(String[] args) {
    CommunicationWidget widget = new CommunicationWidget();
    widget.communicate("hello");
    List<String> vals = Arrays.asList(new String[] { "A", "B", "C", "D" });
    widget.communicate(vals);
  }
}
  1. Run the program and note the output.
hello
[A, B, C, D]

The two communicate methods have different signatures. When the code is compiled, the compiler recognizes which method is supposed to be called based on the signature. This occurs at compile time and becomes a fixed part of the program.

Dynamic Polymorphism

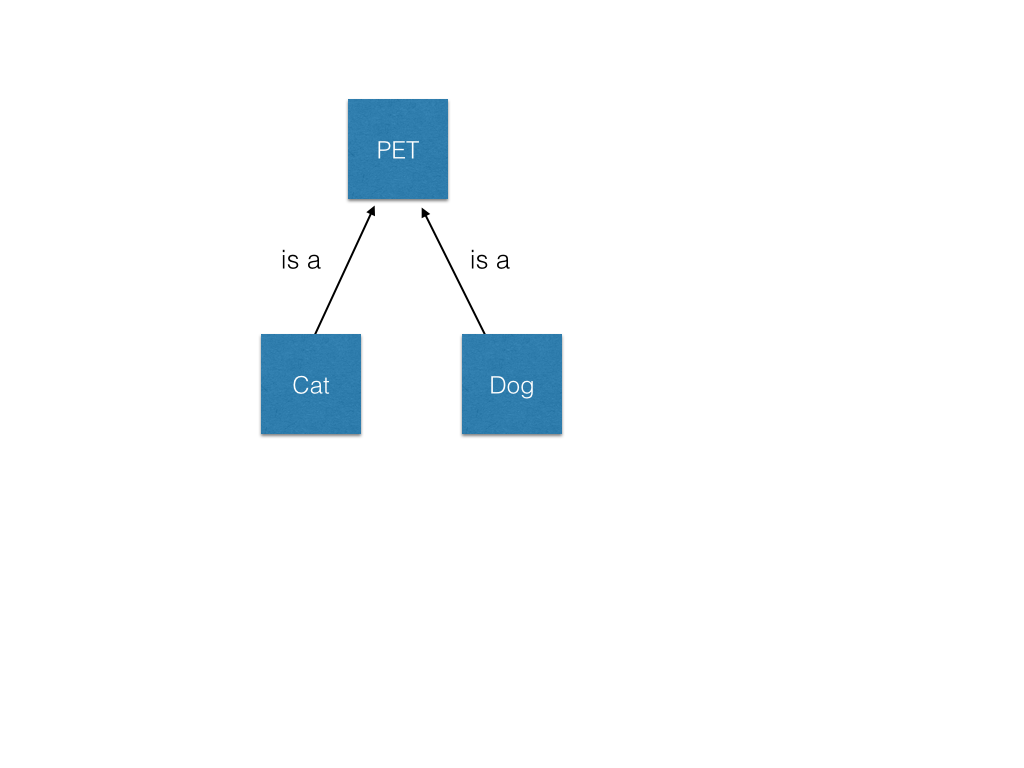
Polymorphism occurs at run-time rather than compile-time. It is accomplished through inheritance. Run-time polymorphism is when an object can be subclassed by objects and the behavior of the sub-object can override the parent’s behavior. For example, consider a pet, all pets make noise. However, cats purr while dogs bark.

A dog is a pet. A cat is a pet. You can represent this relationship through the following simple class diagram.

Let’s illustrate runtime polymorphism through a simple example.

  1. Create a new class named Pet and add a method named makeNoise.
package com.tutorial.junk;

public class Pet {
  public void makeNoise() {
    System.out.println("grunt");
  }
}
  1. Create a new class named Cat and have it extend Pet. In Java when a child class builds upon a parent class you say it extends the parent.
  2. Implement the makeNoise method, where the noise it makes is to purr.
package com.tutorial.junk;

public class Cat extends Pet {
  @Override
  public void makeNoise() {
    System.out.println("purr");
  }
}
  1. Create a Dog class that extends Pet.
  2. Create a makeNoise method where the noise it makes is to bark.
package com.tutorial.junk;

public class Dog extends Pet {
  @Override
  public void makeNoise() {
    System.out.println("bark");
  }
}
  1. Now create a class named RuntimePoly with a main method.
  2. Create a static method named causeNoise that takes a Pet as an argument and calls the Pet class’s makeNoise method.
  3. Create a new instance of a Dog and pass it to the causeNoise method.
  4. Create a new instance of a Cat and pass it to the causeNoise method.
  5. Create a new instance of Pet and pass it to the causeNoise method.
  6. Set the Pet instance to the Cat instance and pass it to the causeNoise method.
  7. Set the Pet instance to the Dog instance and pass it to the causeNoise method.
package com.tutorial.junk;

public class RuntimePoly {

  public static void causeNoise(Pet pet) {
    pet.makeNoise();
  }

  public static void main(String[] args) {
    Dog a = new Dog();
    RuntimePoly.causeNoise(a);
    Cat b = new Cat();
    RuntimePoly.causeNoise(b);
    Pet c = new Pet();
    c.makeNoise();
    c = a;
    c.makeNoise();
    c = b;
    c.makeNoise();}
  }
}
  1. Compile and run the program.
bark
purr
grunt
bark
purr

The causeNoise method takes a Pet. But a Dog is a Pet and so the code compiles. Moreover, the Dog makeNoise method overRides the Pet makeNoise method. The same is true for Cat when it is passed to the makeNoise method.

The causeNoise method takes any object that subclasses Pet. This is one aspect of dynamic polymorphism. In the main method, the new instance of Pet is assigned to the Dog instance (remember the variable c is a reference to an instance of Pet). Because c references a Pet, it can be changed to reference a Dog or a Cat and the appropriate makeNoise method is called. The correct makeNoise method is determined at runtime and is not precompiled statically.

REST Using Spring Boot

In the next few posts I will be exploring implementing microservices using REST, messaging, and finally Amazon Web Services (AWS) Lambda. Although the tutorials are largely written in a step-by-step format, we also explore the underlying theory of microservice architecture. In this tutorial we explore REST using Spring Boot.

In this first tutorial, I assume Eclipse, Maven, and Postman. If new to Java then you are strongly recommended to begin by first going through this book, Think Java, along with my accompanying tutorials. There are also many links to excellent YouTube tutorials that accompany the step-by-step tutorials provided. If you are new to Maven and/or Eclipse, then here are two introductory tutorials on Maven and Eclipse.

Let’s begin by building a simple Hello World REST endpoint using Spring Boot. Spring boot is an easy way to create Spring applications without requiring web server installation, Spring configuration files, and other necessities of standing a Spring application. You can quickly create and run a Spring application. Although useful for tutorials, and it is used in production, if you do not understand more traditional Spring applications, you should also learn the details of more traditional Spring application configuration before going to a job interview. But in this and the next several tutorials, I assume Spring Boot.

  1. Create a new Maven project named rest-tutorial. If you have never created a Maven application in Eclipse, refer to this tutorial.
  2. Replace the content of pom.xml with this content.
<?xml version="1.0" encoding="UTF-8"?>
<projectDescription>
<name>rest-tutorial</name>
<comment></comment>
<projects>
</projects>
<buildSpec>
<buildCommand>
<name>org.eclipse.jdt.core.javabuilder</name>
<arguments>
</arguments>
</buildCommand>
<buildCommand>
<name>org.eclipse.m2e.core.maven2Builder</name>
<arguments>
</arguments>
</buildCommand>
</buildSpec>
<natures>
<nature>org.eclipse.jdt.core.javanature</nature>
<nature>org.eclipse.m2e.core.maven2Nature</nature>
</natures>
</projectDescription>
  1. Create the following two packages: com.tutorial.spring.application and com.tutorial.spring.rest in the rest-tutorial project. (how to create a package)
  2. Create the class Hello.java in the com.tutorial.spring.rest package. (how to create a class)
package com.tutorial.spring.rest;

public class Hello {

  private String greeting;
  
  public String getGreeting() {
    return greeting;
  }

  public void setGreeting(String greeting) {
    this.greeting = greeting;
  }
}
  1. Create a class with a main method named TutorialApplication in the com.tutorial.spring.application package.
  2. Add the @SpringBootApplication and @ComponentScan annotations to the class.
package com.tutorial.spring.application;

import org.springframework.boot.SpringApplication;
import org.springframework.boot.autoconfigure.SpringBootApplication;
import org.springframework.context.annotation.ComponentScan;

@SpringBootApplication
@ComponentScan({ "com.tutorial.spring.rest" })
public class TutorialApplication {
  
  public static void main(String[] args) {
    SpringApplication.run(TutorialApplication.class, args);
  }
}

An annotation is metadata that provides more information to the compiler and that can be interpreted at runtime (introduction to annotations). Spring Boot uses the @SpringBootApplication annotation to signify that a class is the starting point for a Spring Boot application. It also provides default values for the @Configuration, @EnableAutoConfiguration, and @ComponentScan Spring annotations. However, notice we also use the @ComponentScan annotation because we do not wish using the provided default value. Instead, we explicitly instruct Spring to scan for Spring classes in the com.tutorial.spring.rest package.

  1. Create another class named HelloController in the com.tutorial.spring.application.rest package.
  2. Add the @RestController and @RequestMapping annotations to the class.
    package com.tutorial.spring.rest;
    
    import org.springframework.web.bind.annotation.RequestMapping;
    import org.springframework.web.bind.annotation.RestController;
    import org.springframework.web.bind.annotation.RequestMethod;
    
    @RestController
    @RequestMapping(value="/hello")
    public class HelloController {
    
      @RequestMapping(value = "/greeting", method = RequestMethod.GET)
      public Hello greeting() {
        Hello hello = new Hello();
        hello.setGreeting("Hello there.");
        return hello;
      }
    }

The @RequestController annotation serves two purposes, it defines the class as a Spring controller and as a REST endpoint (more on @RequestController and @Controller). The first @RequestMapping use defines the hello endpoint or http://localhost:8080/hello. The second defines the greeting endpoint and is used with the previous endpoint to form http://localhost/hello/greeting. It defines the HTTP method as GET (more on GET and POST).

  1. Build and run the application in Eclipse. You should see log messages from the Spring Boot embedded web server in the Eclipse Console. Note the line that confirms the greeting endpoint was mapped to the method developed.
019-02-24 16:11:52.675 INFO 3491 --- [ main] 
s.w.s.m.m.a.RequestMappingHandlerMapping : Mapped 
"{[/hello/greeting],methods=[GET]}" onto public com.tutorial.spring.rest.Hello
com.tutorial.spring.rest.HelloController.greeting()
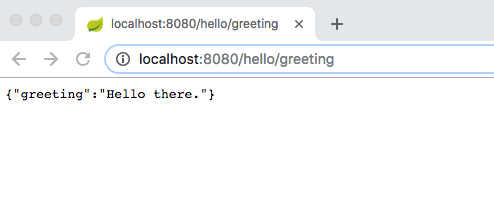
  1. Open a web browser and type http:localhost:8080/hello/greeting in as the address to navigate to the endpoint. You should see the following.

But a web browser is intended for results viable for consumption by an end-user. For instance, an HTML page renders in a web browser and is visible to the viewer. A Rest service, in contrast, is intended to be used by another application. Moreover, the endpoint’s purpose is to provide data and not display the data. Or,

REST, or REpresentational State Transfer, is an architectural style for providing standards between computer systems on the web, making it easier for systems to communicate with each other. REST-compliant systems, often called RESTful systems, are characterized by how they are stateless and separate the concerns of client and server. We will go into what these terms mean and why they are beneficial characteristics for services on the Web (code academy).

Moreover, note the displayed results. The results are displayed using JavaScript Object Notation (JSON). This notation is for easy communication between programs rather than human end-user consumption (more on JSON).

Instead of using a browser, let’s use a free tool named Postman. It is designed specifically for Rest developers. Download and install Postman if you do not already have it installed. You can obtain it here. For more information on Postman refer to the many tutorials provided.

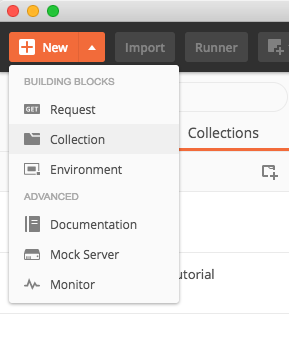
  1.  Start Postman and create a new Collection named SprintMicroservicesTutorial.

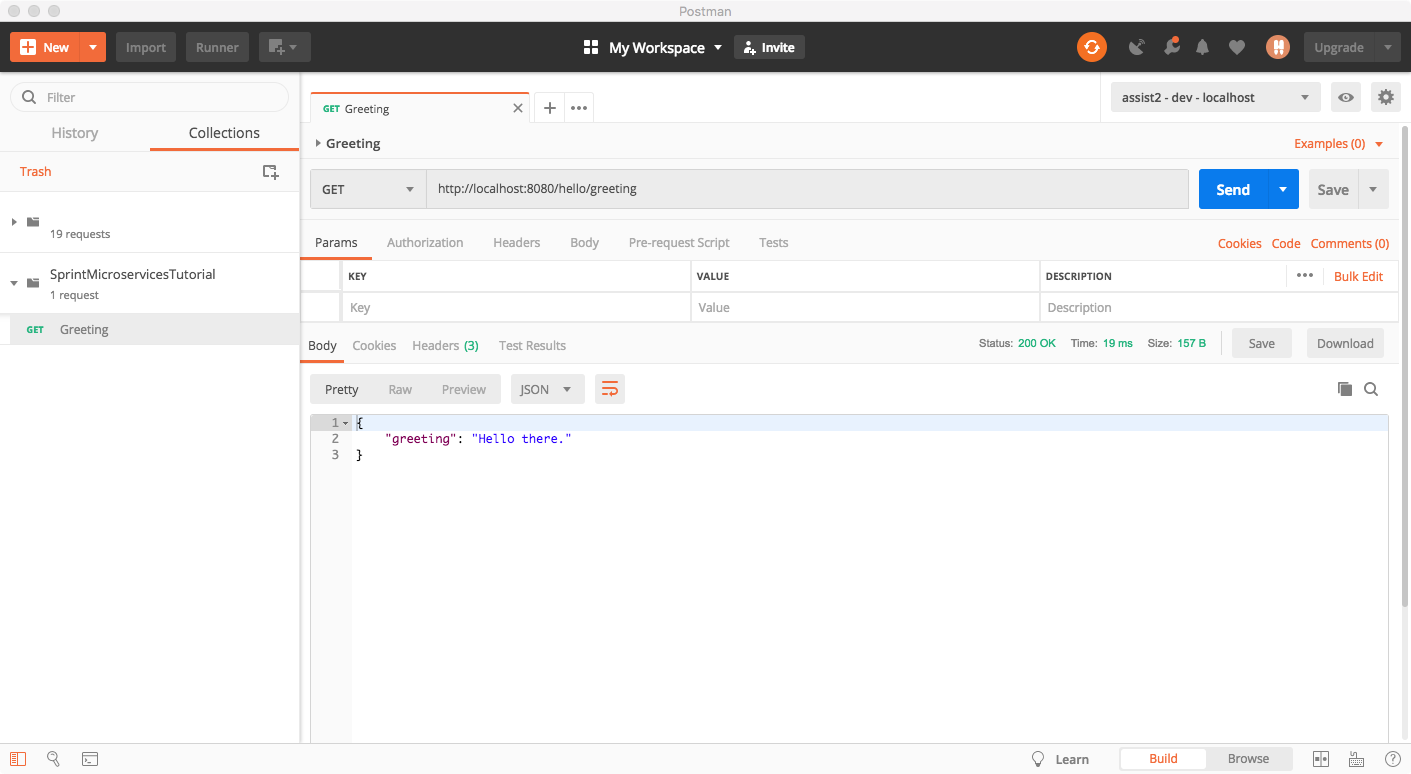
  1. Create a new Request named Greeting. Ensure the method is GET and has the following URL http://localhost:8080/greeting (creating a GET request).

  1. Click Send and the following should appear as the response.
{
"greeting": "Hello there."
}

Congratulations, you created your first Rest web service.

API Design

REST is designed like webpages, except with computers as the consumers. Just as you would almost never navigate to a page conceptually represented by a verb you should never represent a REST endpoint by such. Use nouns. Endpoints, like webpages, are resources.

REST endpoints are also designed to be layered into hierarchies, the same as webpages. Suspend disbelief and let’s assume we have a simple endpoint to a dogfood and catfood database. Obviously, the example is greatly simplified.

The endpoint is food. The API provides information on food for two species: dogs and cats. Each species has thousands of possible breeds. And each food has three possible sizes: small, medium, and large.

For purposes of illustration, we chose to make dog and cat two separate endpoints. And because there are thousands of potential breeds, we make them what are called path parameters. Finally, we choose a query parameter to represent the food size.

Path and Query Parameters

Parameters that are part of an endpoint path are termed path parameters. They are distinguished by curly braces. For example,

http://www.president.com/{president}

represents an endpoint where the client replaces the president with the name of the specific president.

A query string parameter are represented after the endpoint by using a question mark to offset the query string.

http://ww.president.com/{president}?age=<age>
  1. Create a new com.tutorial.spring.rest.petfood package. Create three new classes named Food, DogFood, and CatFood. Create enumerations for the species and size properties.
package com.tutorial.spring.rest.petfood;

public class Food {

  public enum Species {DOG, CAT}
  public enum Size {SMALL, MEDIUM, LARGE}

  private String brand;
  private Double price;
  private Size size;
  private Species species;
  private String enteredBreed;

  public String getEnteredBreed() {
    return enteredBreed;
  }
  public void setEnteredBreed(String enteredBreed) {
    this.enteredBreed = enteredBreed;
  }
  public Species getSpecies() {
    return species;
  }
  public void setSpecies(Species species) {
    this.species = species;
  }
  public Size getSize() {
    return size;
  }
  public void setSize(Size size) {
    this.size = size;
  }
  public String getBrand() {
    return brand;
  }
  public void setBrand(String brand) {
    this.brand = brand;
  }
  public Double getPrice() {
    return price;
  }
  public void setPrice(Double price) {
    this.price = price;
 }
}
package com.tutorial.spring.rest.petfood;

public class DogFood extends Food {
}
package com.tutorial.spring.rest.petfood;

public class CatFood extends Food {
}
  1. Create a class named FoodController. Provide it with a @RestController annotation and a top-level @RequestMapping for the /food endpoint.
  2. Create two endpoint methods, one for the /dog endpoint and one for the /cat endpoint.
  3. Add the {breed} path parameter to both methods.
package com.tutorial.spring.rest.petfood;

import java.util.List;

import org.springframework.beans.factory.annotation.Autowired;
import org.springframework.web.bind.annotation.PathVariable;
import org.springframework.web.bind.annotation.RequestMapping;
import org.springframework.web.bind.annotation.RequestMethod;
import org.springframework.web.bind.annotation.RequestParam;
import org.springframework.web.bind.annotation.RestController;

@RestController
@RequestMapping(value = "/food")
public class FoodController {

  @RequestMapping(value = "/dog/{breed}", method = RequestMethod.GET)
  public List<DogFood> dogFoodrecommendation(@PathVariable String breed, 
       @RequestParam("size") Food.Size size){
  }

  @RequestMapping(value = "/cat/{breed}", method = RequestMethod.GET)
  public List<CatFood> catFoodrecommendation(@PathVariable String breed,
       @RequestParam("size") Food.Size size){
  }
}

The {breed} combined with the @PathVariable annotation is how you define a path parameter. The @RequestParam annotation is how you define a parameter bound to a query parameter.

  1. Create a new class named FoodService and add simple methods to create a list containing cat food and a list containing dog food.
  2. Annotate the class with the @Service annotation.
package com.tutorial.spring.rest.petfood;

import java.util.ArrayList;
import java.util.List;
import org.springframework.stereotype.Service;
import com.tutorial.spring.rest.petfood.Food.Size;
import com.tutorial.spring.rest.petfood.Food.Species;

@Service
public class FoodService {

  public List<CatFood> createCatFood(String breed, Size size)
  {
    List<CatFood> food = new ArrayList<CatFood>();
    CatFood a = new CatFood();
    a.setBrand("Purina");
    a.setPrice(13.12);
    a.setSize(size);
    a.setSpecies(Species.CAT);
    a.setEnteredBreed(breed);
    food.add(a);

    CatFood b = new CatFood();
    b.setBrand("Science Diet");
    b.setPrice(10.00);
    b.setSize(size);
    b.setSpecies(Species.CAT);
    b.setEnteredBreed(breed);
    food.add(b);

    return food;
  }

  public List<DogFood> createDogFood(String breed, Size size)
  {
    List<DogFood> food = new ArrayList<DogFood>();

    DogFood a = new DogFood();
    a.setBrand("Purina");
    a.setPrice(33.22);
    a.setSize(size);
    a.setSpecies(Species.DOG);
    a.setEnteredBreed(breed);
    food.add(a);

    DogFood b = new DogFood();
    b.setBrand("Science Diet");
    b.setPrice(12.22);
    b.setSize(size);
    b.setSpecies(Species.DOG);
    b.setEnteredBreed(breed);
    food.add(b);

    return food;
  }
}

The annotation causes the class to be scanned by Spring when performing classpath scanning. Spring registers the class as a service. An instance of this class is then available to other classes without explicit instantiation using a constructor. You then auto-wire it to other classes using the @Autowired annotation.

  1. Modify the FoodController class to auto-wire the FoodService class.
  2. Modify the two methods to call the service classes createDogFood and createCatFood methods respectively.
package com.tutorial.spring.rest.petfood;

import java.util.List;

import org.springframework.beans.factory.annotation.Autowired;
import org.springframework.web.bind.annotation.PathVariable;
import org.springframework.web.bind.annotation.RequestMapping;
import org.springframework.web.bind.annotation.RequestMethod;
import org.springframework.web.bind.annotation.RequestParam;
import org.springframework.web.bind.annotation.RestController;

@RestController
@RequestMapping(value = "/food")
public class FoodController {

  @Autowired
  private FoodService foodService;

  @RequestMapping(value = "/dog/{breed}", method = RequestMethod.GET)
  public List<DogFood> dogFoodrecommendation(@PathVariable String breed, 
                                   @RequestParam("size") Food.Size size){
    return foodService.createDogFood(breed, size);
  }

  @RequestMapping(value = "/cat/{breed}", method = RequestMethod.GET)
  public List<CatFood> catFoodrecommendation(@PathVariable String breed, 
                                   @RequestParam("size") Food.Size size){
    return foodService.createCatFood(breed, size);
  }
}

The @Autowired annotation marks an object as automatically injected using Spring’s dependency injection. An instance of the FoodService class is annotated with @Service and so is loaded by Spring and subsequently injected into the FoodController instance. The FoodController instance can then use the Foodservice instance as if it had explicitly created it using a constructor.

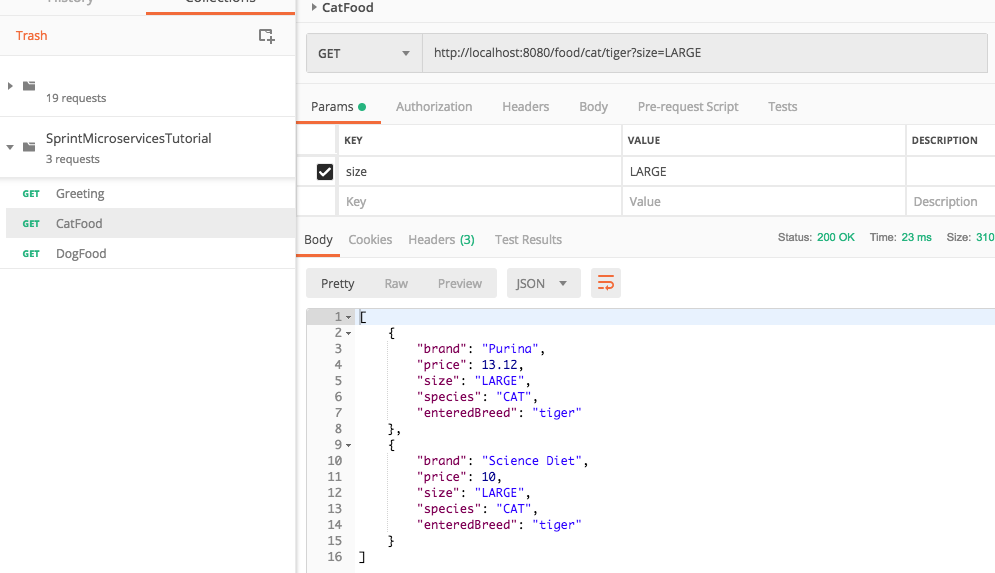
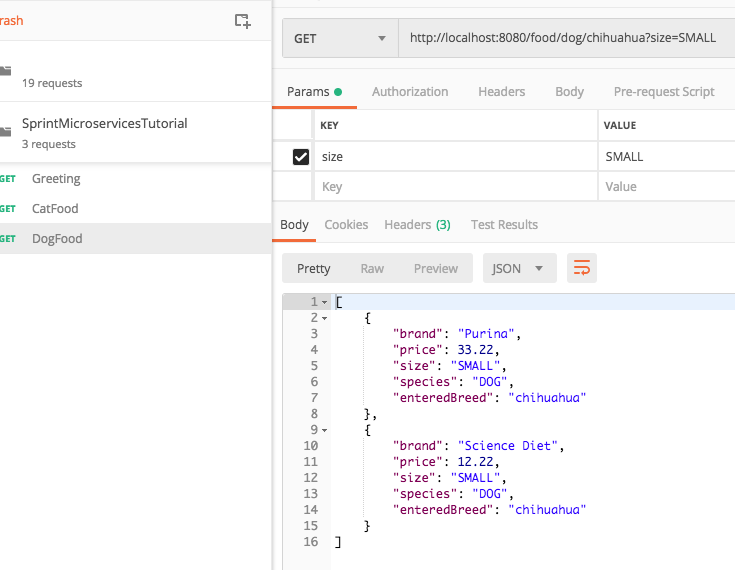
  1. Create two new GET requests in Postman. One for cat food and one for dog food.
  2. For the cat endpoint enter tiger as breed and LARGE as size.

  1. For the dog endpoint enter chihuahua as breed and SMALL as size.

What is returned is an array of cat foods and a list of dog foods (JSON arrays).

In this tutorial we explored REST using Spring Boot. We used Spring Boot to create several Rest endpoints. You learned a little of the reasoning behind the idea of a Restful API.