Here you use the put_record and the put_record_batch functions to write data to the Kinesis Firehose client using Python. If after completing the previous tutorial you wish to refer to more information on using Python with AWS, refer to the following two information sources.
In the previous tutorial you created an AWS Kinesis Firehose stream for streaming data to an S3 bucket. Moreover, you wrote a Lambda function that transformed temperature data from Celsius or Fahrenheit to Kelvin. You also sent individual records to the stream using the Command Line Interface (CLI) and its firehose put-record function.
In this tutorial you write a simple Kinesis Firehose client using Python to the stream created in the last tutorial (sending data to Kinesis Firehose using Python). Specifically, you use the put-record and put-record-batch functions to send individual records and then batched records respectively.
Creating Sample Data
Navigate to mockaroo.com and create a free account.
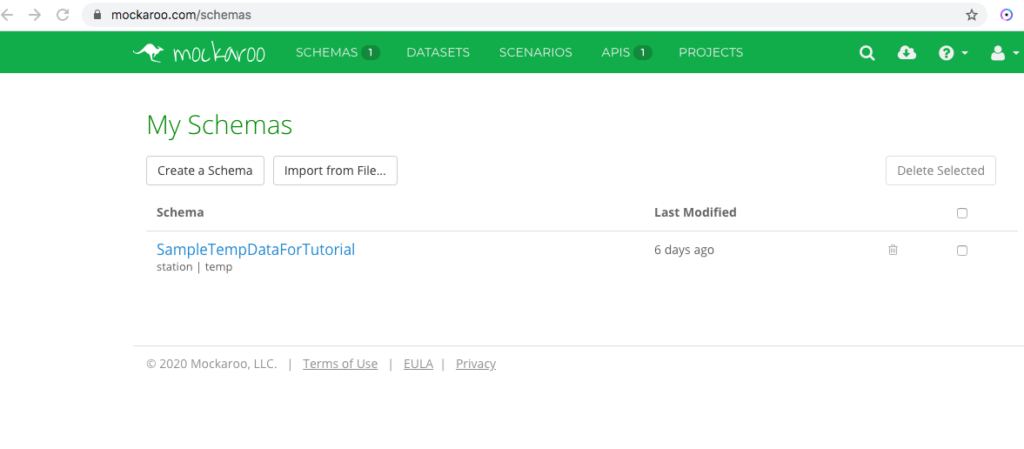
Click Schemas to create a new schema.
Name the schema, here I named it SampleTempDataForTutorial.
Creating a schema in Mockaroo
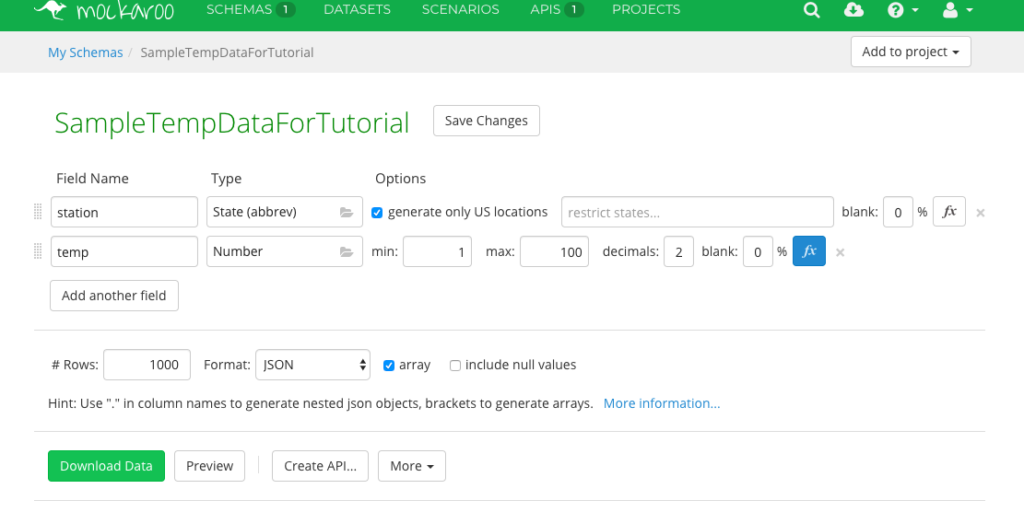
Create a field named station and assign its type as State (abbrev).
Create a field named temp and assign it as Number with a min of one, max of 100, and two decimals.
Creating the SampleTempDataForTutorial data in Mockaroo
Click the fx button and create the formula as follows.
if random(0,10) == 10 then this = this + 1000 end
if this > random(0,100) then format(this,2) + 'F'
elseif this < random(0,100) then format(this,2) + 'f'
elseif this > random(0,75) then format(this,2) + 'c'
else format(this,2) + 'C' end
The formula randomly generates temperatures and randomly assigns an F, f, C, or c postfix. Note that it also generates some invalid temperatures of over 1000 degrees. You will use this aberrant data in a future tutorial illustrating Kinesis Analytics.
Creating a formula in Mockaroo for a field
Click Apply to return to the main screen.
Enter 1000 for rows, select Json as the format, and check the array checkbox.
You should have a file named SampleTempDataForTutorial.json that contains 1,000 records in Json format. Be certain the data is an array, beginning and ending with square-brackets.
Python Client (PsyCharm)
Here I assume you use PsyCharm, you can use whatever IDE you wish or the Python interactive interpreter if you wish. Let’s first use the put-record command to write records individually to Firehose and then the put-record-batch command to batch the records written to Firehose.
Writing Records Individually (put_record)
Start PsyCharm. I assume you have already installed the AWS Toolkit and configured your credentials. Note, here we are using your default developer credentials.
In production software you should use appropriate roles and and a credentials provider, do not rely upon a built-in AWS account as you do here.
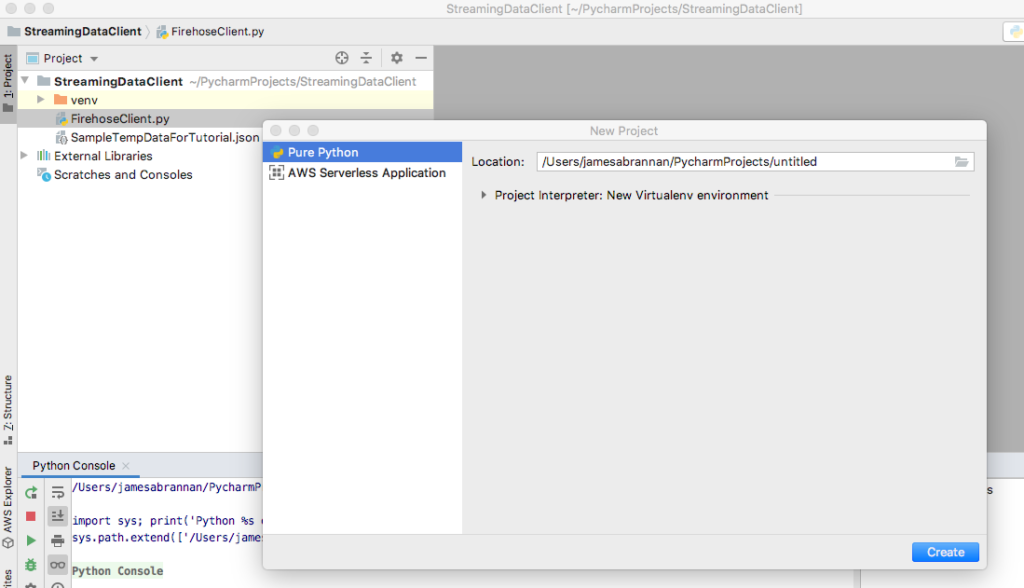
Create a new Pure Python application named StreamingDataClient.
Create a new Pure Python project in PsyCharm
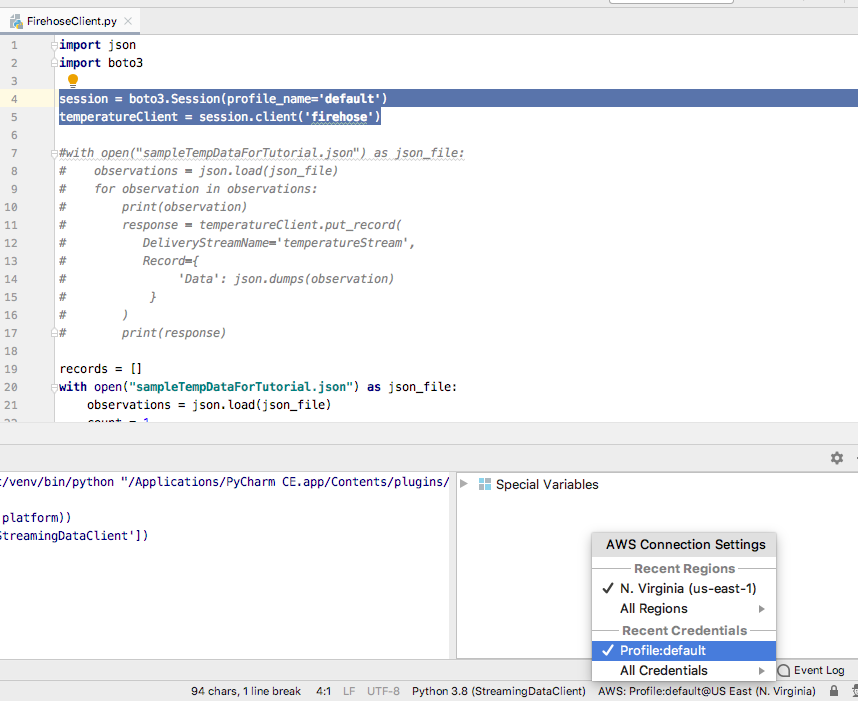
Create a new file named FireHoseClient.py and import Boto3 and json.
Create a new session using the AWS profile you assigned for development.
Create a new firehose client from the session.
Creating a session using default AWS credentials
Write the following code.
import json
import boto3

session = boto3.Session(profile_name='default')
temperatureClient = session.client('firehose')

with open("sampleTempDataForTutorial.json") as json_file:
    observations = json.load(json_file)
    for observation in observations:
        print(observation)
        response = temperatureClient.put_record(
           DeliveryStreamName='temperatureStream',
           Record={
                'Data': json.dumps(observation)
            }
        )
        print(response)
In the preceding code you open the file as a json and load it into the observations variable. You then loop through each observation and send the record to Firehose using the put_record method. Note that you output the record from json when adding the data to the Record.
You should see the records and the response scroll through the Python Console.
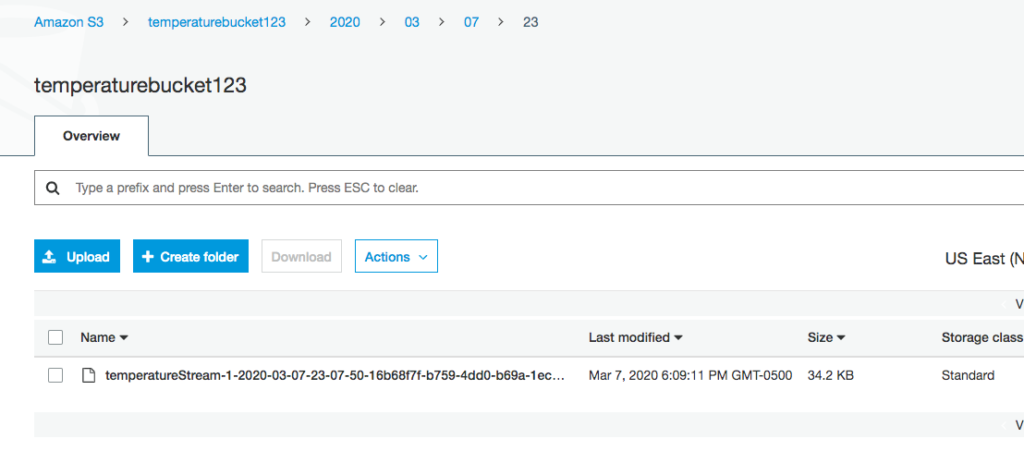
Navigate to the AWS Console and then to the S3 bucket.
Data created in S3
You should see the records written to the bucket.
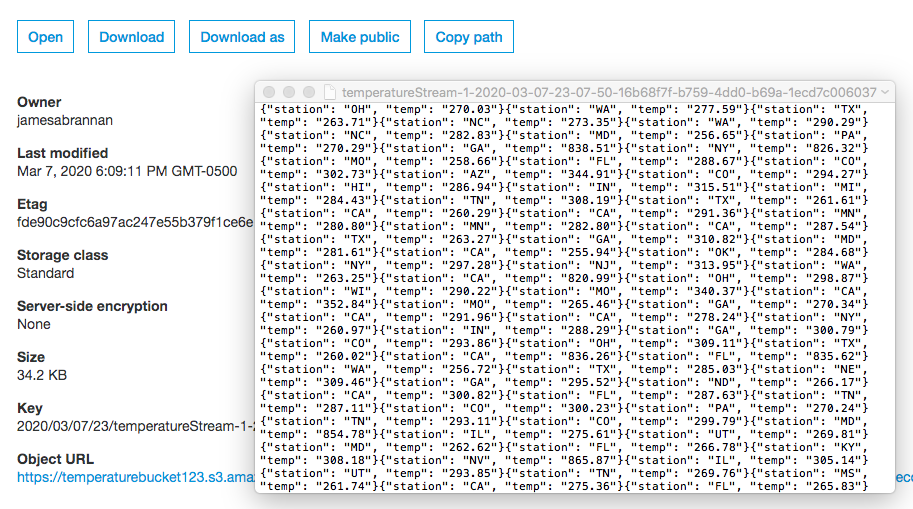
Open the file to ensure the records were transformed to kelvin.
Data converted to kelvin in S3
Batch Writing Records (put_record_batch)
Writing records individually are sufficient if your client generates data in rapid succession. However, you can also batch data to write at once to Firehose using the put-record-batch method.
Replace the code with the following code.
import json
import boto3

session = boto3.Session(profile_name='default')
temperatureClient = session.client('firehose')
records = []

with open("sampleTempDataForTutorial.json") as json_file:
    observations = json.load(json_file)
    count = 1
    for observation in observations:
        if count % 500 == 0:
            response = temperatureClient.put_record_batch(
                DeliveryStreamName='temperatureStream',
                Records= records
            )
            print(response)
            print(len(records))
            records.clear()
        record = {
            "Data": json.dumps(observation)
        }
        records.append(record)
        count = count + 1

    if len(records) > 0:
        print(len(records))
        response = temperatureClient.put_record_batch(
                DeliveryStreamName='temperatureStream',
                Records= records
            )
        print(response)
In the preceding code you create a list named records. You also define a counter named count and initialize it to one. The code loops through the observations. Each observation is written to a record and the count is incremented. When the count is an increment of 500 the records are then written to Firehose. Note that Firehose allows a maximum batch size of 500 records. After looping through all observations, any remaining records are written to Firehose.
The data is written to Firehose using the put_record_batch method. Instead of writing one record, you write list of records to Firehose.
Before executing the code, add three more records to the Json data file.
Run the code and you should see output similar to the following in the Python Console.
Python Console output
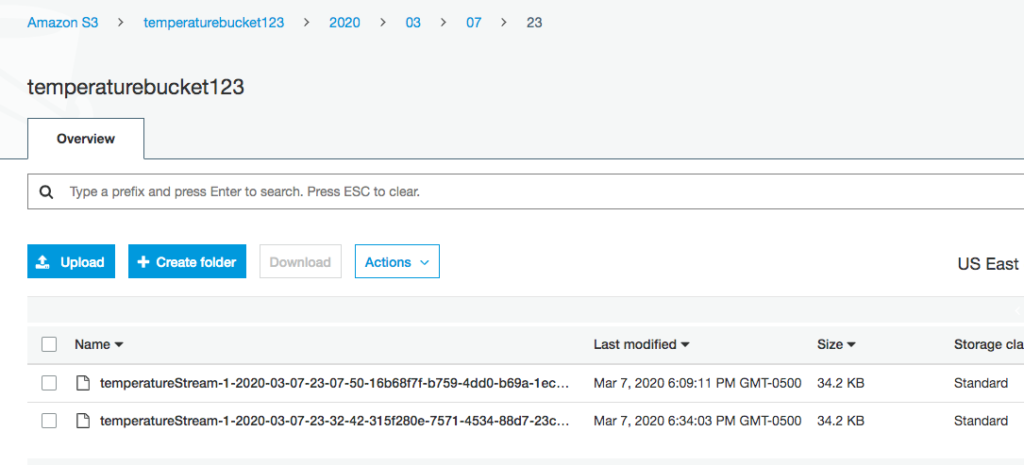
Navigate to the S3 bucket in the AWS Console and you should see the dataset written to the bucket.
Data written to S3 bucket
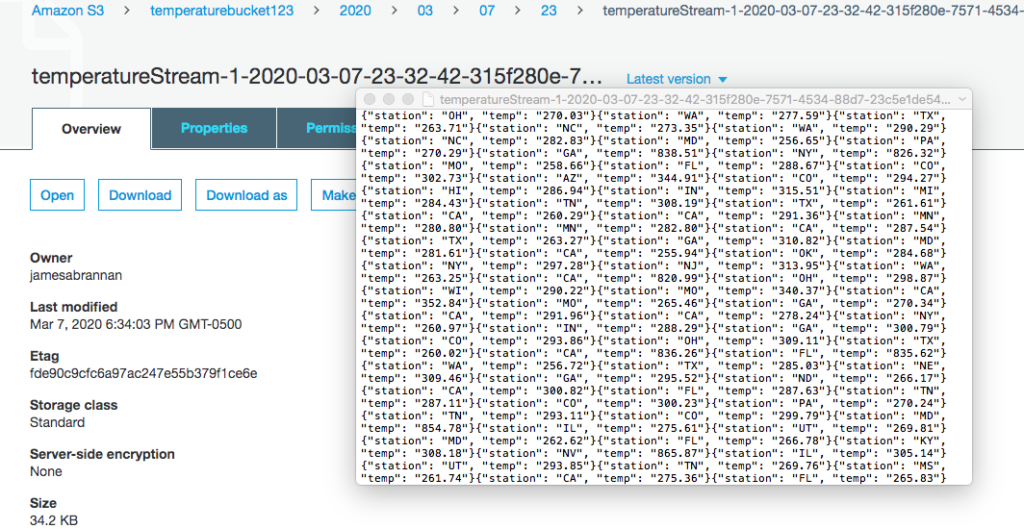
Open the records and ensure the data was converted to kelvin.
Data converted to kelvin in S3 bucket
Summary
This tutorial was on sending data to Kinesis Firehose using Python. You wrote a simple python client that wrote records individually to Firehose. You then wrote a simple python client that batched the records and wrote the records as a batch to Firehose. Refer to the Python documentation for more information on both commands. In the next tutorial you will create a Kinesis Analytics Application to perform some analysis to the firehose data stream.
Attached find my study notes for the AWS Certified Developer Associate Exam. These notes were written in September 2019. The test may have changed considerably since then, so be certain to consult other sources.
I prepared for the AWS Certified Developer Associate exam through a combination of the A Cloud Guru’s Video course on Udemy, Whizlab’s practice exams, and my own study notes. I passed by the way.
AWS SQS Message Queues are a way to exchange messages between applications. Senders, send data objects to a queue and receivers, receive objects from a queue. Amazon’s Simple Queue Service (AWS SQS) is a service offered by AWS that offers scalability and reliability by being distributed across Amazon.
A message queue decouples applications. An message producer only knows about the queue and knows nothing about the queue’s consumers. Likewise, a message consumer only knows about the queue and knows nothing about the queue’s other consumers or producers. Moreover, producers and consumers know nothing about timing, and are asynchronous.
For more on queues and message-passing in general, there are many resources online. Here is a good reference from MIT: Reading 22: Queues and Message-Passing.
Use Case
Suspend disbelief, or more accurately, simply build the system regardless of what you think about the soundness behind the business plan. Famous entrepreneur John Bunyan from Washington State has a plan to get rich and famous by finally proving conclusively that Bigfoot – or Sasquatch for the cultured – exists and uses the extensive system of hiking trails to move around.
Against his accountant’s advice, he liquidated half his fortune to install a series of hidden cameras along Washington State’s hiking trails to take photos every fifteen minutes. As he is a busy man, he does not have time to analyze all the photos personally, and so he want’s image analysis software to analyze the images. If the software registers a Sasquatch, he wants the images to personally go to his email account so he can register the image as a Squatch or not.
Now, with if 10,000 cameras take a picture every 15 minutes, that is 600,000 images per hour. Assume each image takes up to five minutes to process. Hopefully you can see, we have a scalability issue.
There are various ways to deal with this scalability issue, but as this is a tutorial on SQS, we use AWS SQS. And, as I am fond of admonishing in all my tutorials, if the “business case” seems suspect, then suspend disbelief and focus on the AWS code.
Design
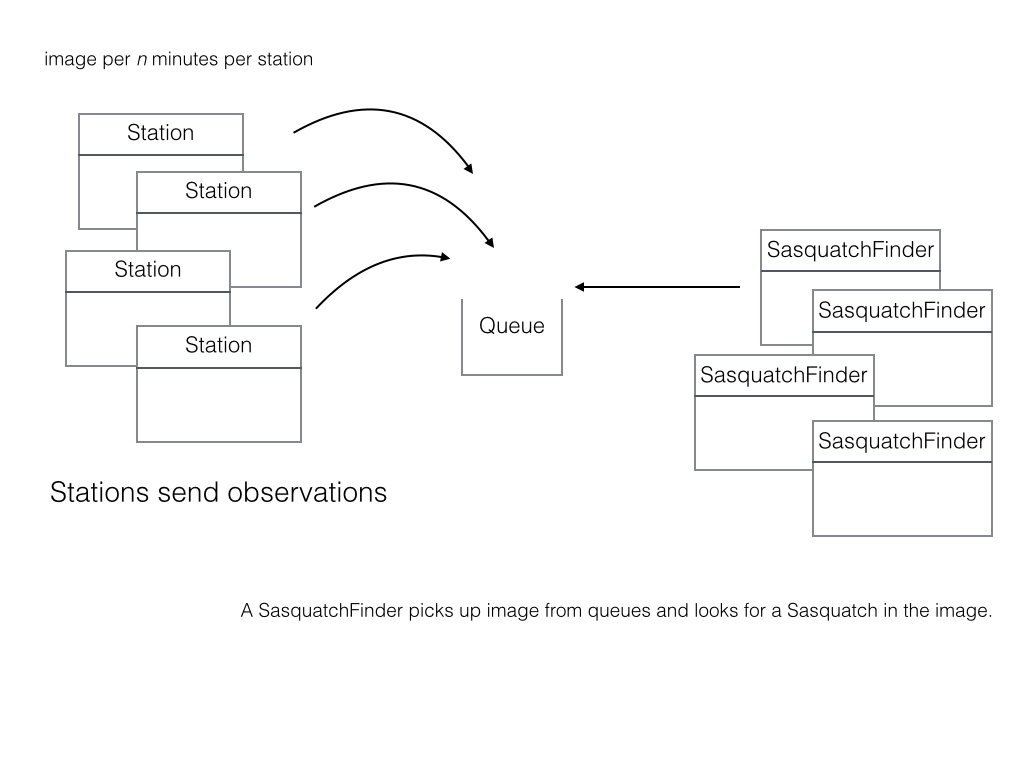
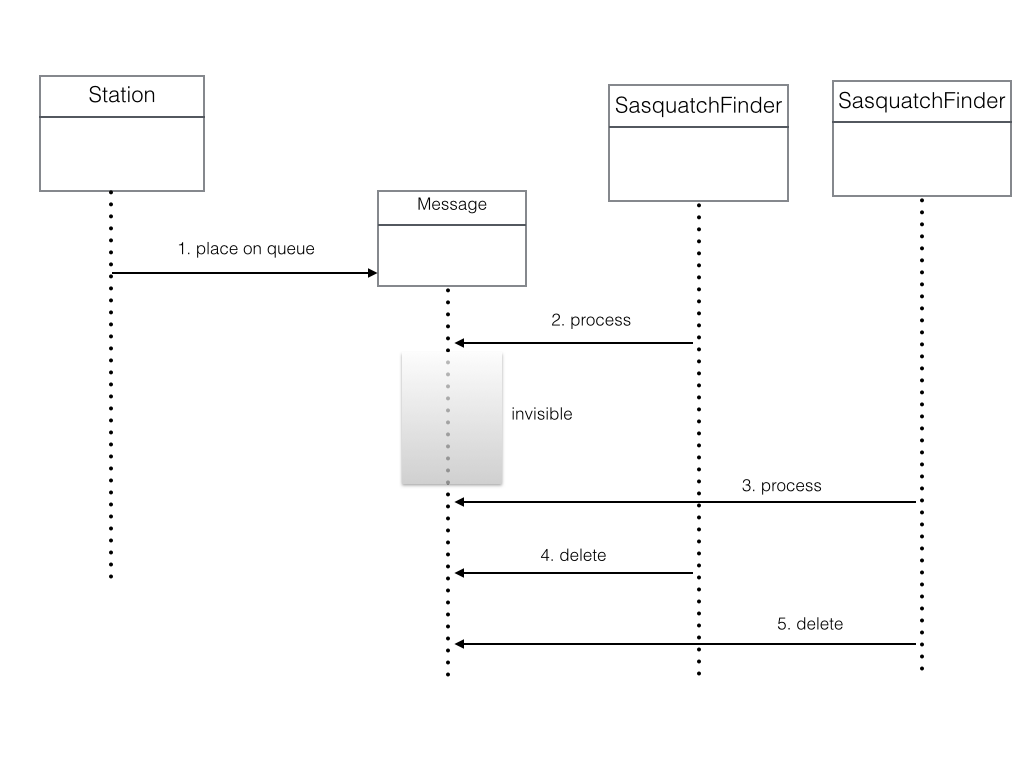
Enough apologizing for the business case, let’s focus on the application’s design. The following diagram illustrates the dilemma.
Every n minutes a Station sends an observation to an AWS queue.
There are 1 or more SquatchFinder components who’s job is to pick up an observation from the queue and process the observation.
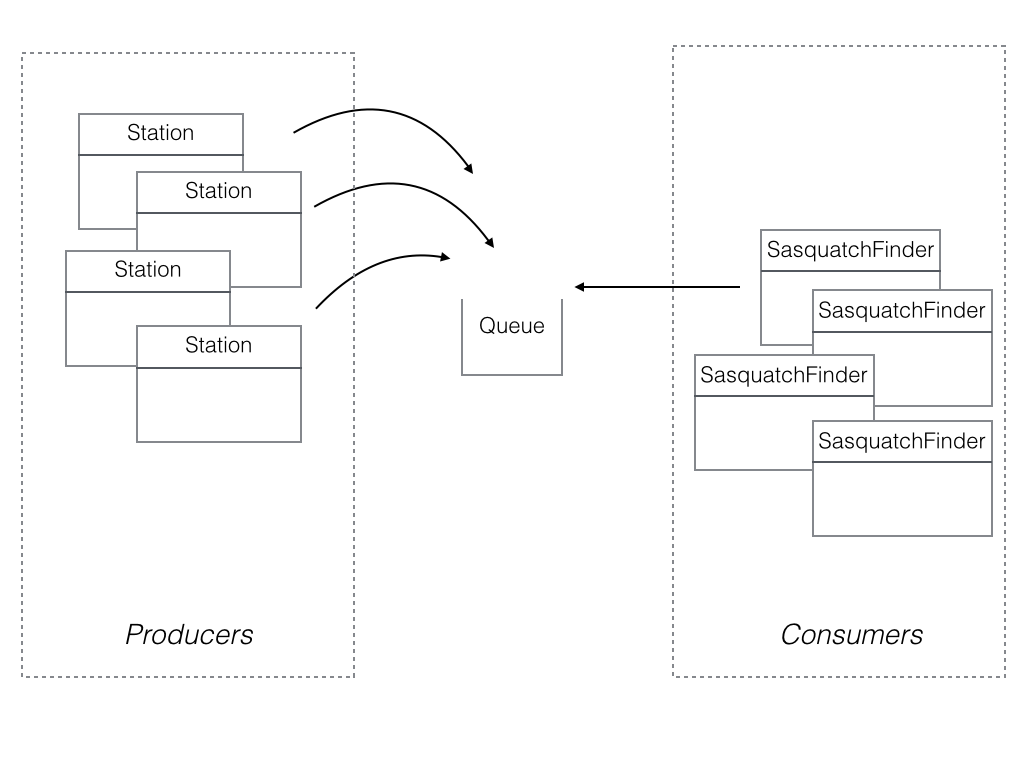
Station is the producer while SasquatchFinder is the consumer.
Stations send observations to the queue and SasquatchFinders get observations from the queue.Queues implement an asynchronous Producer/Consumer design pattern.
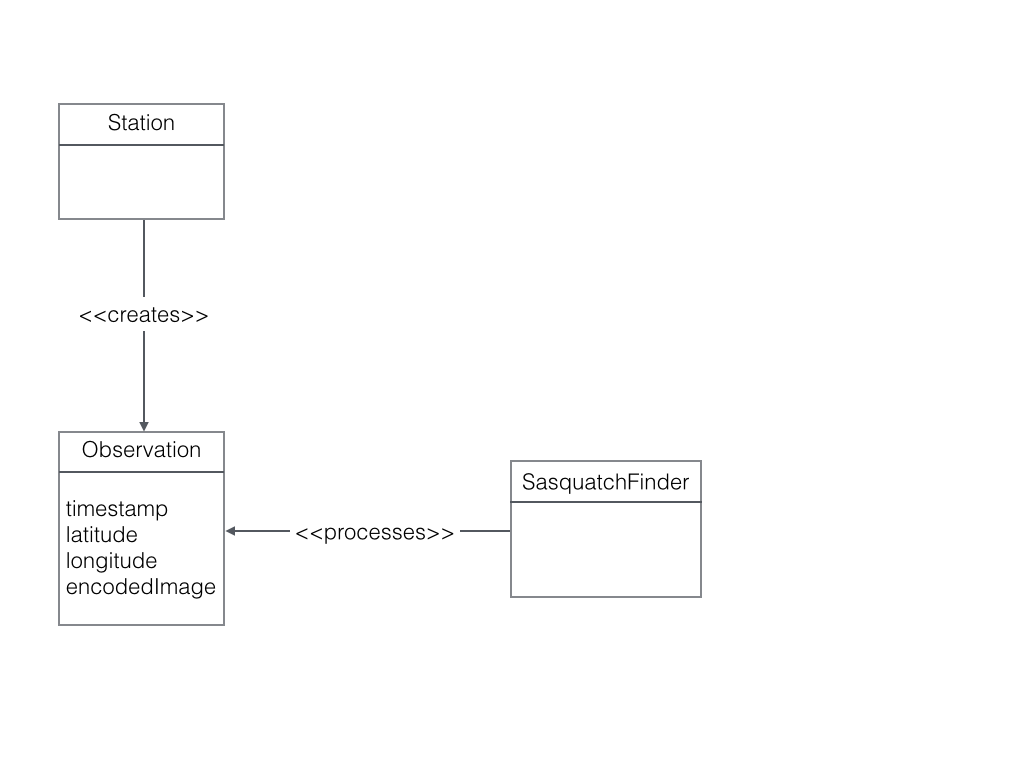
We can formalize our requirements with a simple class diagram. A Station creates an Observation. A SasquatchFinder processes an Observation.
Class diagram illustrating the design.
All communication with AWS isfrom external processes is via its REST API. AWS SQS is no different. Moreover, SQS queues only accept textual data. But a common need is for the queue to accept binary data, such as an image. Also, JSON is a textual data transport format.
We can translate the Observation into a JSON document. The image is converted to base64 encoding so it can be represented as text. Note the encodedImage in this tutorial is always truncated with <snip>, as the base64 string is quite long.
Images are binary. However, all binary can be represented by a String provided it is encoded and decoded correctly. Base64 is an encoding scheme that is converts binary to a string. It’s useful because it allows embedding binary data, such as an image, in a textual file, such as a webpage or JSON document. AWS SQS queues only allow textual data, and so if you wish to store an image on an AWS SQS queue, you must convert it to a string. And the easiest way to accomplish this is by using Base64 format to encode binary data to strings when transporting data and decode strings to binary data when storing the data. For an example of Base64 and DynamoDB, refer to this site’s tutorial: Using the AWS DynamoDB Low-Level Java API – Sprint Boot Rest Application.
Station – Producer
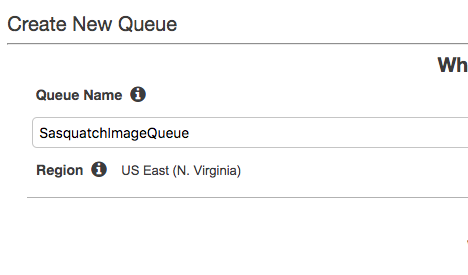
Before coding the application, let’s create a queue. You can create a queue via the Java 2 API SDK; however, here we create the queue manually and then use this queue to send and receive messages.
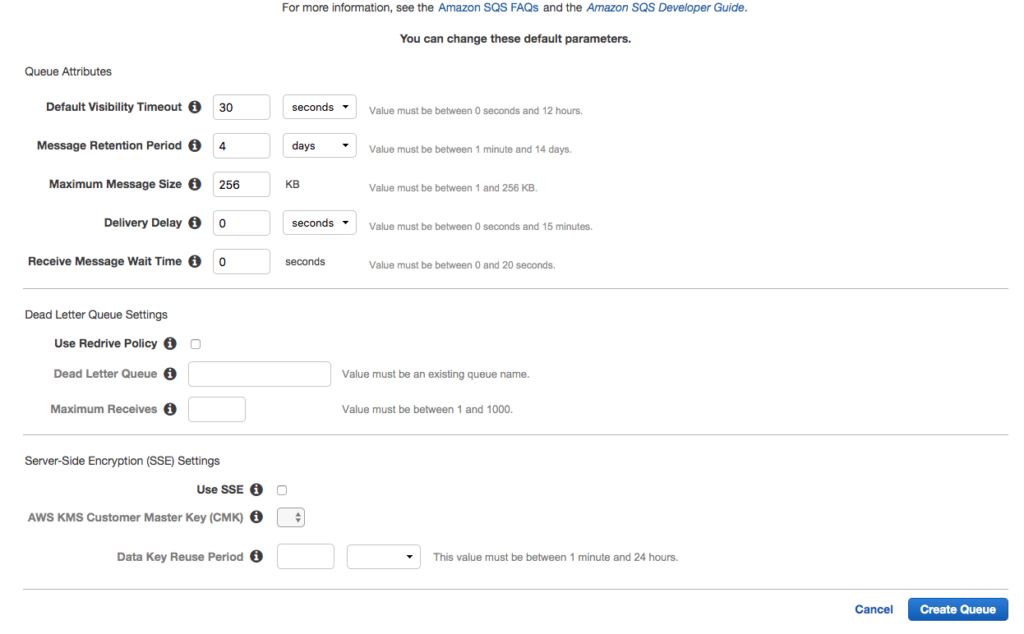
Create SQSQueue
Navigate to the SQS console and select standard Queue.
Click the Configure Queue button.
Name the queue SasquatchImageQueue.
Accept the defaults for the Queue Attributes.
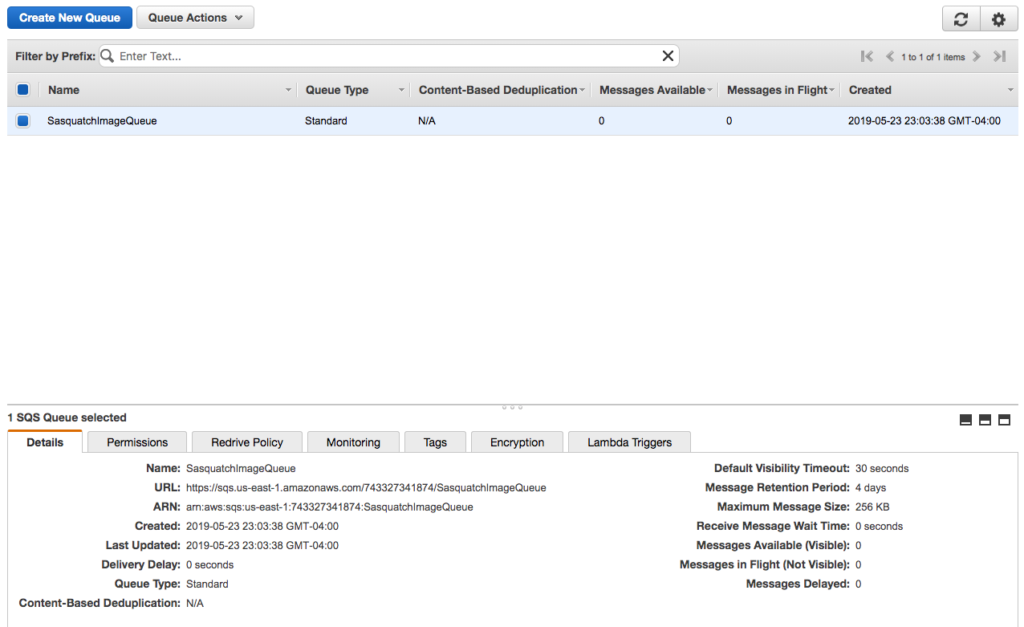
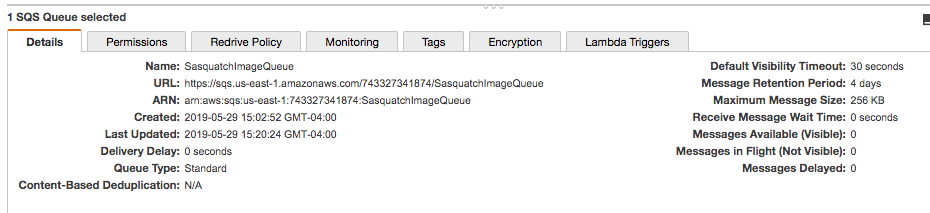
After creating the queue you should see a screen similar to the following.
Click on the Permissions tab and notice that we have not created a permission. We return to the Permissions tab after creating the two necessary users.
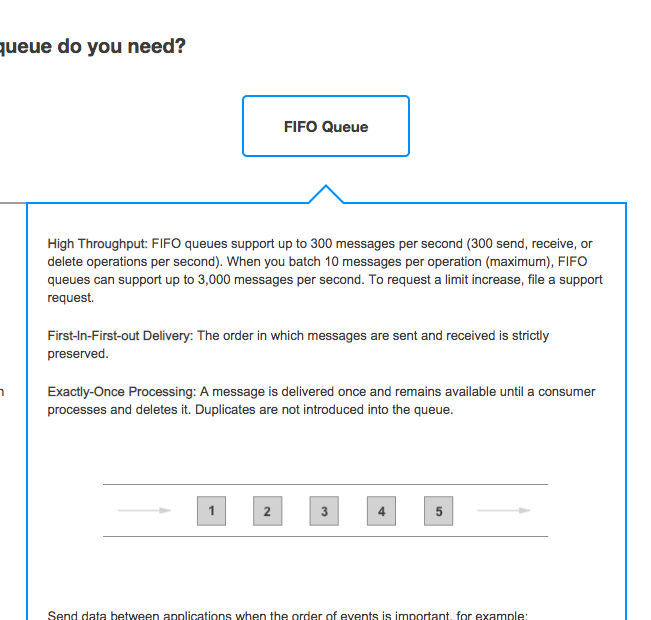
There are two types of queues offered by AWS SQS, Standard Queues and First In First Out (FIFO) Queues. Standard queues provide what is called best-effort ordering. Although messages are usually delivered in the order they are received, there are no guarantees. Moreover, messages can also be processed more than once. FIFO queues, in contrast, guarantee first in first out delivery and processing only once.
In this tutorial we primarily use standard queues. However, toward the end of this tutorial we illustrate using a FIFO queue.
Create SQSQueue Users
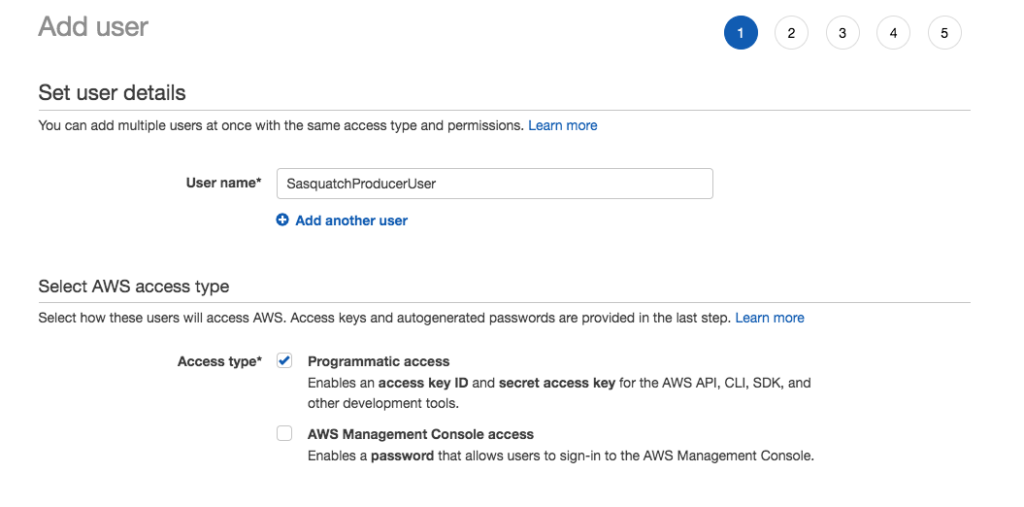
We need to create two users, one to interact with the queue for sending messages and another for receiving messages. If you have created IAM users before, note we do not assign the user to any group or assign any policies. Instead, we allow the queue to determine its permissions. Of course, we assign the user programmatic access and download the credentials file.
Navigate to the IAM console and create a new user called SasquatchProducerUser that has programmatic access.
Save the user’s credentials locally.
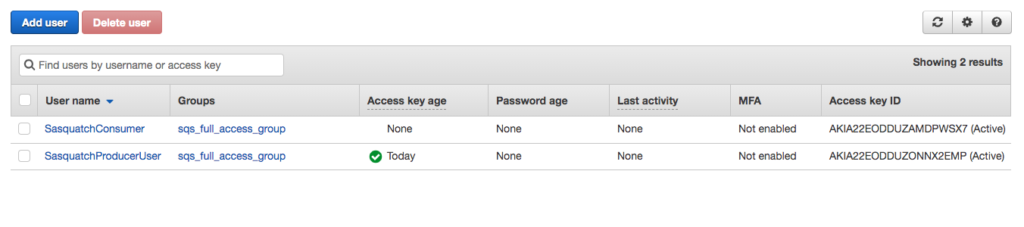
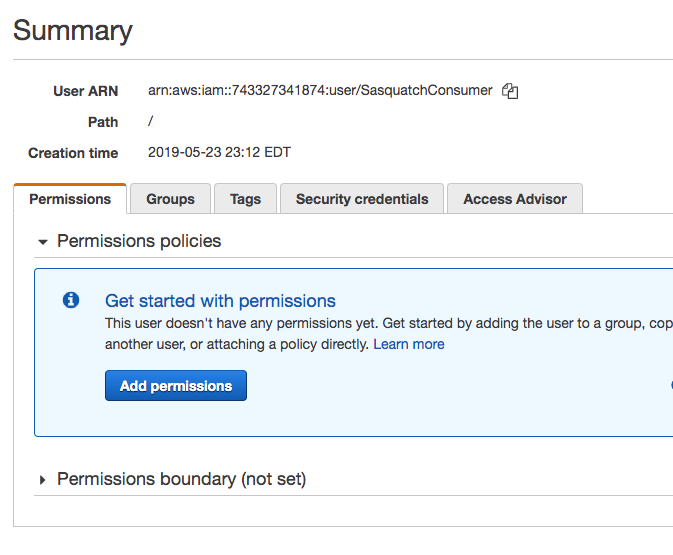
Create a second user called SasquatchConsumerUser that also has programmatic access.
Save the user’s credentials locally.
You should have two users created with programmatic access.
Queue Permissions
Initially only a queue’s creator, or owner, can read or write to a queue. The creator must grant permissions. We do this using a queue policy. We write the policy using the ASW SQS Console, although you write it manually if you wished.
Consumer Permissions
Navigate to the SasquatchConsumerUser summary screen and copy the Amazon Resource Name (ARN).
The ARN should appear similar to the following.
arn:aws:iam::743327341874:user/SasquatchConsumer
The Amazon Resource Number, or ARN, uniquely identifies an Amazon resource, in this case, the SasquatchConsumer user.
Return to the SQS console and select the SasquatchImageQueue and click on the Permissions tab.
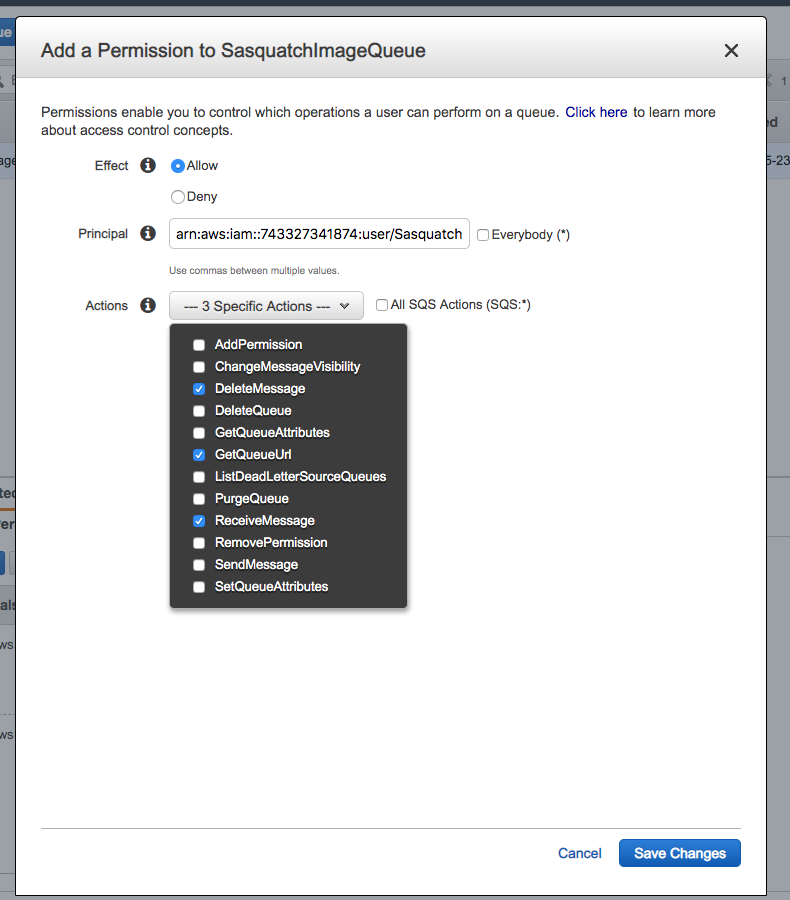
Click Add a Permission.
In the resultant popup, paste the ARN in the Principal text box.
Check the DeleteMessage, GetQueueUrl, and ReceiveMessage Actions.
Click Save Changes.
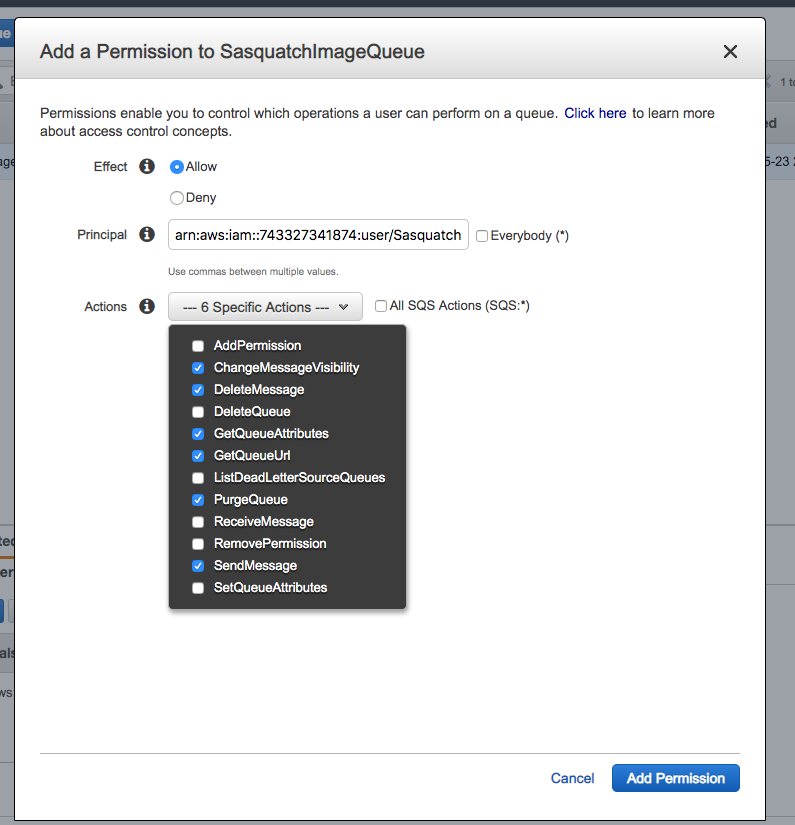
After creating the SasquatchConsumerUser, navigate to the SasquatchProducerUser and copy the ARN for the producer.
Navigate back to the SQS Queue and add this user to the queue as a permission. Allow the ChangeMessageVisibility, DeleteMessage, GetQueueAttributes, GetQueueUrl, PurgeQueue, and SendMessage Actions.
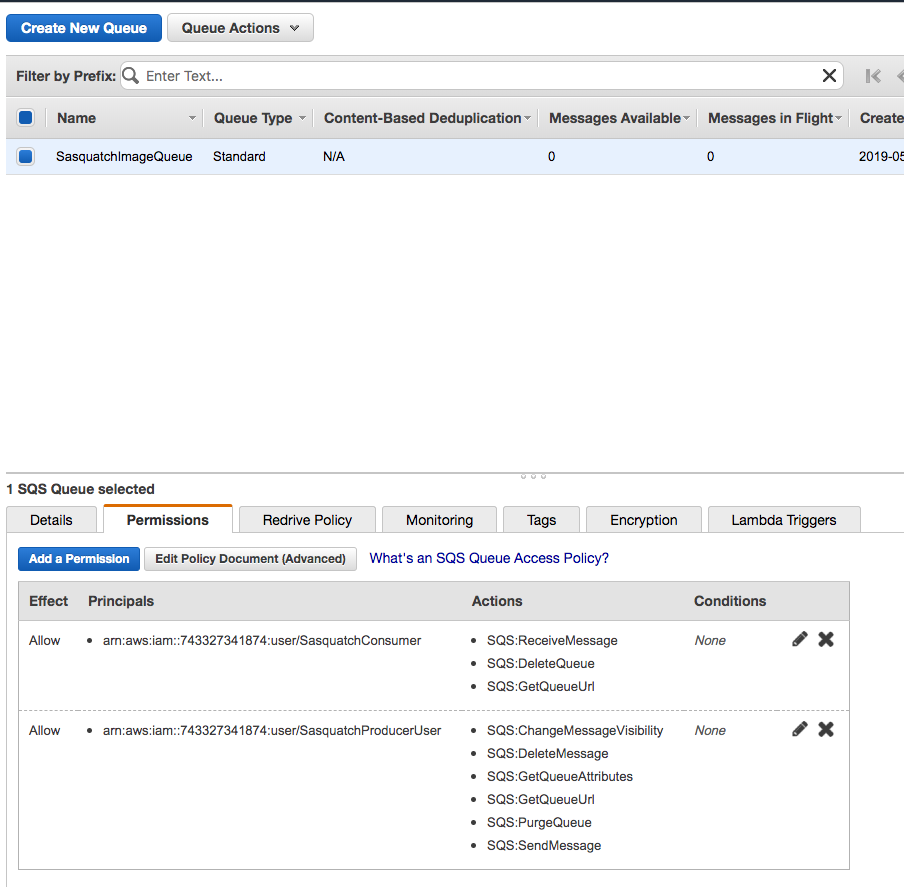
After adding the permissions for both users the queue should appear similar to the following image.
Although we do not discuss Policy documents, the following illustrates that a JSON document underlies the settings we set using the console. It is, however, important you understand policy documents, as they are at the heart of AWS security. For more information on AWS SQS Policies refer to this documentation: Using Identity-Based (IAM) Policies for Amazon SQS.
One thing to note is that here we assigned permissions to the queue using AWS SQS rather than the consumer or producer user we created. We could have just as easily used an IAM Policy, as the documentation in the link in the preceding paragraph discusses.
Sending Message Via Console
Although there is probably rarely a business reason, for testing purposes you can manually add a message to a queue. Although we will not use the message, let’s explore sending a message using the AWS SQS Console.
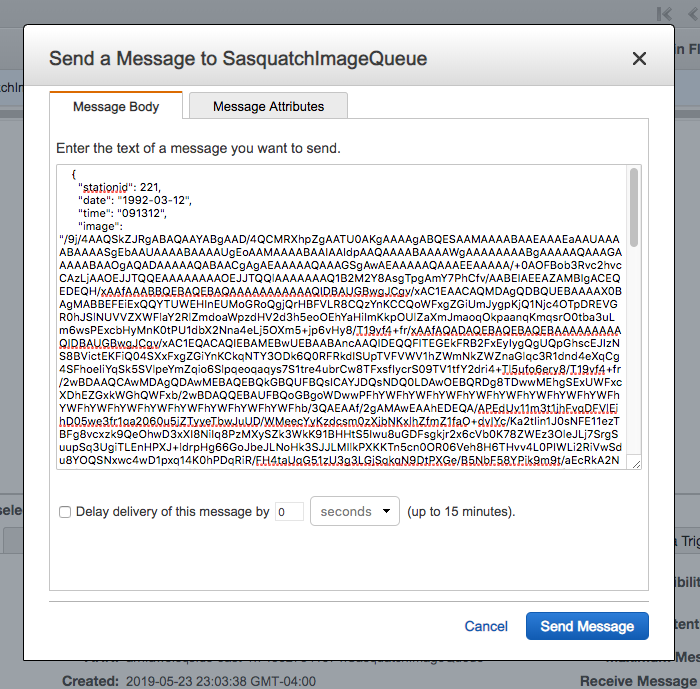
Refer to the observations.json document and copy one of the observations. Of course, in the code listing below the image is truncated.
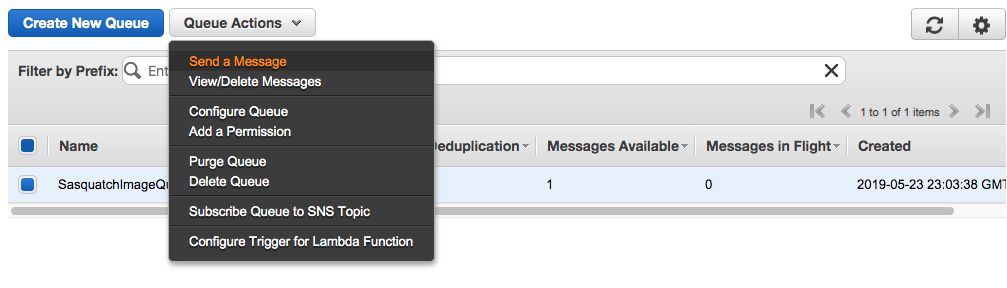
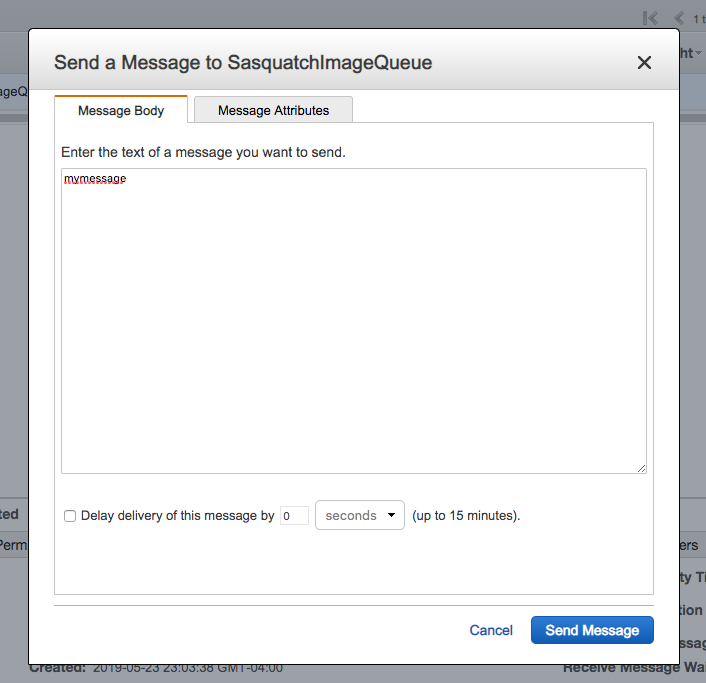
Select the queue and from Queue Actions select Send a Message.
Copy a single message from observations.json and add the entry to the Message Body.
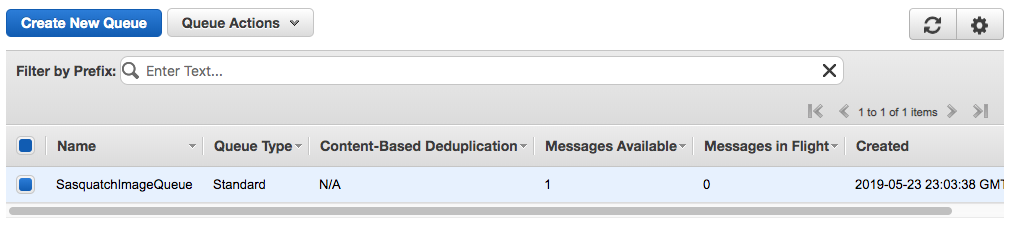
Click Send Message and within a minute the Messages Available column should show one message on the queue.
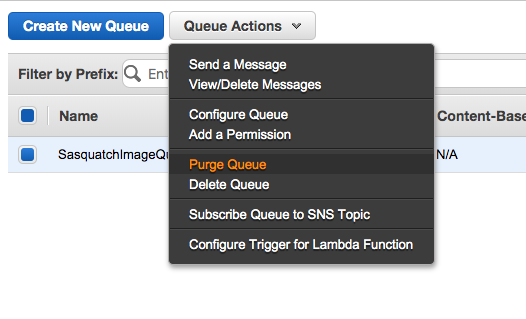
Purge the queue by selecting Purge Queue from Queue Actions.
Java Project – Producer
As discussed, a producer, well, produces messages. If we fully implemented the design above we would have many Stations and many . However, to keep the tutorial simple we limit ourselves to one Station in one project.
Project Setup
Although I developed the tutorial using Eclipse, you can use your own IDE or even the command-line. However, you really should use Maven or Gradle. Here we use Maven. It is assumed you are familiar with using Maven to build Java projects.
In the POM we use the AWS BOM so we can avoid specifying AWS library versions. We add dependencies for the required AWS libraries. We also specify that maven is to build an executable jar with the required dependencies packaged in the jar.
If we do not specify Java 1.8 or higher, the compilation will fail, as the AWS builders are static interface methods that do not work with older Java versions. Although on your machine, the code might compile, you could have issues if you have multiple Java SDKs on your computer. By explicitly setting the version, source, and target we avoid any potential issues with compilation.
Station
Let’s create a simple executable Java class named Station. This will simulate a bona-fide message producer.
First create an com.aws.tutorial.sqs.main package.
Create a class named Station with a main method in the created package.
Have the main method printout a message that the class executed.
package com.aws.tutorial.sqs.main;

public class Station {
  public static void main(String[] args) {
    System.out.println("Station running....");
  }
}
Executable Jar
Compile and package the project. If running from the command-line you would type the following.
$ mvn clean compile package
After building, execute the program from the command-line. The printout should appear.
$ java -jar SQSTutorialProducer-0.0.1-SNAPSHOT.jar
Station running....
Now that we have created the consumer’s basic structure, we can modify it to send an SQS message.
Sending A Message
In this example we send a message to the queue using the SDK. The data payload is a string of JSON data. You use hardcoded data to send to the queue. Obviously in a real-world application the data would come from a different source. To simulate sending messages from a bona-fide producer, a delay is introduced between sending each message.
Before modifying the program, create a new class named TestData in the com.aws.tutorial.sqs.main package.
Copy three observations from the observations.json file.
Or, if you do not wish escaping the strings yourself, use the TestData.java from this tutorial’s Git project. Note: if you use Eclipse, it will escape the strings for you when you paste the string immediately after the opening quotation. The image’s base64 code is shortened so they can be easily displayed.
Compile and run the application and you should see the following output.
Station running....
sent message: b861220e-a37a-424d-880c-5dd67a052967
sent message: 5185e68b-a16f-4300-8ee5-7ef5cca0eb53
sent message: 161f7444-ae7b-4890-b022-0447933054c3
Navigate to the queue in the AWS Console and you should see three messages in the Messages Available column.
The consumer has only one SqsClient instance that is initialized in the Station constructor and closed in a method annotated with the @PreDestroy annotation. This annotation is used to mark a method that should be called when a class is about to be destroyed for garbage collection.
Credentials
The client requires credentials to operate. This is the user account that the application uses to authenticate itself to the AWS SDK. Here we hardcode the credentials for simplicity. For more information on AWS Java 2 SDK and credentials, refer to SDK Documentation.
SqsClient
The SqsClient is an interface that extends SdkClient, and is the client for accessing AWS SQS service. You use the SqsClientBuilder to build the client. You build the client by passing the credentials and the region.
All requests to SQS must go through the client. Different types of requests are named accordingly. For instance requesting to send a message requires a SendMessageRequest, requesting to delete a message requires a DeleteMessageRequest. If you have worked with the other services offered by the Java 2 SDK such as DynamoDb or S3, then this pattern should be familiar.
SendMessageRequest
The SendMessageRequest wraps requests to send messages to the client. You build the request using a SendMessageRequestBuilder. Above we are setting the queue’s URL, the message’s body, and how long to delay before sending the message. We obtained the queue’s URL from the AWS SDK Console.
The URL is in the Details tab of the queue in the AWS Console.
SendMessageResponse
The client sends the request and receives a response. The SendMessageResponse wraps the response. The method then returns the messageId and main prints the value to the console.
Now that we have created three messages and sent them to SQS, we can write a consumer to consume the messages. Now let’s create a Java project named SQSTutorialConsumer.
Java Project – Consumer
Consumers, well, consume messages. Let’s create a consumer for the messages on the queue. As with the producer, we greatly simplify the consumer by creating an executable class that runs from the command-line.
Project Setup
Let’s create a Java Maven project for the Consumer.
POM
Create a Java project named SQSTutorialConsumer as a Maven project.
Navigate to the queue in the AWS Console and you should see no messages, as they were deleted after processing.
In this simple consumer we first create a client for interacting with the queue. We then obtain a single message from the queue. The program pauses to simulate processing. It then deletes the message from the queue by using the receiptHandle.
Because the program loops, it processes all three messages place on the queue when we created the consumer.
ReceiveMessageRequest
The ReceiveMessageRequest wraps the request to receive a message from an SQS queue. We use a builder to create the request. Then we specify the queue URL and the maximum number of messages to fetch. Finally, we specified a single message; however, you can specify multiple messages if desired.
After processing the message you should delete it from the queue. We do this by obtaining the receiptHandle of the received message which is then used to delete the message.
The program processes all messages on the queue. This is a simple consumer, but you could have multiple consumers consuming messages from the same queue.
Message Visibility
A message might be processed twice when using a standard queue. A message, when picked up by a consumer for processing becomes invisible for a configurable time. When we created the queue we accepted the visibility timeout of 30 seconds. However, if processing takes longer than the visibility timeout, the message can be processed by another consumer. The following diagram illustrates.
There is a following wrinkle. What happens when the message is deleted from the queue a second time?
Open the SQS Console and send a single message to the queue.
Modify SasquatchFinder to sleep for 40 seconds between each message.
After building the application, open two command-line windows and execute the program in the two different windows at the same time.
One running instance gets the message from the queue. The message’s visibility timeout set at 30 seconds begins. The instance sleeps for 40 seconds to simulate processing.
Meanwhile, the instance that first picked up the message finishes processing and deletes the message. In reality, it attempts to delete the message. But, as the other process already requested the message and a new receipt handle was issued, the message is not truly deleted.
$ java -jar SQSTutorialConsumer-0.0.1-SNAPSHOT.jar 2
SasquatchFinder 2 running....
mymessage
sleeping for 40 seconds...
Deleted message AQEB3/lhW8cY2cTsl2gd/GOsyPrt1J/SQn+ZR06ngf24aL5C8SqfUSPZfAl4uc2IwuZuLhZ/5BXYLWVU7AvmgSf0kb4zm0owKh01EXC4pGhvtNSsioLnk3nd4KiS5YEUO/EssCnRM1we7rXw0eLyd2LehOpPOZ49893lIJ6opy1vamQxxk6C+7iGcWbY0dMNTvrZqVaZw2JW/eZV5wI99rdUwRP16+RFj7XWsxEI5KJcExgnWY3jDRQv1mXqe5ZgWI9M7mqPH/rrx8afBdV2P53B7OK0uRm3vUGMzmW/xUgbsxsy5UB0+DZGLaccUAbegtC74LQ6BLZs64VlFxc8jAC2sp2gheLAZ849j4JkMrA8nWf+P+xKCjqdALeGrN754DcxnvhZv79R6sOGcp2lBtTOsA== by SasquatchFinder 2
As the message is still being processed by the second instance, the first does not see the message. The second instance then deletes the message.
$ java -jar SQSTutorialConsumer-0.0.1-SNAPSHOT.jar 1
SasquatchFinder 1 running....
mymessage
sleeping for 40 seconds...
Deleted message AQEBgZK7kq12asCcVVNbFQNlQmmgYTXXO8OzgoJzHpAnqdsBtMnaBxSBvjjgyVqO3nqYwuhFoxPWgXhUoUcgDzejHHSG6dM/VNG1Wdv3Q93THsJPj6BSQSH/sLjX7qvdFYT20Es0jdhN4dQTNMPyaA3sA7a2x025cUYLsegKfMlWVfCDThABbn+0evwgkn3hmzwLBvAWZEGIp0mooZvYf6WiLcblbqCnx+Gh5j5/XvmIpWuT9ux3DQSTYH+f+XdfUxclXP6exwAYyyFm7xHJnlF9LXcRcKmv2QitpQjgjK3yQBLrogU6dPf8Zp34K8iwMr1TBXEi5mZnfPSA7Cl3a4N2c+MxB+OupGIGGY6uoy2gFLSiaaunsij/weB0FFaYaE/MFhMsXdMMhNho2o/lrq6SOA== by SasquatchFinder 1
Notice that both messages have a different receiptHandle. The queue has an internal mechanism to avoid errors when a message is processed and subsequently deleted twice. However, it does not prevent processing a message multiple times. If we manipulated the processing time and/or the visibility timeout, we could have the message processed even more times.
To actually delete the underlying message, the most recent receipt handle must be provided. So in our example above, the first attempt to delete the message came after the second receipt handle was returned and so the message was not deleted. But the second attempt to delete the message was the most recent receipt handle and so the message was deleted. To delete a message you must pass the most recently issued receipt handle.
You should design your system to not be dependent upon the number of times a message is processed. Your system should be idempotent. If you need strict processing of once and only once, then use a FIFO queue.
Message Attributes & Dead Letter Queue
Let’s explore two topics important when working with AWS SQS queues: message attributes and dead letter queues. A message can have associated metadata. However, to receive messages with associated metadata the ReceiveMessageRequest must be explicitly instructed to fetch the associated metadata in addition to the message itself. A message might not be successfully processed. Rather than leaving the message on the queue to fail indefinitely, a dead letter queue can be configured to send message that fail a configurable number of times.
DeadLetter Queue
Create a new standard queue named DeadLetterQueue.
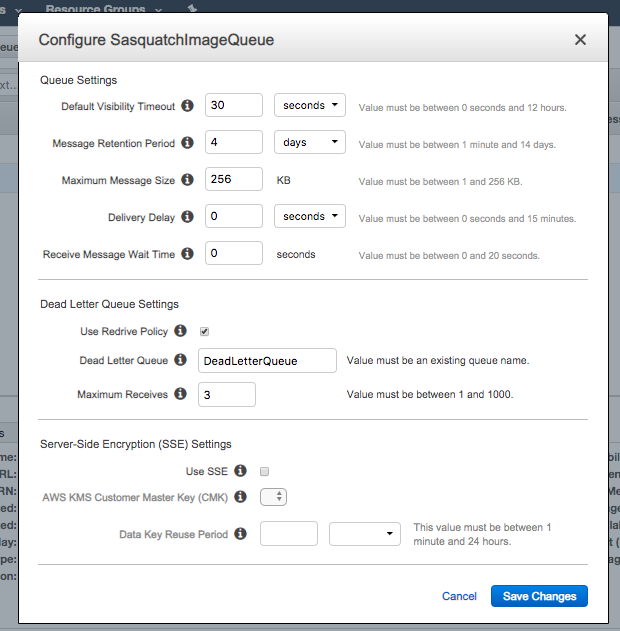
SelectSasquatchImageQueue and from the Queue Actions dropdown select Configure Queue.
Modify SasquatchImageQueue to use DeadLetterQueue for its Dead Letter Queue.
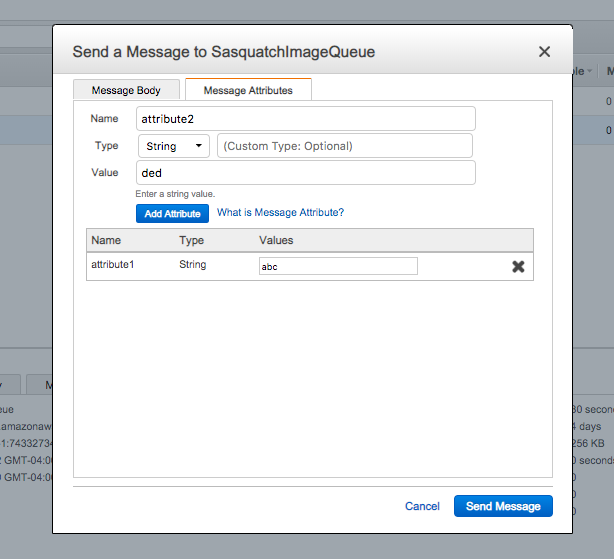
Message Attributes
Select SasquatchImageQueue and send a new message.
When creating the message, add two message attributes.
Open the SQSTutorialConsumer project and modify the processMessage method in SasquatchFinder. Note that you comment the call to delete the message.
Compile and run the application. The message should process three times.
SasquatchFinder 1 running....
abc
e6ede972-9a6d-4c86-8c00-b16fe18977ff
attribute1:abc
attribute2:ded
sleeping for 10 seconds...
abc
e6ede972-9a6d-4c86-8c00-b16fe18977ff
attribute1:abc
attribute2:ded
sleeping for 10 seconds...
abc
e6ede972-9a6d-4c86-8c00-b16fe18977ff
attribute1:abc
attribute2:ded
sleeping for 10 seconds...
Return to the AWS Console and you should see that the message is placed on DeadLetterQueue.
To receive message attributes we were required to build the ReceiveMessageRequest with the explicit instruction to receive the message attributes by specifying messageAttributeNames. That method can take one or more attribute names, or a * to signify all attributes.
The message was sent to DeadLetterQueue, the queue configured as the SasquatchImageQueue dead letter queue.
The ReceiveMessageRequest can receive more than one message at a time if more are available on a queue. Above we set the maximum number of messages as one. Let’s explore what happens we change the setting to more messages.
Modify the SasquatchFinder class by creating a new method called deleteMessages.
Have the method iterate over all received messages.
After compiling, navigate to the AWS SQS Console and add five messages to the queue, with the message body of a1, a2, a3, a4, and a5 respectively.
Run the application and you should see output similar to the following.
SasquatchFinder 1 running....
a4
98a42736-e4b5-4dfd-9428-3e32d2ea145d
sleeping for 10 seconds...
Deleted message AQEBqmAqpGs85ERM2Y8EnD4zjBPO1KxomlhJgQCPQ+JO3gjYhRcZbflS1gKJT1kas0JId7bX4X+OmFWQfC8r+gZGr02jwBcKlhvSUIv0tx13Q88EPpzMJDNbB9w9oKbgR+hc8c0nZQPPjJ2uHu7KeQfTmIdK/dt49cs/GHFRZeq3pIUWN2jJO8h0UdlpLeFKbB96WjPvakAnXDFd46meejQvBod0x18L1Y1dBt6cZc5+9AbB6eb4bJjV5dKvyDCtIUP2XFZ8iwtZF1lxntzqXxdMGYCjzaQ/oqQ5EmVJ/pFMTgWlUTks+qVFMu7a/sOCfQm7bFwE3AofXQROAK3B0crssZTbzoqQ9oJv+nj0kn596gidN+gygrISvF9vESIG1M5Ll+Lk2ADWQeO+2UA/AJax3A== by SasquatchFinder 1
a1
a5
c167bb7a-f356-4d5b-aa0f-ea90075cef50
f0d79263-05da-485e-bf6a-fa6b3f9fe92a
sleeping for 10 seconds...
Deleted message AQEBGwtlQPM080KnHDAOWUsZKUQ4PWfLP2g/AFn0sr9ERDOJFssjl7rNXl3mL6ryqoH9EgiPEGyGXwPm6n/FSsfbPA9OSMJYLq0Fho9qtpkcoI0mmAqRPQ/7h0J++zAmmf3bflcD9BqJS+hz4a/Di8Eo6GB0oWJUFZEFYcKWnIUGMNgnQfY3xs1DF9UuNZdsu7h3KN9hGGy3vSTuLvJJox7DDHSgY+QU3nisT5dTSfltKc9vJMQq2mPxB/f2EUmgwKQ82f10A6lPlSjVuiyNtGkKVau3BorKINz3dtG+xAHd5wWfALFExyip7zFZl6wVsnzfKox9QBaxRSrukIfx3+w5rIilq1QujPpNqLKItlxOvaXvDvxi/8lWv31S5UNlY7ooEOYSIkh1wnNwXKY7ZP4aQQ== by SasquatchFinder 1
Deleted message AQEBLIUJqmODdigrnQ88hzta9Zr+PaQnctLqmYrQT0iU5ZxvaLPy0PGNTe7eKwLHbBvc+WdDbLXK951WaPYWoY9dbMJZMyRNnjEj3doGoUkmBOm0LzTs1xDkV+QPb3fGH3s+mxh2TFhX3KFOwXrvf4uqkpx9mHdGioMWa86NSsCUUEQ3vXGUXprSdGsSqXUsoAug7v6wBU3QIPzeQm8pRLmjbZPdx+ndeV80FwnFkxDfNx/mtpAibum4ON4CxDUB66jLC7nVRe0XxXBllM2G/brS7jseqbz+Q61qbFjLNWKo96kTBIrYDjvZEmcSQdp37cYMf4rO/vsr+/XCNUtbtcD8h9Xk8Fc+atcIsuQSlrLbYMplVgN3EwogYlXJsB9GSOlVQVpO+gwOLBXonXJ6i3EAbQ== by SasquatchFinder 1
a2
a5
e65fbcc2-2c4a-42f6-8b61-ca97dad4826e
b2bc665c-4c1c-42c7-b3d2-c1d5bf048ee9
sleeping for 10 seconds...
Deleted message AQEB2FZyDGQEOUgLxR9wIxAiJbk++Ktec9RLon3nAZr7bPeQu2QJ8iVxRMNg92ZgvoPY5qsBndcRGEQjI5zKHQ/r62tg4+LMWwFLSDBhDF3d55w6OosgLf+K7AIBICGAeTJanTkhCzQlWYM+HCDFEve+NhPsr5+/zabaeZrkKwSBh8E2jTCmr29LmNR6ld9Bz0NSboj5gi+Gxa3dTu+xPGMLMjANVQ1Qa1BhoYEI0QP8kl9gL8aBpLhkeW1eWXgRaRtRcTAVpjxF73ZlUEFVNyYeE/Mwz9ZT2lWRftj6dv5p2PUG5Z6VtbbBw/9AXQElJUTgfHKGd4iGEjo4A3l6ff6g/NVJzm/LkGq6909txbTIk8PSp5istS4bM318W6VG2ten9jYSU7+pj8H809AHoW3VEw== by SasquatchFinder 1
Deleted message AQEBMdzd33/uz7jNQMnBJu1ne7GRh9g2xHx6X0cPWLsU0emEN0G5SGbr3nF/9QklDrrW42BX1HW6IDWxvhlI4/bOByZobYOfjmv5Cr8rDEJYnNKWxqxBZeQqjArKTy90WeEs0puUw4l6PouEZOv35daHO0h01A8Dpk/oMlVBi/OZFCIM4fetG2tUxwa7eU15WiEF4mklZqqJx2bVTbdiZqwhOucgqXlyXK3IJ5FtBFd6ACtEyX1tQmIBn6njmk/CBuX0v5+LzaxlntHy9Q+FpjuPLEyyE5wGqIk9B8Kcqv469pnaE3UJJaCK7DxgG70rF/7M1kYzaDRbRBYJB9jS3W9b8qZpj1JU4JM4euH9xBP4j59MvdwgIs4lSPvO1F3NtdCuNeOOMF15/n1WvU2U31jSeg== by SasquatchFinder 1
As the example illustrates, you can specify the maximum number of messages to process, but not the number of messages. This should seem reasonable, as the consumer does not know how many messages are in the queue before processing. As an aside, note that the messages were not processed in the same order they were received in the listing above.
First In First Out (FIFO) Queue
Let’s modify the project to use a FIFO queue and rerun the two consumer instances simultaneously. Note that neither the consumer nor the producer know they queue’s type. They only know it’s url.
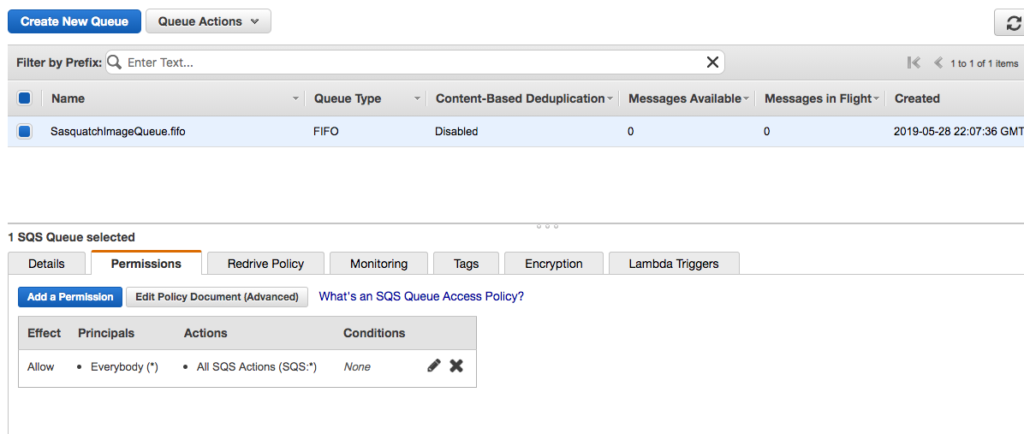
Create a new queue named SasquatchImageQueue.fifo of type FIFO Queue.
Click Quick-Create Queue.
Create a new permission, but let’s be lazy and check the Everybody checkbox and the All SQS Actions checkbox. You would obviously not do this in production.
Modify both the consumer and producer to use this queue’s URL.
Compile and run the application. Note you get an SqsException.
SasquatchFinder 2 running....
messageMine
sleeping for 40 seconds...
software.amazon.awssdk.services.sqs.model.SqsException: Value AQEBBJL+BlwyhRLnQGxaIKDkkrEv1sU6VnHzYM51Q0UFdx2lDyWvKoI/JYcs7MktVJ1Nmyr1mCVX/cpcqS9dMqq7Ual92VLEXDS9hEYM/qg1vdEGHB60OktMzpidyWBenQQyybzXofO+pAdKOYpC/wiEw8GBPsmFDCHpVn1hxHeLSNJyw10SwNv3DTXQXk4Pe+v3yGf23bf8sDk7Rx7ApqWYi8n8z9uijZAQBdwuFpUrZslivMWCzid6AFOXI/k83+/tKnSMyT0/Mx0rng0v1k4WliSgv5YJo5HyEZTt+cOBwfA= for parameter ReceiptHandle is invalid. Reason: The receipt handle has expired. (Service: Sqs, Status Code: 400, Request ID: 845b9538-4104-5428-aa2f-c05092244385)
	at software.amazon.awssdk.core.internal.http.pipeline.stages.HandleResponseStage.handl <snip> at com.aws.tutorial.sqs.main.SasquatchFinder.main(SasquatchFinder.java:58)
SasquatchFinder 2 stopped.
Attempting to delete messages fail when executed after the visibility timeout window if using FIFO queues.
Conclusions
In this tutorial we created an Amazon SQS Queue. After creating the queue, we created a message producer and a message consumer using the AWS Java 2 SDK. We then explored several topics such as message attributes, dead-letter queues, and message visibility. We also created a FIFO queue.
Amazon’s SQS Queue is a easy to use queue that takes the infrastructure management hassle away from the organization. In this tutorial we only examined SQS basics. For more information, refer to both the Java 2 SDK Developer’s Guide and the SQS Developer’s Guide. Remember, the API from version 1 to 2 changed, so when in doubt, assume you need a builder for an object and that you must configure the object when building it. However, the API is consistent and once you start working with the API translating 1.1. code to 2 is intuitive.
In this tutorial you use the AWS S3 Java API in a Spring Boot application. Amazon’s S3 is an object storage service that offers a low-cost storage solution in the AWS cloud. It provides unlimited storage for organizations regardless of an organization’s size. It should not be confused with a fully-featured database, as it only offers storage for objects identified by a key. The structure of S3 consists of buckets and objects. An account can have up to 100 buckets and a bucket can have an unlimited number of objects. Objects are identified by a key. Both the bucket name and object keys must be globally unique. If working with S3 is unfamiliar, refer to the Getting Started with Amazon Simple Storage Service guide before attempting to work with the AWS S3 Java API in this tutorial.
In this tutorial we explore creating, reading, updating, listing, and deleting objects and buckets stored in S3 storage using the AWS S3 Java API SDK 2.0 to access Amazon’s Simple Storage Service (S3).
First we perform the following tasks with objects:
write an object to a bucket,
update an object in a bucket,
read an object in a bucket,
list objects in a bucket,
and delete an object in a bucket.
After working with objects, we then use the Java SDK to work with buckets, and perform the following tasks:
create a bucket,
list buckets,
and delete a bucket.
This tutorial uses the AWS SDK for Java 2.0. The SDK changed considerably since 1.X and the code here will not work with older versions of the API. In particular, this tutorial uses the 2.5.25 version of the API.
Do not let using Spring Boot deter you from this tutorial. Even if you have no interest in Spring or Spring Boot, this tutorial remains useful. Simply ignore the Spring part of the tutorial and focus on the AWS S3 code. The AWS code is valid regardless of the type of Java program written and the Spring Boot code is minimal and should not be problematic.
And finally, you might question why this tutorial creates a Rest API as Amazon also exposes S3 functionality as a REST API, which we will explore in a later tutorial. Suspend disbelief and ignore that we are wrapping a Rest API in another Rest API. Here the focus is programmatically accessing the API using the Java SDK. The tutorial should prove useful even if you are a Java developer with no interest in Spring Boot.
The AWS Java 2.0 API Developers Guide is available here.
Prerequisites
Before attempting this tutorial on the AWS S3 Java API you should have a basic knowledge of the Amazon AWS S3 service. You need an AWS developer account. You can create a free account on Amazon here. For more information on creating an AWS account refer to Amazon’s website.
The Spring Boot version used in this tutorial is 2.0.5 while the AWS Java SDK version is 2.5.25. In this tutorial we use Eclipse and Maven, so you should have a rudimentary knowledge of using Maven with Eclipse. And we use Postman to make rest calls. But, provided you know how to build using Maven and know Rest fundamentals, you should be okay using your own toolset.
You must have an AWS development account.
Creating A Bucket – Console
Amazon continually improves the AWS console. For convenience, we create a user and bucket here; however, you should consult the AWS documentation if the console appears different than the images and steps presented. These images and steps are valid as of April 2019. For more information on creating a bucket and creating a user, refer to Amazon’s documentation.
Let’s create a bucket to use in this tutorial.
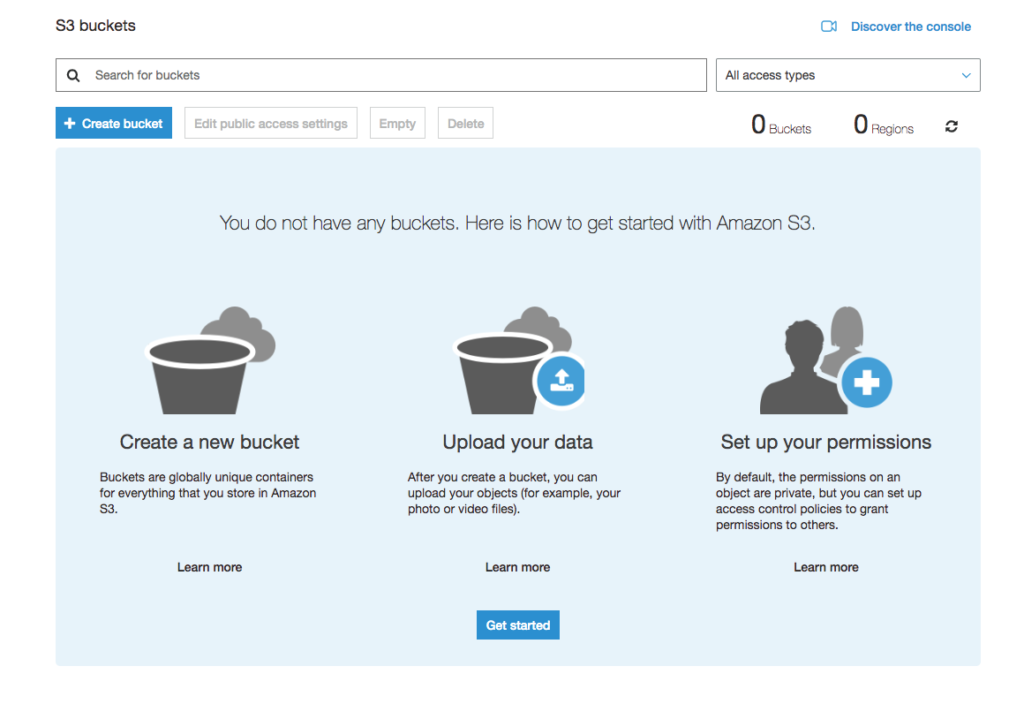
Log into your account and go to the S3 Console and create a new bucket.
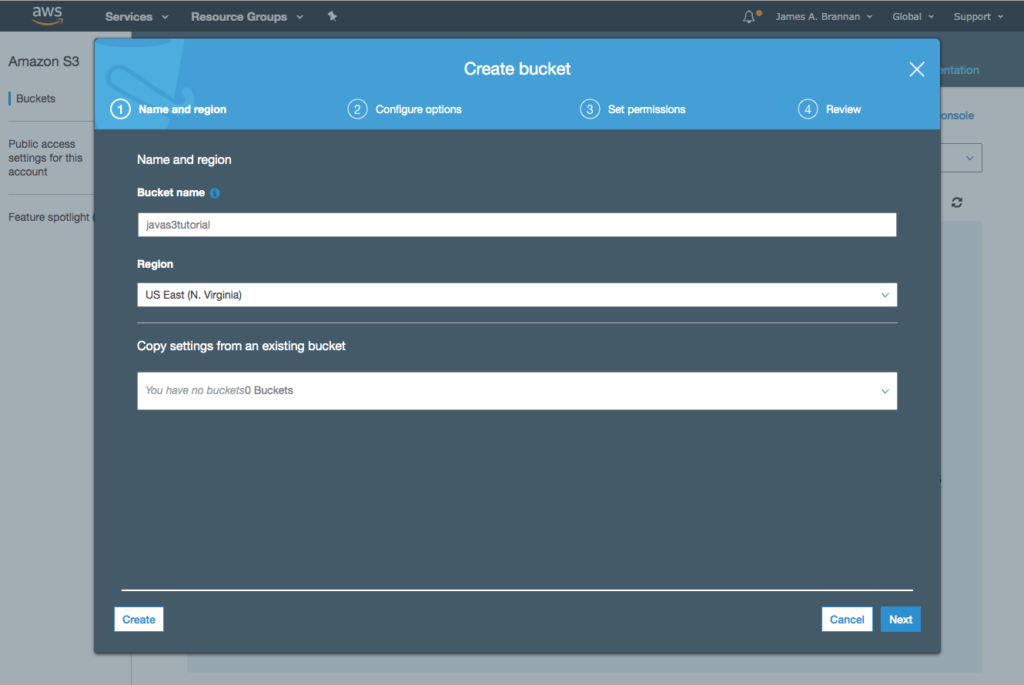
Name the bucket javas3tutorial* and assign it to your region. Here, as I am located in Frederick Maryland, I assigned it to the US East region (N. Virginia).
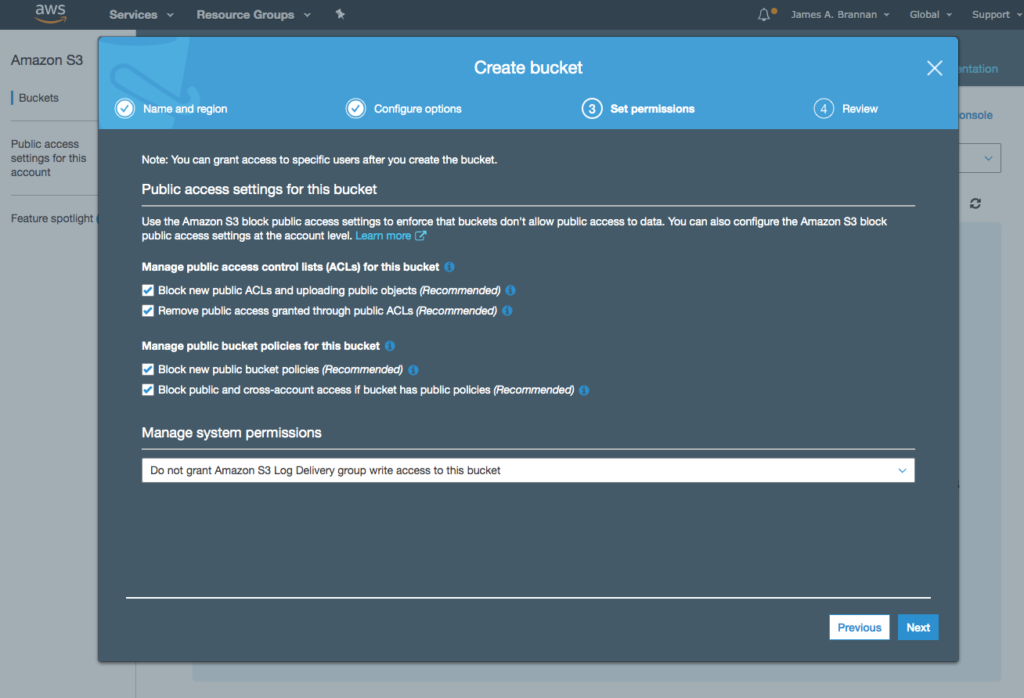
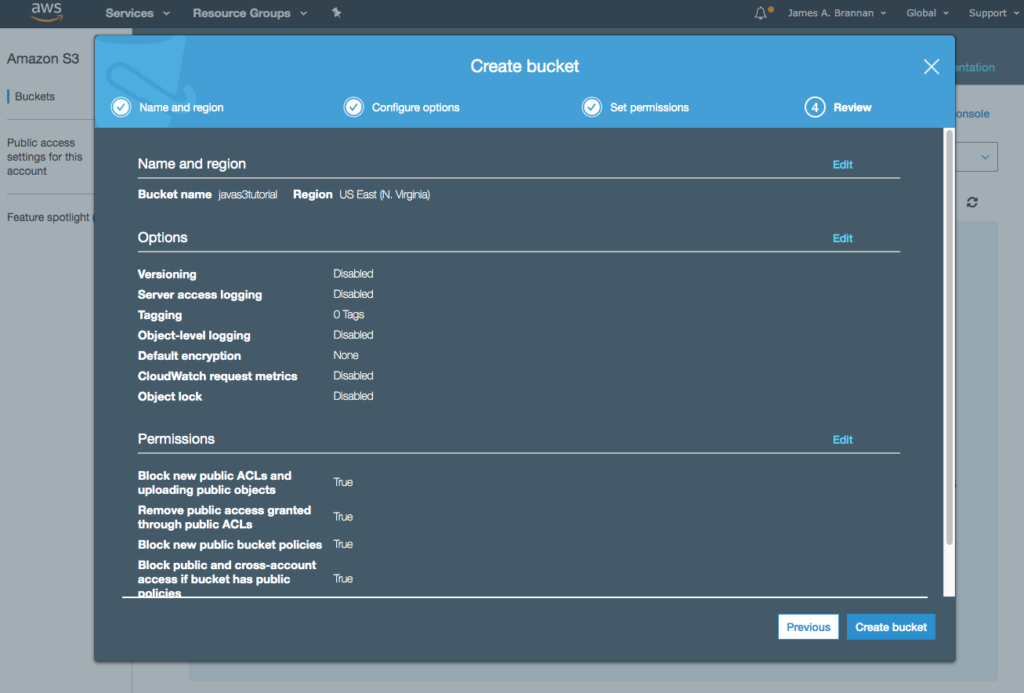
Accept the default values on the next two screens and click Create bucket to create the bucket.
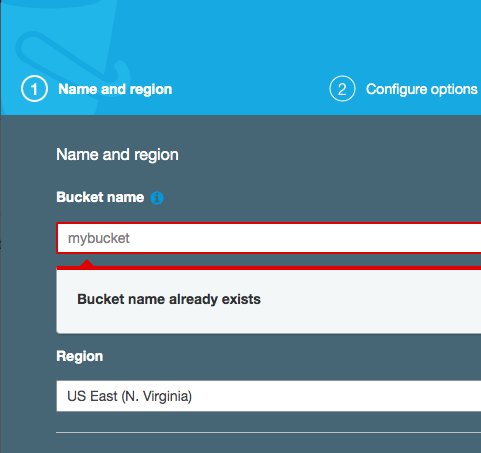
Note that in this tutorial I direct you to create buckets and objects of certain names. In actuality, create your own names. Bucket names must be globally unique, A name such as mybucket was used long ago.
Bucket names must be globally unique across all of S3.Click Create bucket to start creating a bucket.Assign bucket name and region.
Accept the defaults and click Next.Accept the defaults and click Next button.
Click Create bucket if options are correct.
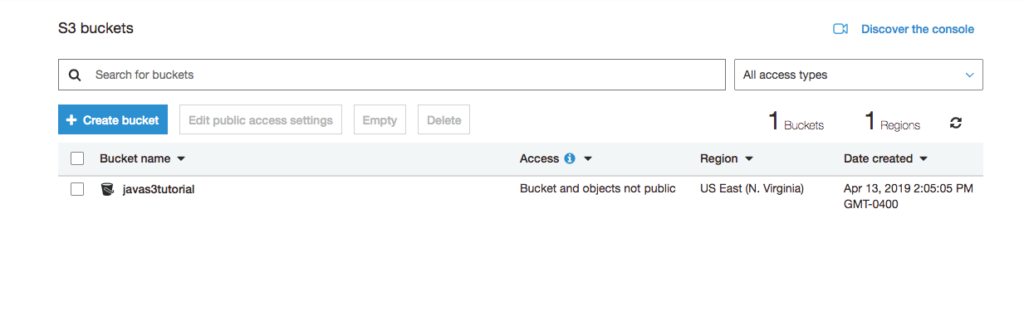
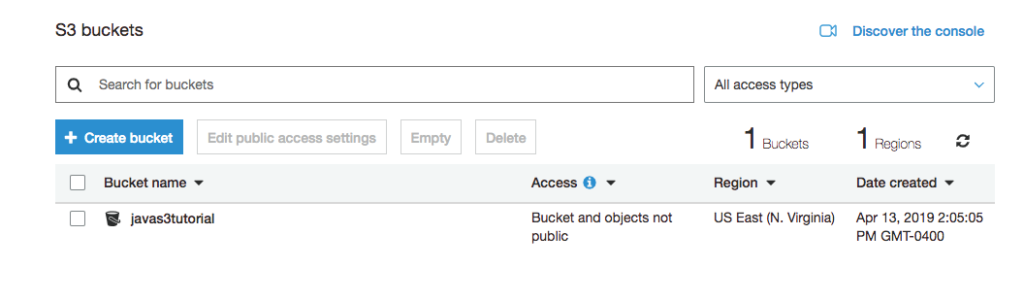
After creating the bucket you should see the bucket listed in your console. Now we must create a user to programmatically access S3 using the Java SDK.
The bucket appears in your S3 buckets screen.
Creating an S3 User – Console
As with creating a bucket, the instructions here are not intended as comprehensive. More detailed instructions are provided on the AWS website. To access S3 from the Java API we must create a user with programmatic access to the S3 Service. That user is then used by our program as the principal performing AWS tasks.
Navigate to the Identity and Access Management (IAM) panel.
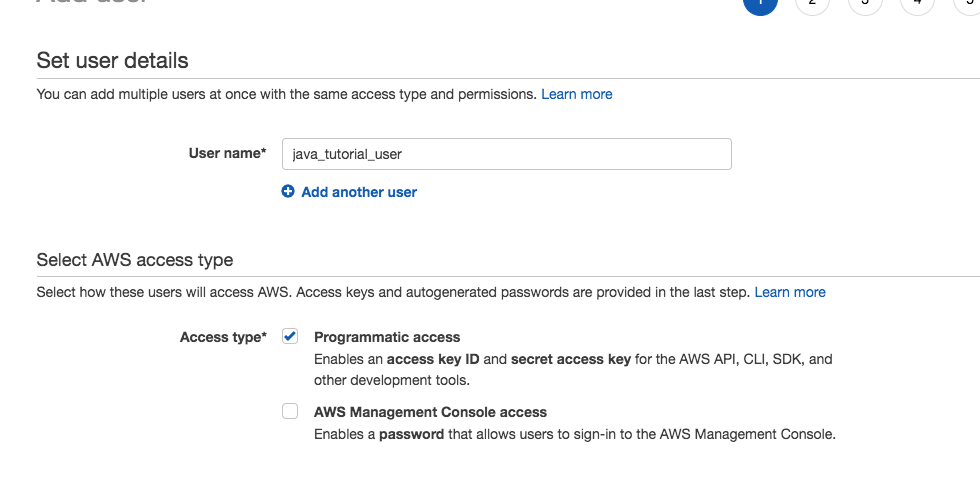
Click on Users and create a new user.
Provide the user with Programmatic access.
Creating a user with programmatic access.
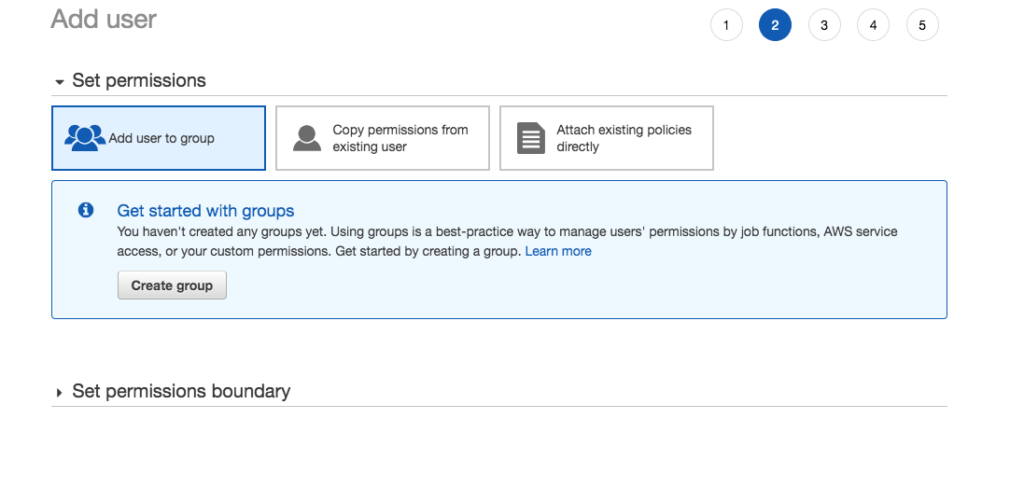
After creating the user, create a group.
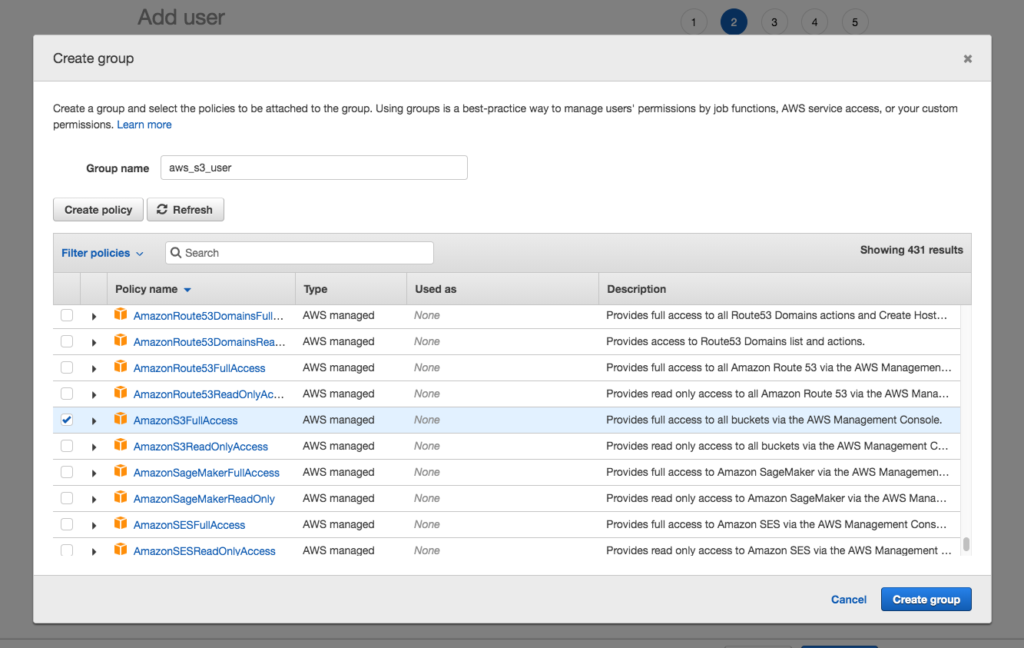
Create a group by clicking Create group.
Assign the AmazonS3FullAccess policy to the group.
Assigning AmazonS3FullAccess to a user.
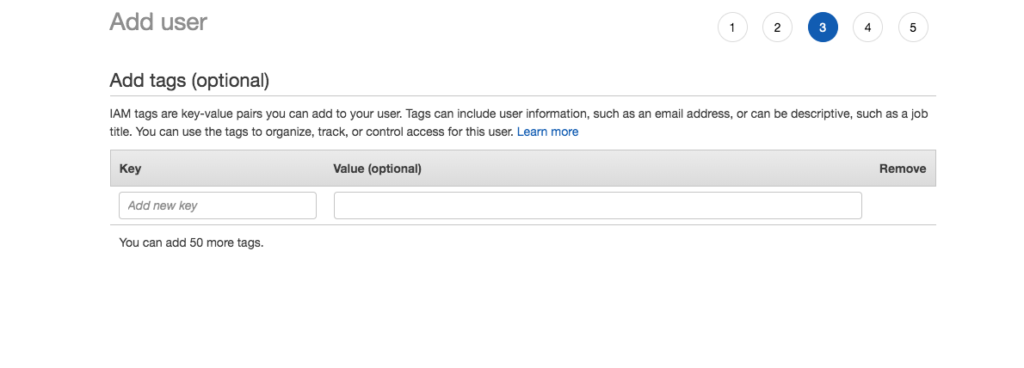
Navigate past create tags, accepting the default of no tags.
Accept default and do not assign tags.
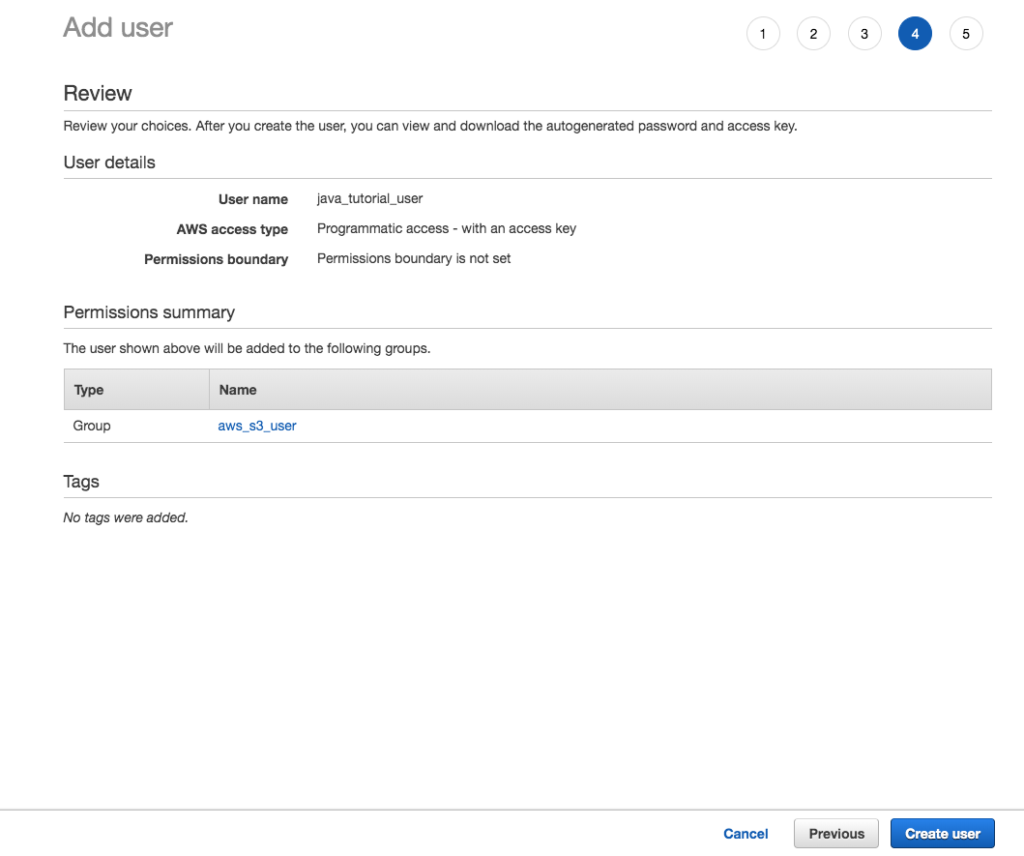
Review the user’s details and click Create user to create the user.
Review user settings and click Create user.
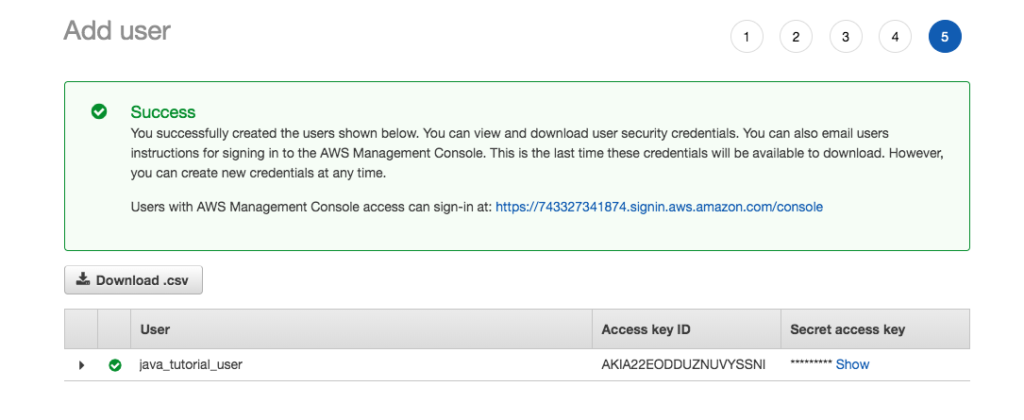
On the success screen note the Download .csv button. You must download the file and store in a safe place, otherwise you will be required to create new credentials for the user.
After creating user, click Download .csv to save the public and private keys.
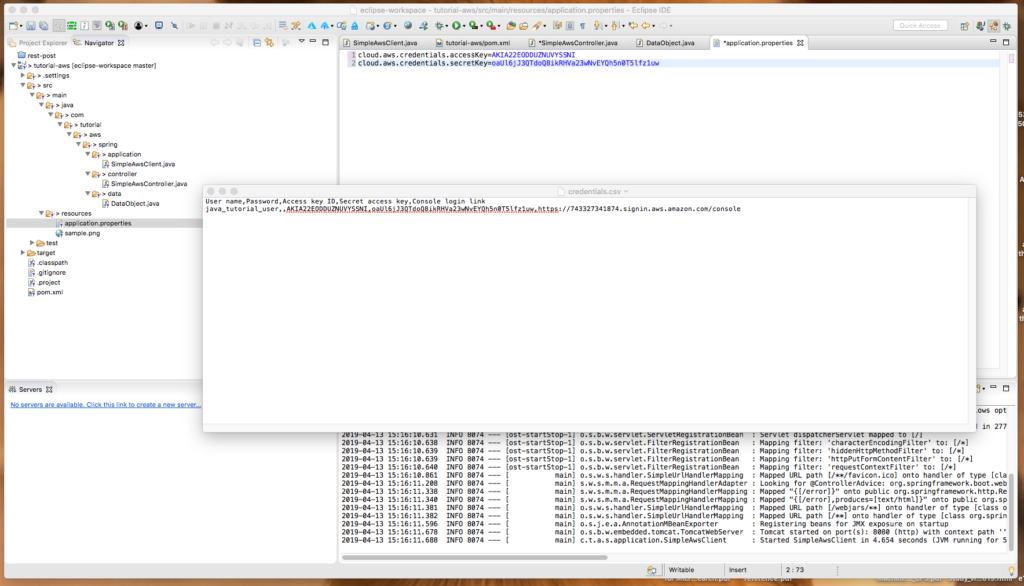
The content of the credentials.csv will appear something like the following. Keep this file guarded, as it contains the user’s secret key and provides full programatic access to your S3 account.
Note: I deleted this user and group prior to publishing this tutorial.
User name,Password,Access key ID,Secret access key,Console login link
java_tutorial_user,,XXXXXXXXXXX,oaUl6jJ3QTdoQ8ikRHVa23wNvEYQh5n0T5lfz1uw,https://xxxxxxxx.signin.aws.amazon.com/console
After creating the bucket and the user, we can now write our Java application.
Java Application – Spring Boot
We use Spring boot to demonstrate using the AWS Java SDK. If you are unfamiliar with Spring Boot, refer to this tutorial to get started with Spring Boot and Rest.
Project Setup
We setup the project as a Maven project in Eclipse.
Maven Pom
Add the Spring Boot dependencies to the pom file.
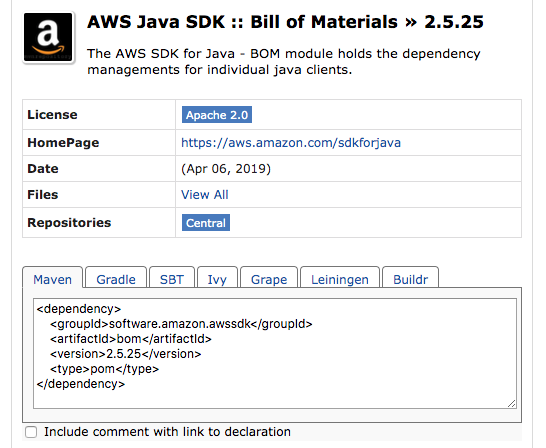
Add the AWS Maven Bill of Materials (BOM) to the pom file.
A BOM is a POM that manages the project dependencies. Using a BOM frees developers from worrying that a library’s dependencies are the correct version. You place a BOM dependency in a dependencyManagement, then when you define your project’s dependencies that are also in the BOM, you omit the version tag, as the BOM manages the version.
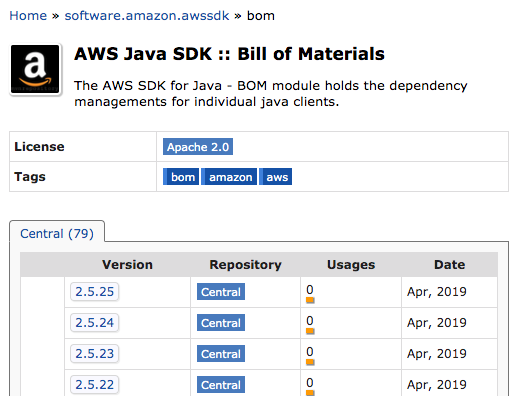
To better understand a BOM, navigate to the BOM and review its contents.
Click on the latest version (2.5.25 as of the tutorial).
The AWSSDK BOM.
Click on the View All link.
Summary of the AWS Java SDK Bill of Materials 2.25.
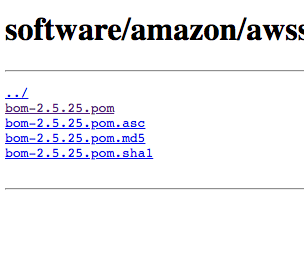
Click the link to the pom and the BOM appears. This is useful, as it lists the AWS modules.
The listing of BOM files. Click on the pom to view the xml pom definition.Snippet of the AWS SDK BOM contents.
Add the auth, aws–core, and s3artifacts to the pom. Note that we do not require specifying the version, as the BOM handles selecting the correct version for us.
After creating the POM you might want to try building the project to ensure the POM is correct and you setup the project correctly. After that, we need to add the AWS user credentials to your project.
AWS Credentials
When your application communicates with AWS, it must authenticate itself by sending a user’s credentials. The credentials consists of the access key and secret access key you saved when creating the user. There are several ways you might provide these credentials to the SDK, for example, you can put the credentials file in a users home directory, as follows, and they will be automatically detected and used by your application.
~/.aws/credentials
C:\Users\<username>\.aws\credentials
For more information on the alternative ways of setting an application’s user credentials, refer to the Developer’s Guide. But here we are going to manually load the credentials from the Spring boot application.properties file
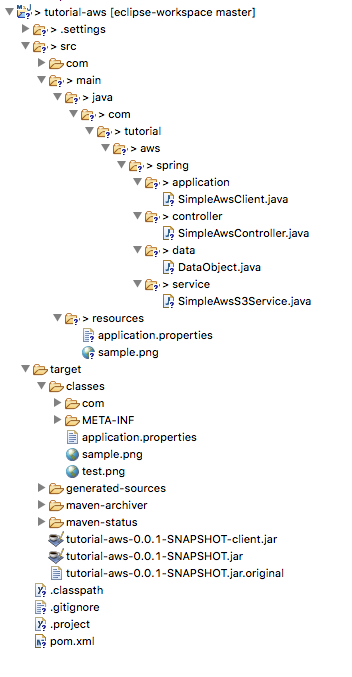
If you did not start with a bare-bones Spring Boot project, create a new folder named resources and create an application.properties file in this folder.
Refer to the credential file you saved and create the following two properties and assign the relevant values. Of course, replace the values with the values you downloaded when creating a programatic user.
Add the two properties to the application.properties file.
Add a small binary file to the resources folder. For example, here we use sample.png, a small image file.
Spring Boot Application
Now that we have the project structure, we can create the Spring Application to demonstrate working with the AWS S3 Java API.
Create the com.tutorial.spring.application, com.tutorial.spring.controller, com.tutorial.spring.data, and the com.tutorial.spring.service packages.
Create a new Spring application class named SimpleAwsClient in the application package.
package com.tutorial.aws.spring.application;

import org.springframework.boot.SpringApplication;
import org.springframework.boot.autoconfigure.SpringBootApplication;
import org.springframework.context.annotation.ComponentScan;

@SpringBootApplication
@ComponentScan({ "com.tutorial.aws.spring" })
public class SimpleAwsClient {
  public static void main(String[] args) {
    SpringApplication.run(SimpleAwsClient.class, args);
  }
}
Data Object (POJO)
Create a simple data object named DataObject in the data package.
Add the variablename and create the getter and setter for this property.
package com.tutorial.aws.spring.data;

public class DataObject {

	String name;

	public String getName() {
		return name;
	}

	public void setName(String name) {
		this.name = name;
	}
}
Ensure the program compiles.
We now have the project’s structure and can work with S3 using the SDK.
Writing Objects to S3
We implement the example application as a Spring Boot Rest application. The standard architecture of this application consists of a Controller, a Service, and a data access layer. In this tutorial there is no need for a data access layer, and so the application consists of a controller and service. Begin by creating a Service class that interacts with the AWS SDK.
Service
Create a new class named SimpleAwsS3Service and annotate it with the @Service annotation.
Create the key and secretKey properties and populate them from the application.properties file.
Add an S3Client as a private variable.
Create a method named initialize and annotate it with the @PostContstruct annotation.
Create a method named uploadFile that takes a DataObject and writes the file to S3.
There are many concepts in the preceding code. Let’s examine each in turn.
Builder Pattern and Fluent Interface
The fluent interface is a term created by Martin Fowler and Eric Evans. It refers to a programming style where the public methods (the API) can be chained together to perform a task. It is used by the AWS S3 Java API 2.x when using builders. The builder tasks perform tasks but then return an instance of the builder. This allows chaining methods together. For more information on the fluid interface and builders, refer to this blog post: Another builder pattern for Java.
AwsBasicCredentials
The AwsBasicCredentials class implements the AwsCredentials Interface and takes a key and secret key. These credentials are then used by an S3Client to securely authenticate to AWS.
In a production application, you should use Amazon’s Security Token Service to get temporary credentials to access AWS services. Refer to the AWS documentation: Getting Temporary Credentials with AWS STS.
S3Client
The S3Client class is a client for accessing AWS. As with most the API, it uses a builder to construct itself. The builder uses the credentials and region to create the S3Client. The S3Client is then used for all communication between a client application and AWS.
PutObjectRequestR
The PutObjectRequest is for uploading objects to S3. You create and configure the class using its associated builder, PutObjectRequest.Builder interface. We provide the bucket name, the object name, and although not required, we pass an access control list specifying the public has read access of the resource.
The ObjectCannedACL provides, well, a pre-canned access control list. Valid values are:
AUTHENTICATED_READ, AWS_EXEC_READ, BUCKET_OWNER_FULL_CONTROL, BUCKET_OWNER_READ, PRIVATE, PUBLIC_READ, PUBLIC_READ_WRITE, and UNKNOWN_TO_SDK_VERSION.
The S3Client then uses the PutObjectRequest to upload the object to S3.
Running The Program
Compile, and run the Spring Application.
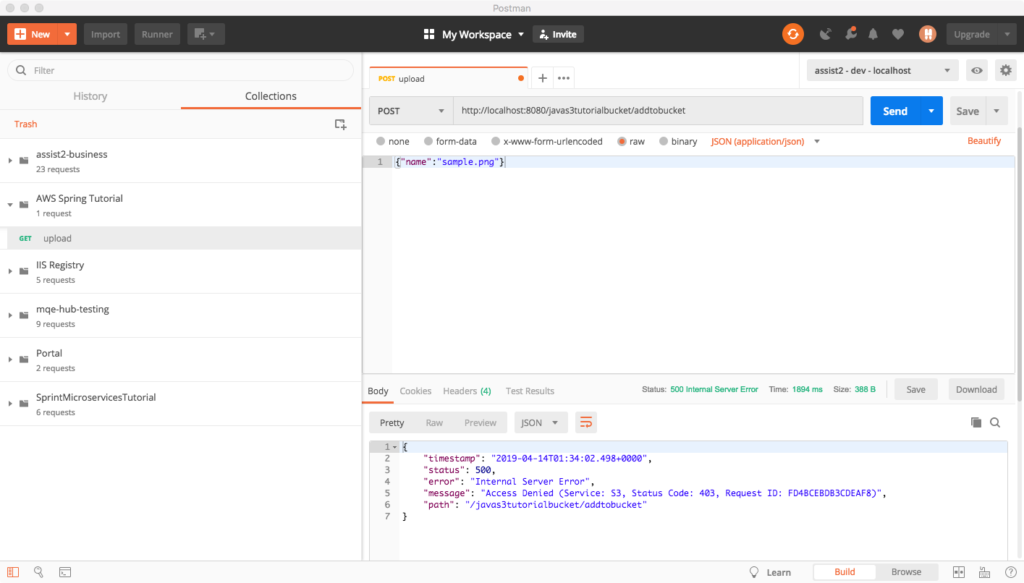
Send the request using Postman or curl and note the error response. S3 denied access.
Uploading the object fails with an Access Denied error.
The failure is because of the ACL we attempted to set. We wished to grant public read access. But, when creating the bucket, we failed to allow for this. We need to return to the bucket configuration and explicitly allow public access.
By default public access is denied.
Object Visibility
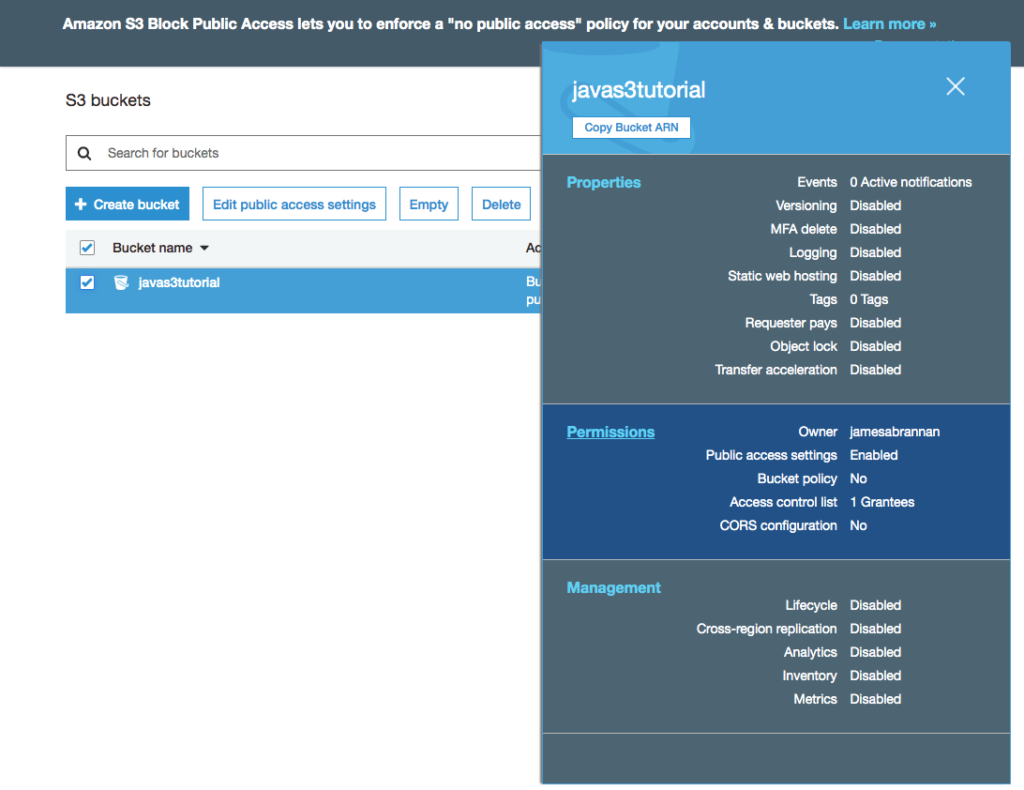
Sign into the AWS Console and navigate to the bucket. Note that neither the bucket nor the objects are public.
Click on the bucket and the following popup should appear.
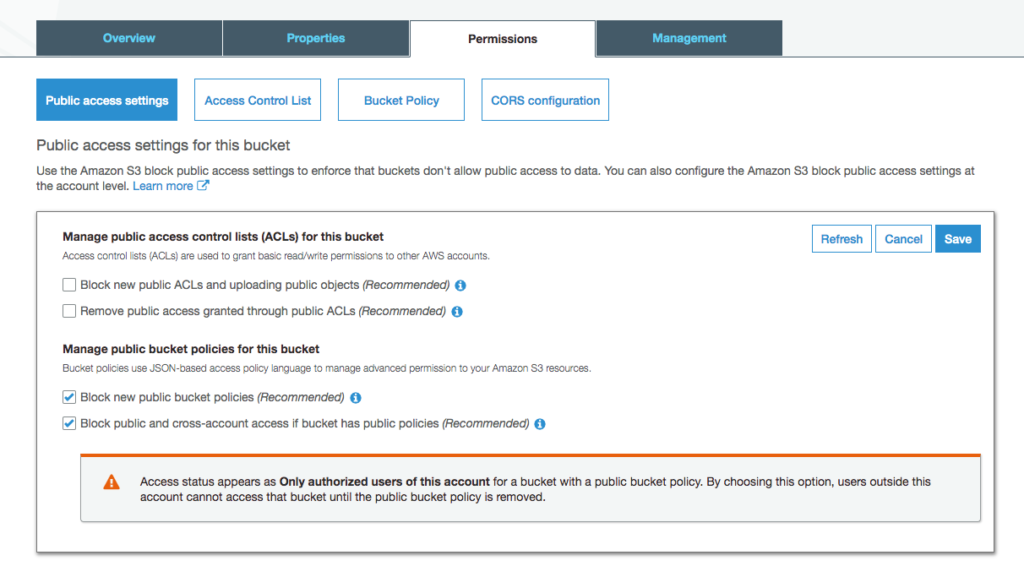
Click on the Permissions link.
Un-check the two checkboxes under the Manage public access… heading. By unchecking them we are allowing new ACLs and uploading public objects.
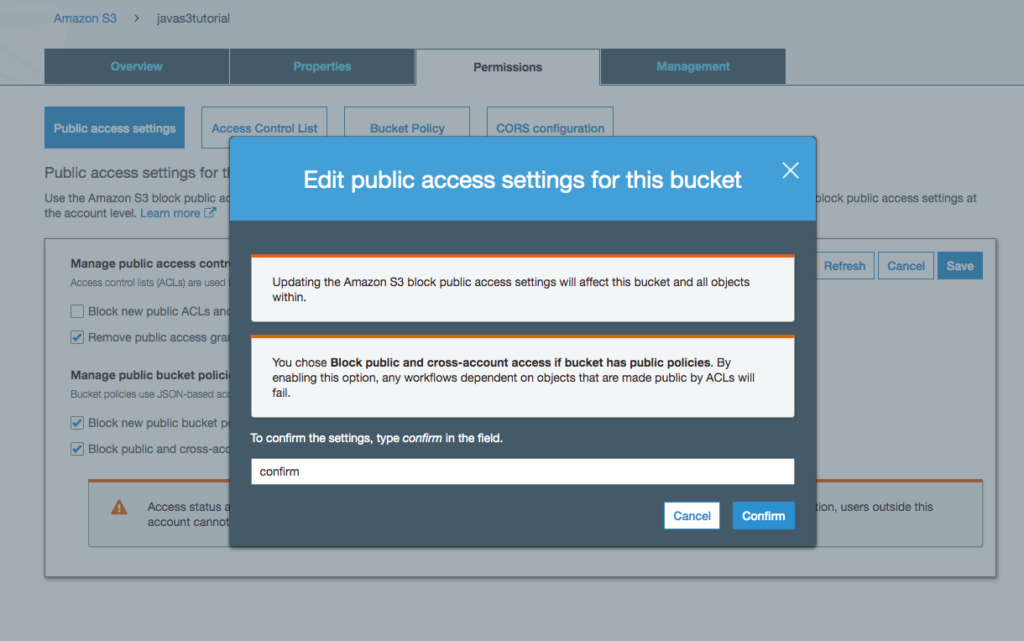
A new popup appears just to be sure that we wish to do this. What this is telling you, of course, is this is generally not a good idea unless you truly wish making the objects in a bucket public.
Type confirm and click the Confirm button.
Return to Postman and try again. Postman should receive a 200 Success HTTP Code.
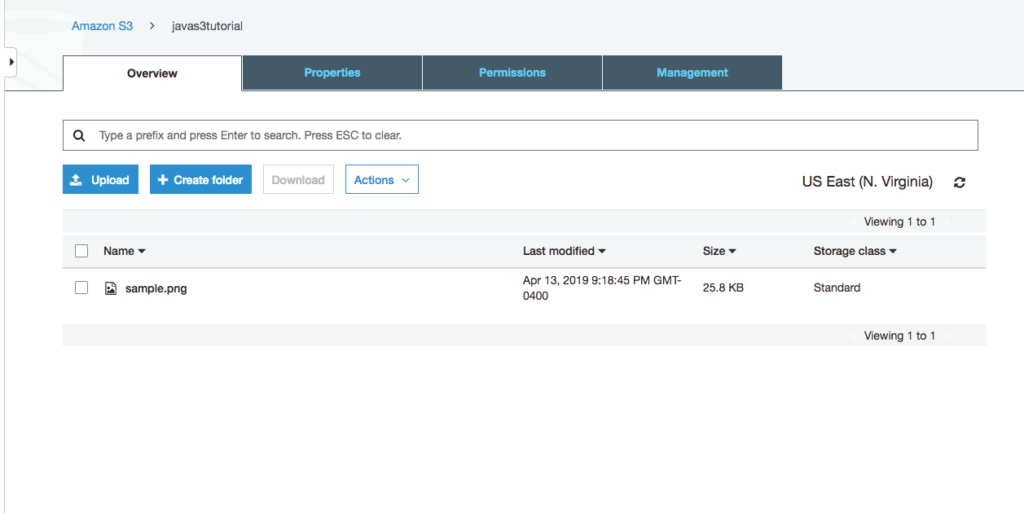
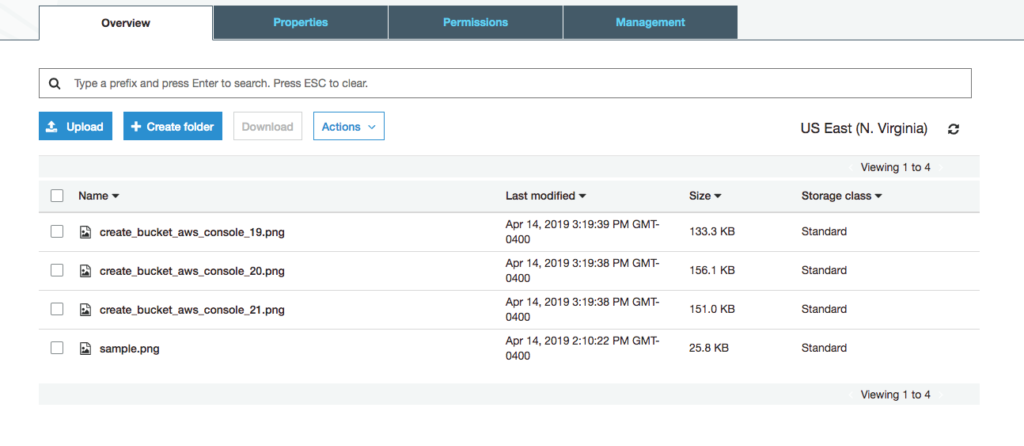
Refresh the bucket screen in AWS and the file should appear.
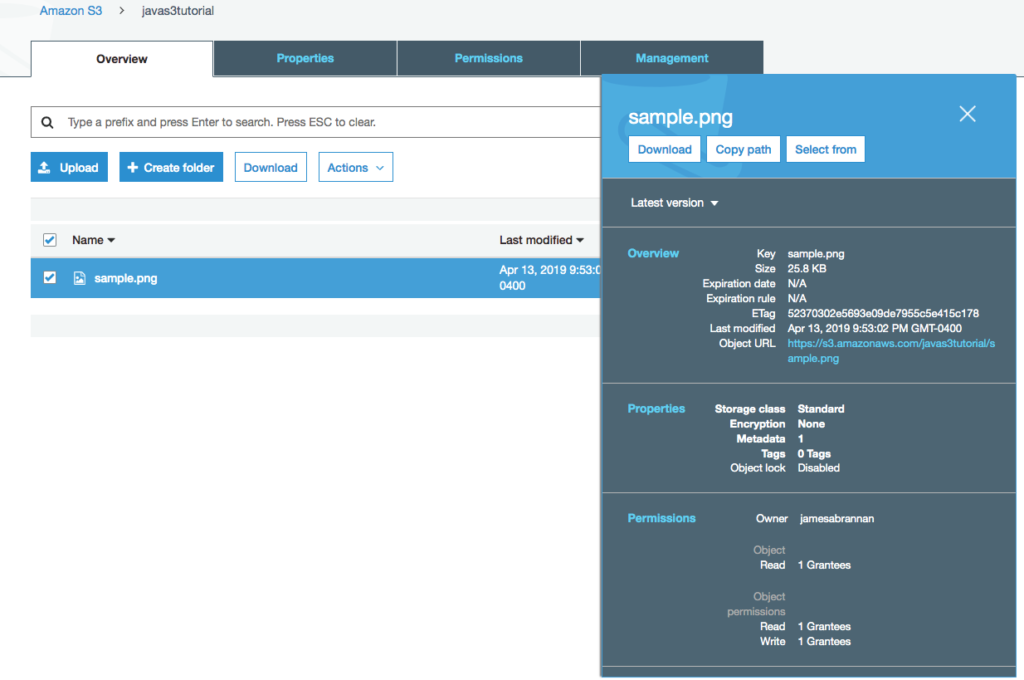
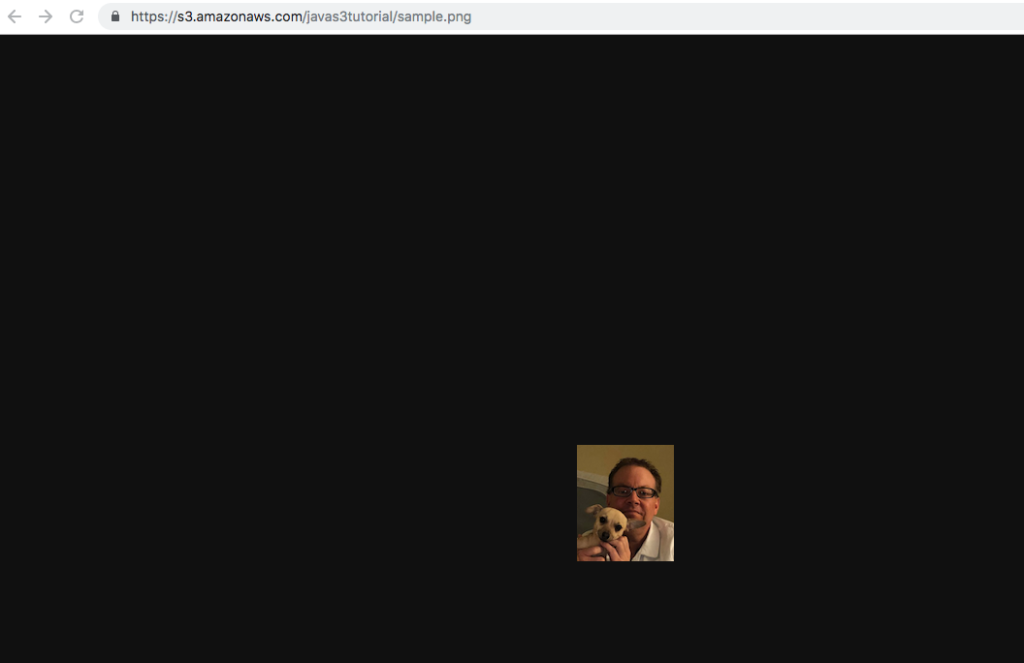
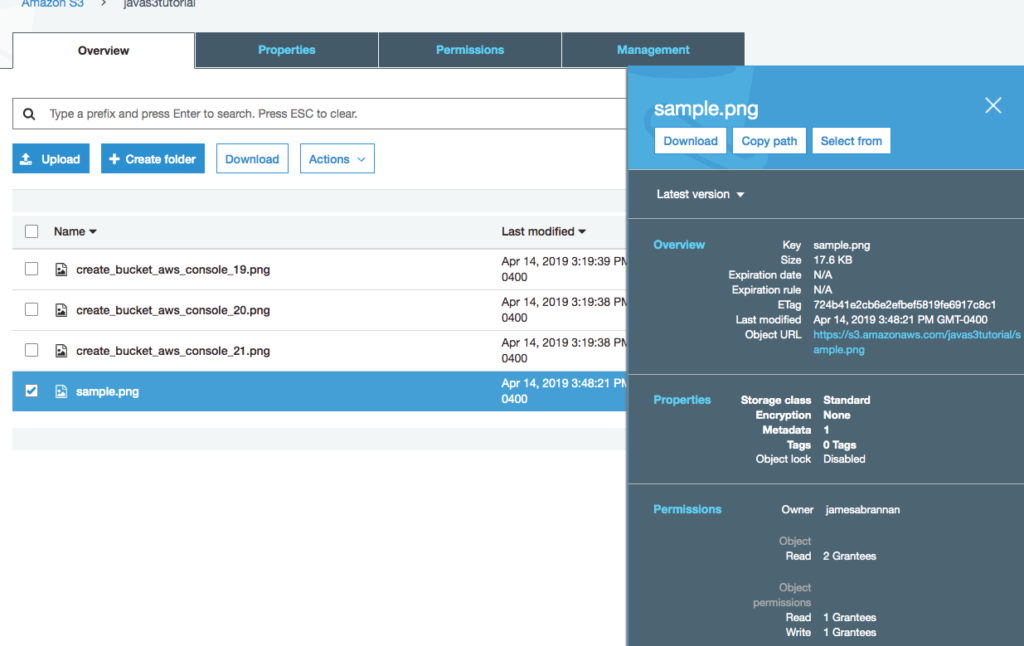
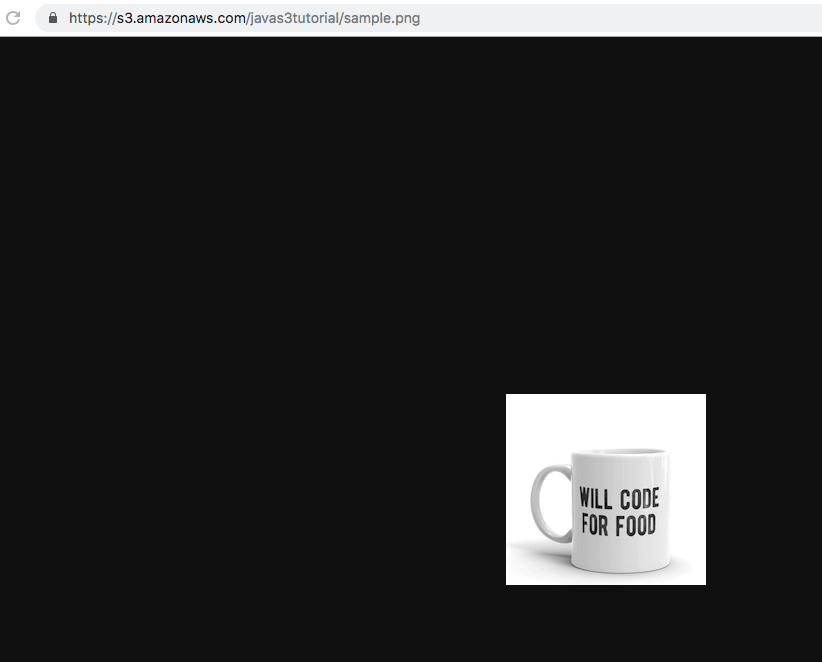
Click on the file and in the resulting popup, click on the object’s URL and the object should load in a browser. If not, copy and paste the url into a browser.
Downloading Objects On S3
Downloading an object involves creating a GetObjectRequest and then passing it to an S3Client to obtain the object. Here we download it directly to a file, although note you can work with the object as it is downloading.
Service
Implement the downloadFile method as follows in the SimpleAwsService class.
Create a GetObjectRequest, get the classpath to the resources folder, and then use s3Client to download sample.png and save it as test.png.
The builder uses the bucket name and the object key to build a GetObjectRequest. We then use the S3Client to get the object, downloading it directly to the file path passed.
Rest Controller
Implement the fetchobject endpoint in the SimpleAwsController class.
@GetMapping("/fetchobject/{filename}")
public void fetchObject(@PathVariable String filename) throws Exception {
  DataObject dataObject = new DataObject();
  dataObject.setName(filename);
  this.simpleAwsS3Service.downloadFile(dataObject);
}
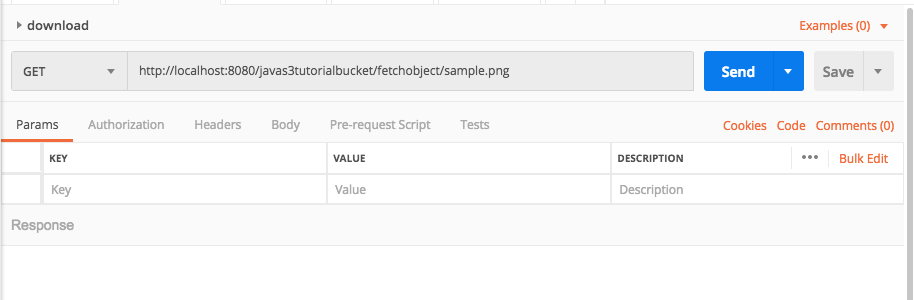
Running the Program
Create a request in Postman (or curl) and fetch the file.
Navigate to the resources folder in the project target folder and you should see the downloaded file.
Listing Objects On S3
The steps to list files in a bucket should prove familiar by now: use a builder to build a request object, which is passed to the S3Client which uses the request to interact with AWS. However, here we work with the response as well.
Add Files
Navigate to the bucket on the AWS console.
Upload a few files to the bucket.
Service
Modify SimpleAwsService to implement a method named listObjects that returns a list of strings.
Create a ListObjectsRequest and have the s3Client use the request to fetch the objects.
We first use a builder to create a ListObjectsRequest. The S3Client then requests the list of objects in the bucket and returns a ListObjectResponse. We then iterate through each object in the response and put the key in an ArrayList.
Rest Controller
Modify SimpleAwsController to implement the listObjects method.
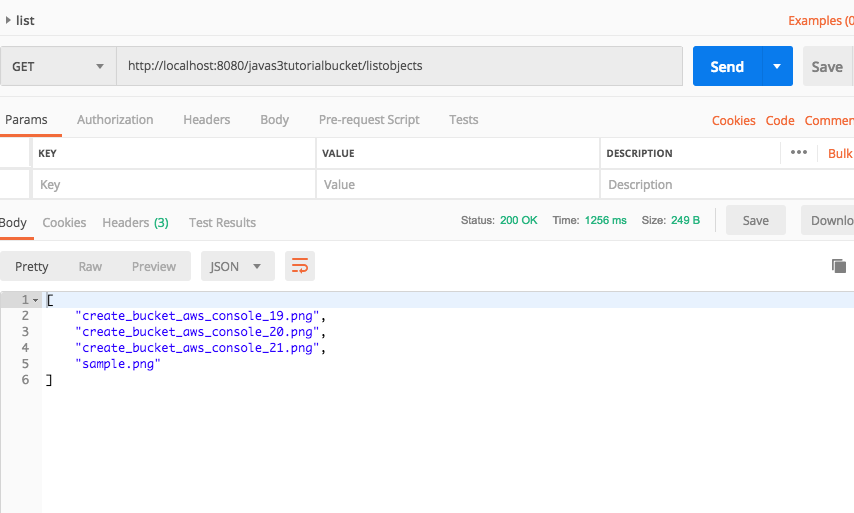
@GetMapping("/listobjects")
public List<String> listObjects() throws Exception {
  return this.simpleAwsS3Service.listObjects();
}
Running the Program
Create a new request in Postman and list the objects in the bucket.
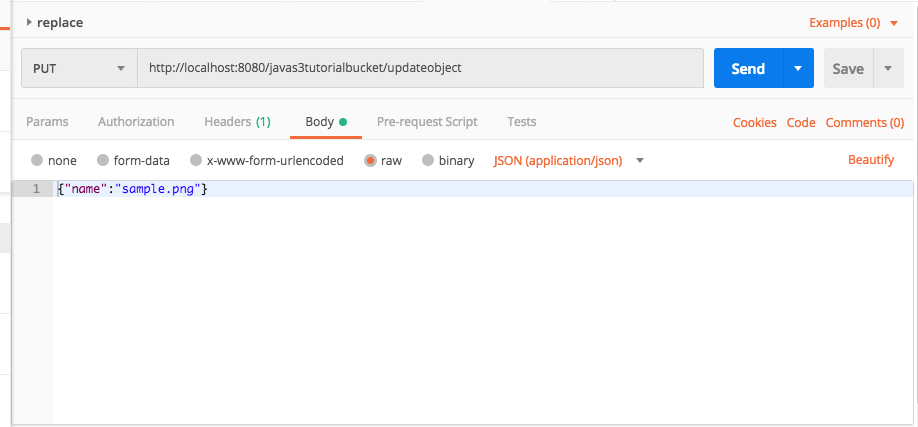
Modifying Objects
Technically speaking, you cannot modify an object in an S3 bucket. You can replace the object with a new object, and that is what we do here.
Replace the file used in your project with a different file. For instance, I changed sample.png with a different png file. Now sample.png in the project differs from the sample.png file in the AWS bucket.
Rest Controller
Modify the SimpleAwsController class so that the uploadObject method calls the uploadFile method in the SimpleAwsService class.
Modify the SimpleAwsController to implement the deleteObject method.
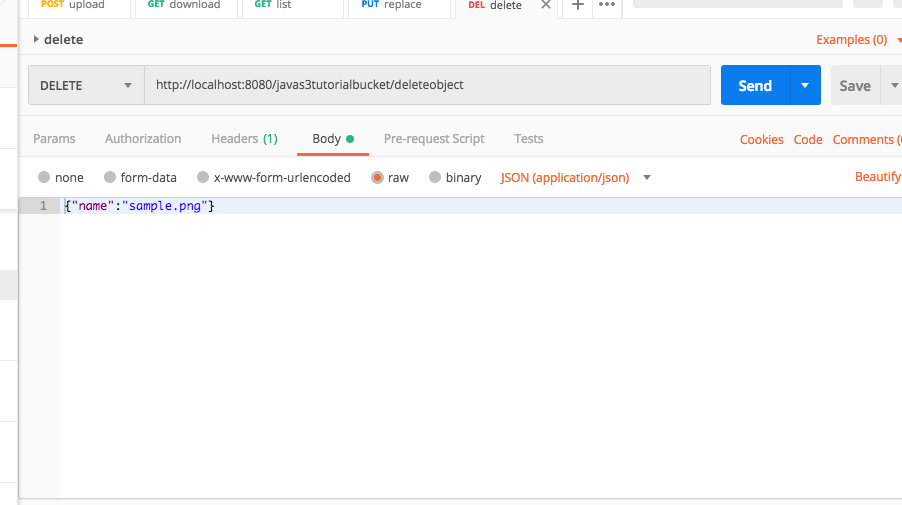
@DeleteMapping("/deleteobject")
public void deleteObject(@RequestBody DataObject dataObject) {
  this.simpleAwsS3Service.deleteFile(dataObject);
}
Running The Application
Compile the program and create a DELETE request in Postman and delete the object.
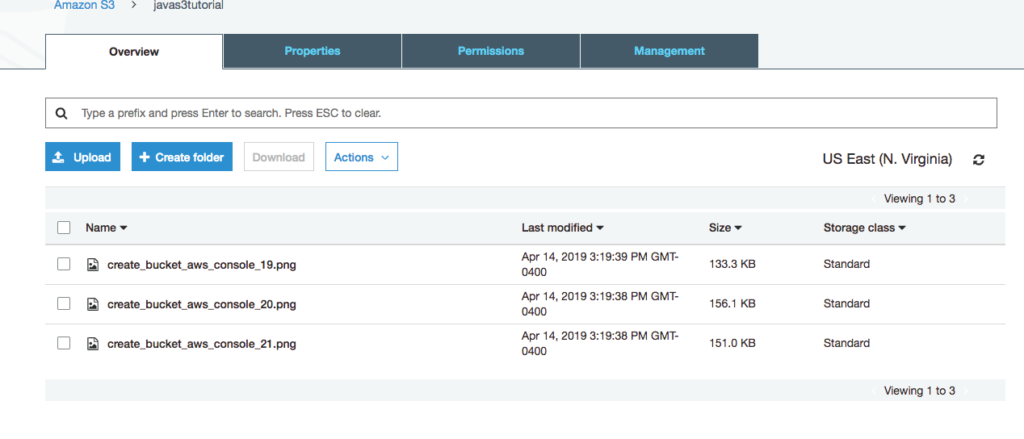
Navigate to the bucket on the AWS Console and the object should no longer exist.
Buckets
By this point, if you worked through the tutorial, you should be able to guess the workflow and relevant classes needed for creating, listing, and deleting buckets. The CreateBucketRequest, ListBucketRequest, and DeleteBucketRequest are the relevant request classes and each request has a corresponding builder to build the request. The S3Client then uses the request to perform the desired action. Let’s examine each in turn.
Creating Buckets
Creating a bucket consists of creating a CreateBucketRequest using a builder. Because bucket names must be globally unique, we append the current milliseconds to the bucket name to ensure it is unique.
Service
Create a method named addBucket to the AwsSimpleService class.
Create a createBucket method in AwsSimpleRestController with a /addbucket mapping.
@PostMapping("/addbucket")
public DataObject createBucket(@RequestBody DataObject dataObject) {
  return this.simpleAwsS3Service.addBucket(dataObject);
}
Listing Buckets
Listing buckets follows the same pattern as listing objects. Build a ListBucketsRequest, pass that to the S3Client, and then get the bucket names by iterating over the ListBucketsResponse.
Service
Create a new method called listBuckets that returns a list of strings to SimpleAwsService.
The listBucketsResponse contains a List of Bucket objects. A Bucket has a name method that returns the bucket’s name.
Rest Controller
Add a /listbuckets endpoint to SimpleAwsController.
@GetMapping("/listbuckets")
public List<String> listBuckets() {
  return this.simpleAwsS3Service.listBuckets();
}
Deleting Buckets
Before you can delete a bucket you must delete it’s contents. Here we assume non-versioned resources. Now, you might be tempted to try the following, but consider the scalability.
for each item in bucket delete.
This is fine for a few objects in a sample project like in this tutorial, but it will quickly prove untenable, as the program will block as it makes the http connection to the S3 storage, deletes the object, and returns success. It could quickly go from minutes, to hours, to years, to decades, depending upon the number of objects stored. Remember, each call is making an HTTP request to an AWS server over the Internet.
Of course, Amazon thought of this, and provides a means of deleting multiple objects at once. The following code will not win any elegance awards for its iteration style, but it demonstrates a scalable way to delete buckets containing many objects.
Service
Add a method called deleteBucket that takes a bucket’s name as a String.
Get the keys of the objects in the bucket and iterate over the keys.
With each iteration, build an ObjectIdentifier and add it to an array of identifiers.
Every thousand keys, delete the objects from the bucket.
After iterating over all the keys, delete any remaining objects.
Add a deletebucket endpoint to the SimpleAwsController.
@DeleteMapping("/deletebucket")
public void deleteBucket(@RequestBody DataObject dataObject) {
  this.simpleAwsS3Service.deleteBucket(dataObject.getName());
}
Conclusions
In this tutorial on the AWS S3 Java API we worked with objects and buckets in S3. We created an object, listed objects, downloaded an object, and deleted an object. We also created a bucket, listed buckets, and deleted a bucket. Although we used Spring Boot to implement the sample application, the ASW Java code remains relevant for other Java application types.
We did not upload an object using multiple parts. For a good example on accomplishing this task, refer to the SDK Developer Guide’s sample S3 code. Also, we assumed no versioning to keep the tutorial simple. If you must support versioning then consult the documentation.
The AWS S3 Java API wraps Amazon’s S3 Rest API with convenience classes. Here you used those classes to work with objects and buckets. In a future tutorial we will work with the Rest API directly.