Introduction
In this tutorial we use the Amazon Web Services Java 2 Application Programming Interface (API) to create a Rest application using Spring Boot that reads and writes to a DynamoDB database. This tutorial assumes AWS familiarity, Java programming experience, and Spring Boot experience. However, even without this experience, this tutorial should still prove useful, as it provides considerable supplementary resources for you to review. If you want to learn the AWS DynamoDB Java API then this tutorial is for you.
Here we create a simple database consisting of “observation stations” and “observations” gathered via a camera. Whatever…suspend disbelief and just go with it. Now, suppose, the stations require a means of uploading observations to an associated DynamoDB table. We decide upon a Rest API for stations to upload data. We implement this API using a Spring Boot Rest application. Again, if this all sounds suspect, suspend disbelief and focus on the AWS code and not the application design.
In this tutorial we,
- create two database tables using the DynamoDB console,
- create a couple items using the console,
- create an IAM programatic user,
- create a Spring Boot application that provides Rest endpoints so a client application can,
- write an observation,
- read an observation,
- update an observation,
- delete an observation,
- batch write multiple observations,
- conditionally query for a station’s observations,
- and conditionally update observations,
- and test the Rest endpoints using Postman.
This tutorial’s purpose is to explore the DynamoDB, not introduce Spring Boot, Rest, or JSON and assumes basic knowledge of all three. However, if new to any of these topics, links are provided to learn them before continuing.
NoSQL Databases
DynamoDB is a key-value and document NoSQL database. If unfamiliar with NoSQL Document databases, you should familiarize yourself before continuing. The following is an introductory video introducing NoSQL Databases.
The following are two good written introductory articles covering NoSQL and DynamoDB.
Note that Amazon also offers DocumentDB, which we could use as an alternative to DynamoDB. However, DocumentDB will be covered in a different tutorial.
A DynamoDB database can be described as the following. Tables consist of items. An item has one or more attributes. In a table you define the partition key and optionally define a sort key. The partition key is a key-value pair that not only uniquely identifies an item, it determines how the item is distributed on a computer’s storage. A sort key not only logically sorts items, it stores the items accordingly. Obviously, there is more to NoSQL physical storage and how it achieves its scalability, but that is beyond this tutorial’s scope.
Amazon Web Services & DynamoDB
Amazon DynamoDB is a NoSQL key-value and document database offered as a cloud service. It is fully managed and allows users to avoid the administrative tasks associated with hosting an enterprise database. As with almost all Amazon’s offerings, it is accessible via a Rest API.
Amazon offers software development kits (SDKs) to simplify working with the Rest API. The languages offered are Java, C++, C#, Ruby, Python, JavaScript, NodeJs, PHP, Objective-C, and Go. In this article we use the Java API. There are currently two versions of the API, in this tutorial we use the Java 2 SDK.
The Java 2 AWS SDK is a rewrite of the Java 1.1 AWS SDK and changes from a more traditional programming paradigm of instantiating objects using constructors and then setting properties using setters to a fluent interface/builder programming style.
Fluent Interface
The fluent interface is a term created by Martin Fowler and Eric Evans. It refers to an programming style where the public methods (the API) can be chained together to perform a task. It is used by the AWS Java SDK 2.0 when using builders. The builder tasks perform tasks but then return an instance of the builder. This allows chaining methods together. For more information on the fluid interface and builders, refer to this blog post: Another builder pattern for Java.
DynamoDB Low-Level API
As with all AWS APIs, DynamoDB is exposed via Rest endpoints. The AWS SDKs provide an abstraction layer freeing you from calling Rest directly. Above that layer, the Java SDK provides a class named DynamoDBMapper that allows working with DynamoDB similarly to the Java Persistence Framework (JPA). Although useful, using the lower-level API is not that difficult. Moreover, there are many situations where you would not wish to create a dependency in your object model that relies on DynamoDB.
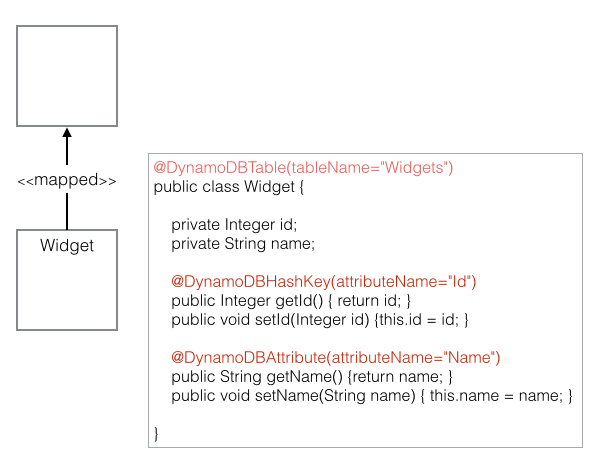
For example, suppose we implemented a system that stored widgets in DynamoDB. If using the DynamoDBMapper, the Widget model class would be dependent upon DynamoDB via annotations mapping the class to the Widgets table.
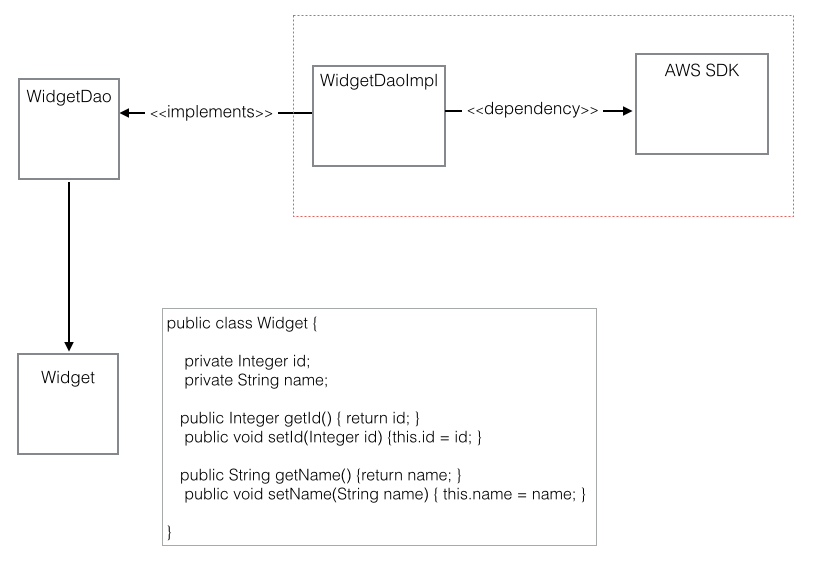
Alternatively, if we do not wish to use the DynamoDBMapper we can implement something similar to the following diagram. It is a typical DAO pattern, where the only direct dependency upon the AWS SDK is the WidgetDaoImpl class. For more information on the DAO design pattern, refer to the following introductory article: DAO Design Pattern.
In this tutorial on the AWS DynamoDB Java APl, we use the SDKs direct calls to the underlying DynamoDB Rest endpoints. As an aside, note that we do not use the DAO design pattern, instead putting the data access logic directly in the controller class for brevity. We do, however, use the Spring MVC design pattern using Rest.
- For more details on the DynamoDB low-level API refer to the DynamoDB Low-Level API documentation in the Amazon DynamoDB Developer Guide.
- For more information on Spring MVC using Rest refer to Spring Controller – Spring MVC Controller.
- Note: If willing to make your application dependent upon DynamoDBMapper, you should consider using it, as it greatly simplifies working with DynamoDB.
- Java: DynamoDBMapper documentation
Tutorial Use-Case – Station Observations
Imagine we have stations responsible for taking photo observations. A station has a coordinate, address, and a name. A station has one Coordinate. A station has one address. A station can have unlimited observations.
Although this tutorial does not discuss NoSQL database design, from the diagram below it seems reasonable we need two tables, Station and Observation. Moreover, as the Observation table is very write intensive – stations will be sending observations to the application on a continuous basis – it makes sense to not include observations as a collection within a Station instance but keep it as a separate table. Remember, these are JSON documents, not relational tables. It is unreasonable to design Observations as a list of items within a Station and would lead to an excessively large and unwieldy database.
If there were enough Stations, for even more efficiency we might create a separate table for each station’s observations. This would allow greater throughput for both writing and reading observations. But, in this tutorial we simply define a stationid to identify an observation’s station and will create an index on this value.

DynamoDB Console
The AWS Management Console provides an easy web-based way of working with Amazon’s cloud services. Although not covered in this tutorial, for those new to AWS, here is a short video by Amazon explaining the Management Console. Note that AWS also offers a command-line interface and Application Programming Interfaces (APIs) for accessing its cloud services.
- AWS Essentials: How to Navigate the AWS Console by LinuxAcademy.
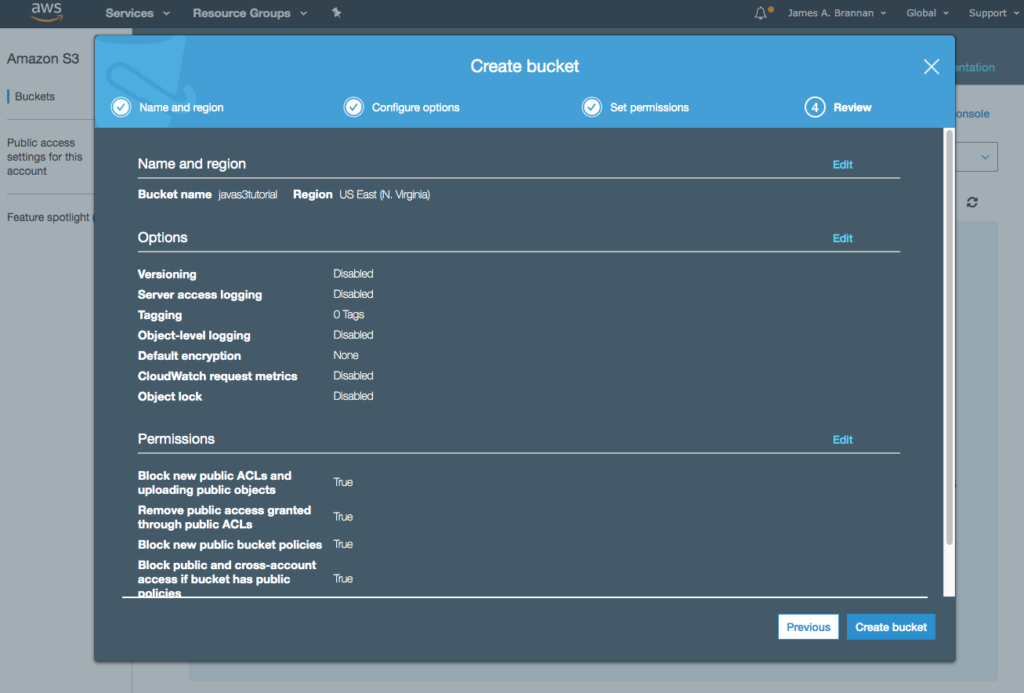
Before beginning the programming portion of this tutorial we must create the DynamoDB database.
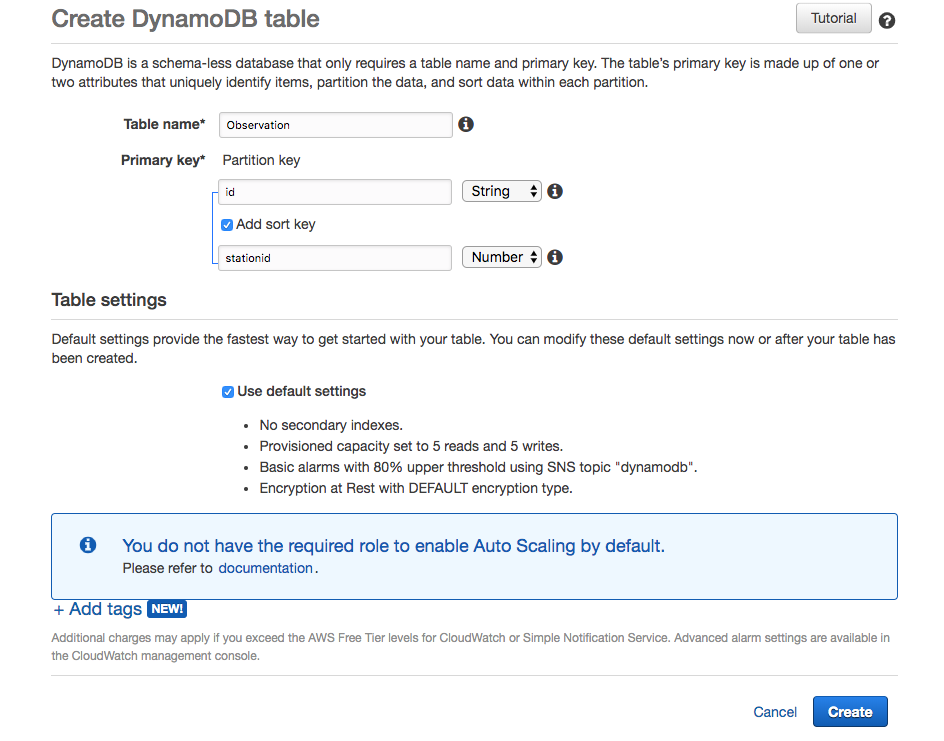
Create Station Table
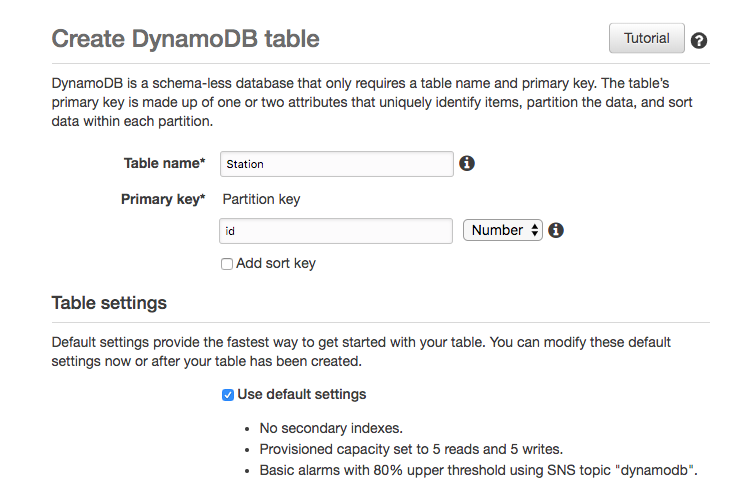
- After entering the AWS Management Console, navigate to the DynamoDB console.
- Click the Create table button.
- Provide Station as the table’s name and id as the table’s primary key.
Creating Station Items
Remember, DynamoDB is schema-less. We create an item but do not define a table’s schema. Instead, we create a couple items with the desired structure.
- Click the Items tab and click the Create Item button.
- Create an id and name attribute, assigning id as a Number datatype and name as a String. Assign the values 221 and “Potomac Falls” respectively.
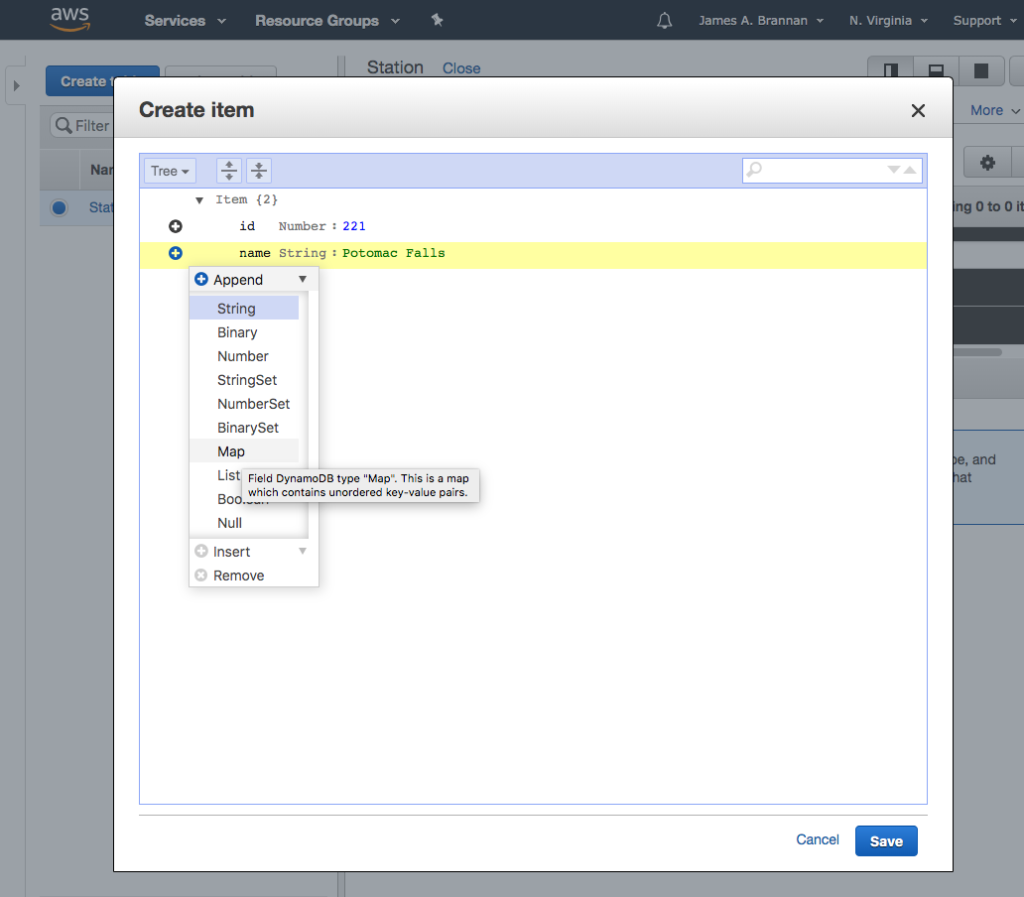
- Create an attribute named address and assign it the Map datatype.
- Add a city, street, and zip attribute as String datatypes to the address map. In the example below, I assigned Potomac, 230 Falls Street, and 22333 as the attribute values.
- Create coordinate as a Map and assign it a latitude and longitude attribute as Number datatypes. I assigned the values 38.993465 and -77.249247 as the latitude and longitude values.
- Repeat for one more station.
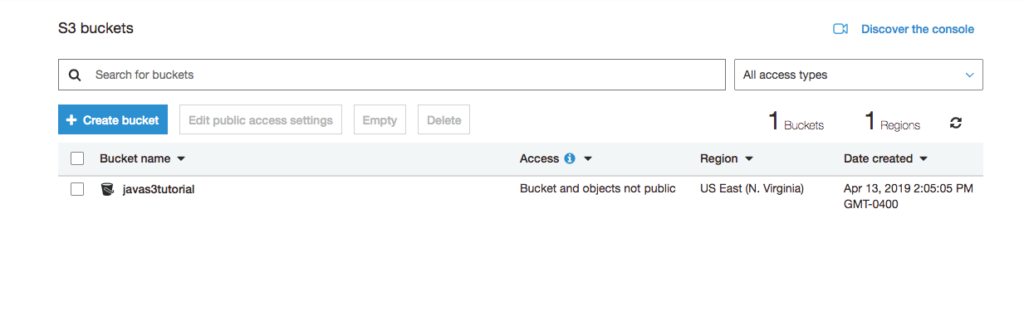
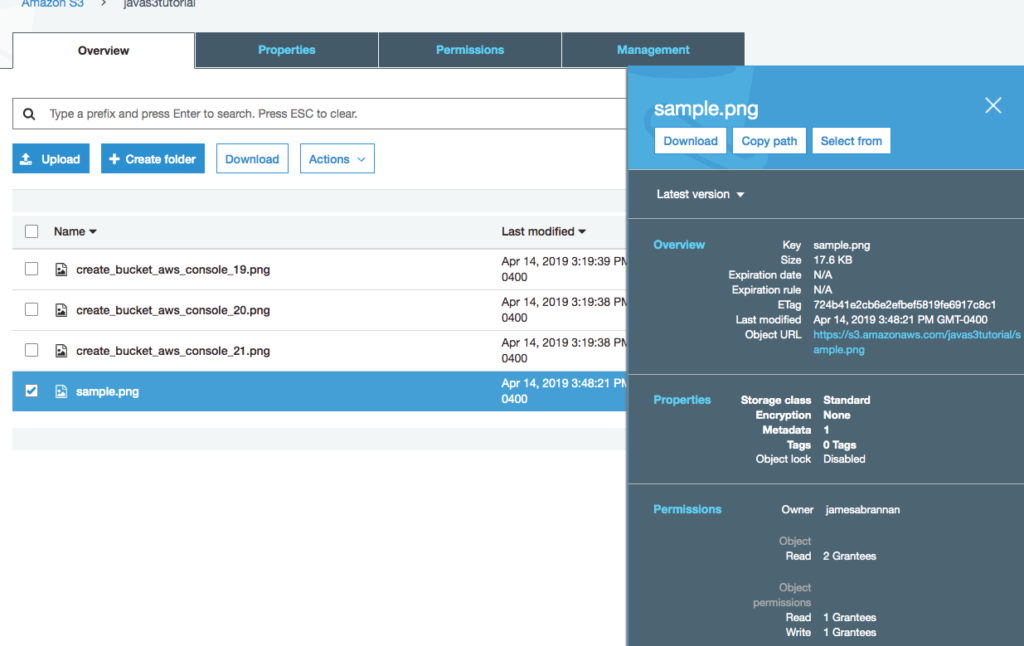
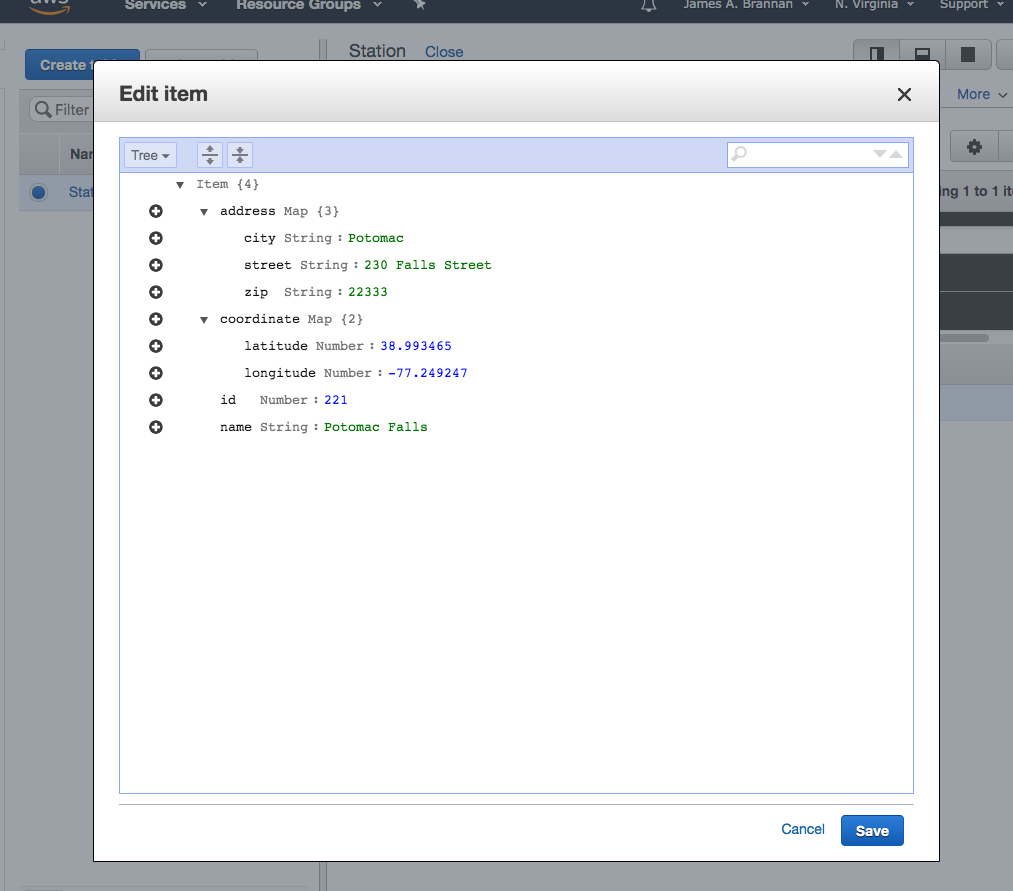
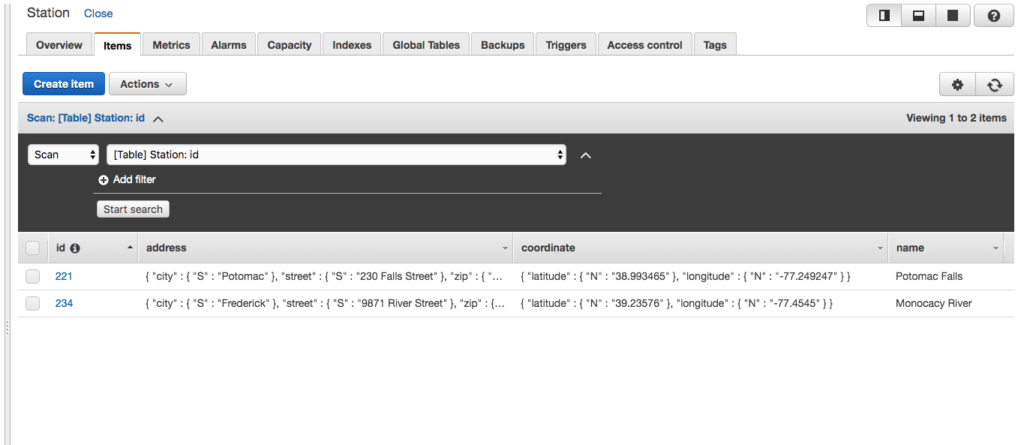
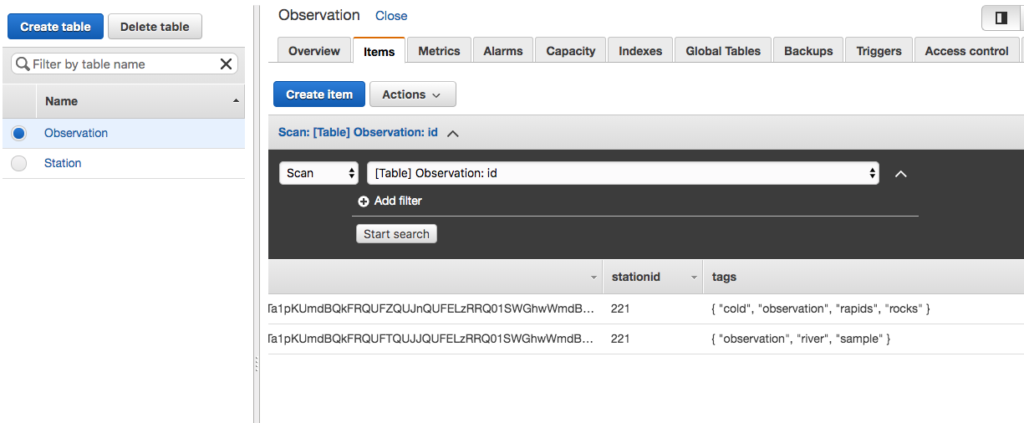
We created two items in the Station table. Here are the two items as JSON.
{
"address": {
"city": "Potomac",
"street": "230 Falls Street",
"zip": "22333"
},
"coordinate": {
"latitude": 38.993465,
"longitude": -77.249247
},
"id": 221,
"name": "Potomac Falls"
}
{
"address": {
"city": "Frederick",
"street": "9871 River Street",
"zip": "221704"
},
"coordinate": {
"latitude": 39.23576,
"longitude": -77.4545
},
"id": 234,
"name": "Monocacy River"
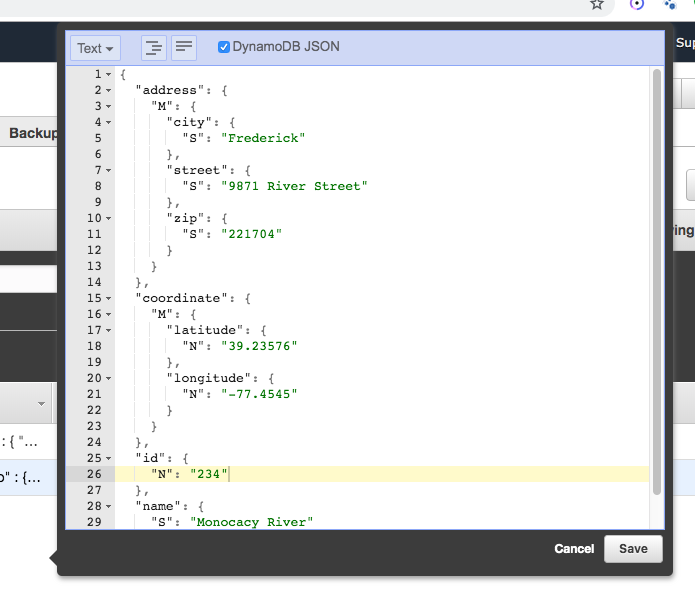
}You can view the JSON after creating an item by selecting the item and then selecting the text view in the popup.
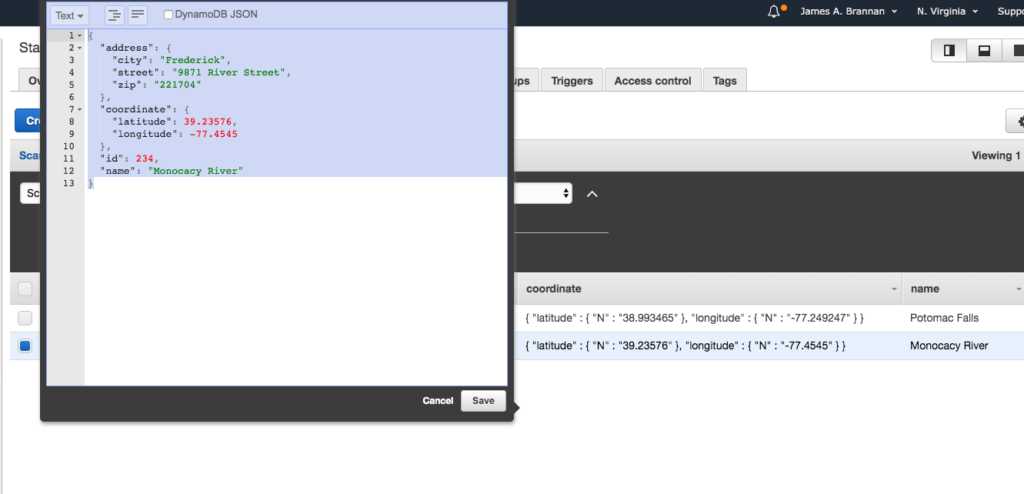
Note that the preceding JSON document is generic JSON. The actual JSON, as stored by DynamoDB (including datatypes), is as follows. Where the M, S, N, SS, etc. represent the element datatypes.
{
  "address": {
    "M": {
      "city": {
        "S": "Frederick"
      },
      "street": {
        "S": "9871 River Street"
      },
      "zip": {
        "S": "221704"
      }
    }
  },
  "coordinate": {
    "M": {
      "latitude": {
        "N": "39.23576"
      },
      "longitude": {
        "N": "-77.4545"
      }
    }
  },
  "id": {
    "N": "234"
  },
  "name": {
    "S": "Monocacy River"
  }
}
The DynamoDB datatypes are:
- String = S,
- Numbers = N,
- Boolean = BOOL,
- Binary = B,
- Date = S (stored as a string),
- String Set = SS,
- Number Set = NS,
- Binary Set = BS,
- Map = M,
- and List = L.
For example, in the following JSON document an observation’s address and coordinate are both Map datatypes, the city, street, zip are String datatypes, and the latitude and longitude are Number datatypes.
You can toggle between JSON and DynamoDB JSON in the popup window, as the following illustrates (note the DynamoDB JSON checkbox).
Create Observation Table
After creating the Station table we need to create the Observation table.
- Create a new table named Observation.
- Assign it a partition key of id and a sort key of stationid.
Composite Key (Partition Key & Sort Key)
The partition key is a table’s primary key and consists of a single attribute. DynamoDB uses this key to create a hash that determines the item’s storage. When used alone, the partition key uniquely identifies an item, as no two items can have the same partition key. However, when also defining a sort key, one or more items can have the same partition key, provided the partition key combined with the sort key is unique. Think of it as a compound key.
The Sort key helps DynamoDB more effectively store items, as it groups items with the same sort key together (hence the name sort key, as it sorts the items using this key).
An observation should have an id that identifies it and observations should be sorted by station, so we defined a stationid as the table’s sort key.
Create Sample Observations
As with the Station table, create some Observation items rather than define a schema.
- Find three images, of small size, to use for this project. If you wish, use the three sample images from this tutorial’s Git project.
- Navigate to Code Beautify’s Convert Your Image to Base64 webpage and convert the three images to a Base64 string.
- Create a JSON list of observations.
- Or, if you wish, simply use the JSON sampleData.json file provided in this tutorial’s Git project.
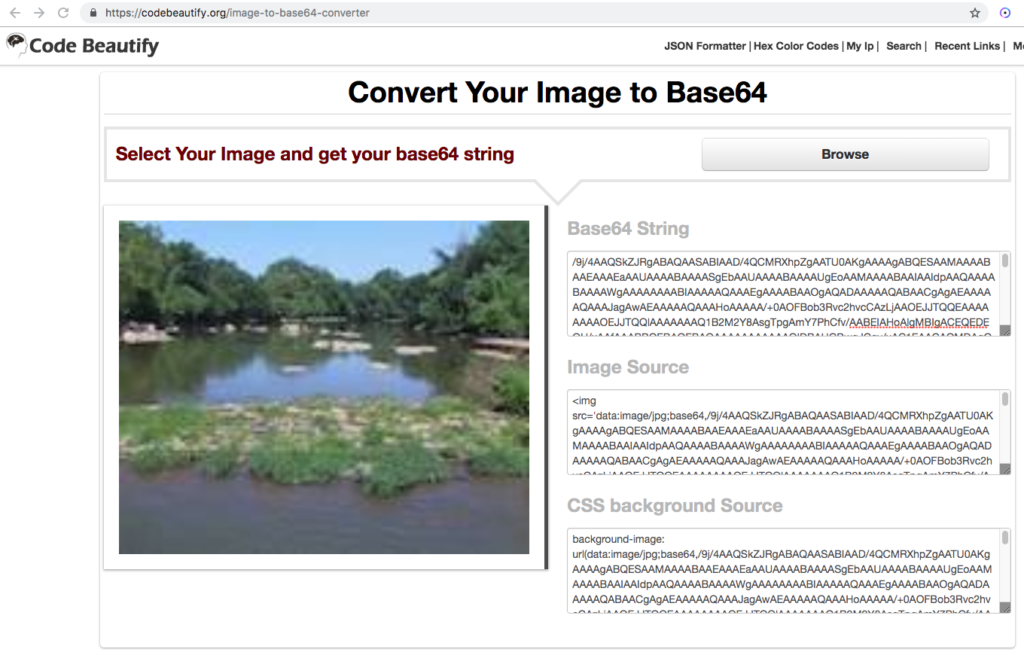
The following is a JSON list of four observations. The image base64 string is truncated so it can be easily displayed here. You can obtain the original file, named observations.json, from this tutorial’s Git project.
{
  [
    {
      "stationid": 221,
      "date": "1992-03-12",
      "time": "091312",
      "image": "/9j/4AAQSkZJRgABAQAAYABg <snip> kf/9k="
    },
    {
      "stationid": 221,
      "date": "1999-09-22",
      "time": "071244",
      "image": "/9j/4AAQSkZJ <snip> D9KhoA//2Q=="
    },
    {
      "stationid": 234,
      "date": "2001-11-09",
      "time": "111322",
      "image": "/9j/4AAQSkZ <snip> WoGf/9k="
    },
    {
      "stationid": 234,
      "date": "2013-01-12",
      "time": "081232",
      "image": "/9j/4AAQS <snip> q5//2Q=="
    }
  ]
}
Base64 Encoding
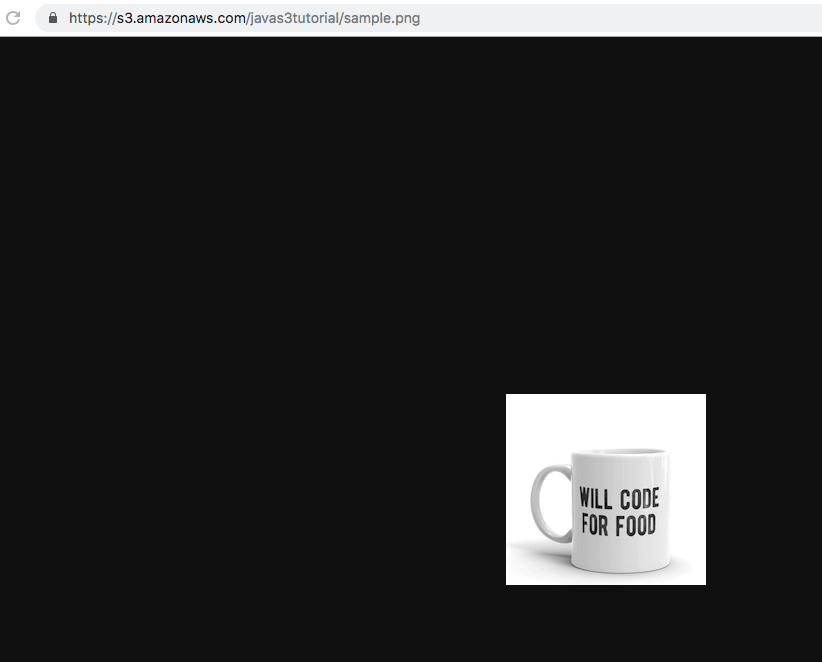
Images are binary. However, all binary can be represented by a String provided it is encoded and decoded correctly. Base64 is an encoding scheme that is converts binary to a string. It’s useful because it allows embedding binary data, such as an image, in a textual file, such as a webpage or JSON document. DynamoDB uses Base64 format to encode binary data to strings when transporting data and decode strings to binary data when storing the data. Therefore, the image sent to the Rest endpoints we create should be base64 encoded.
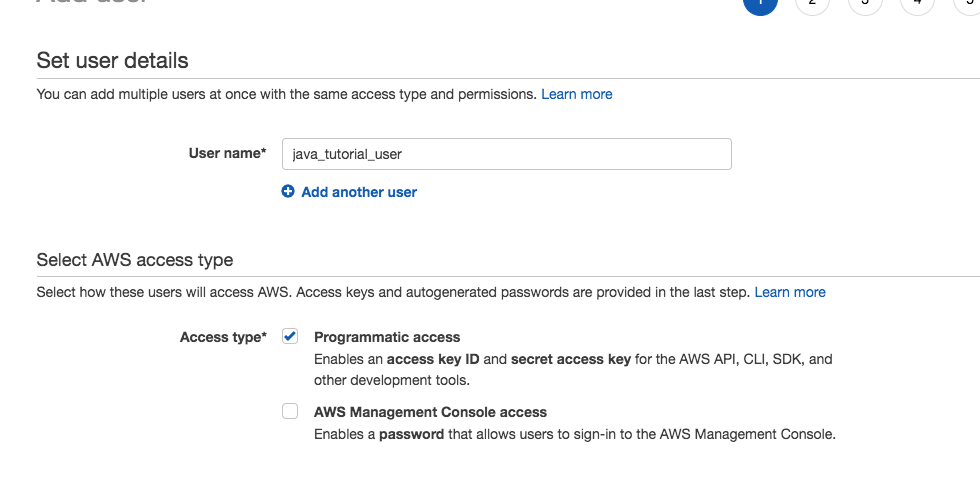
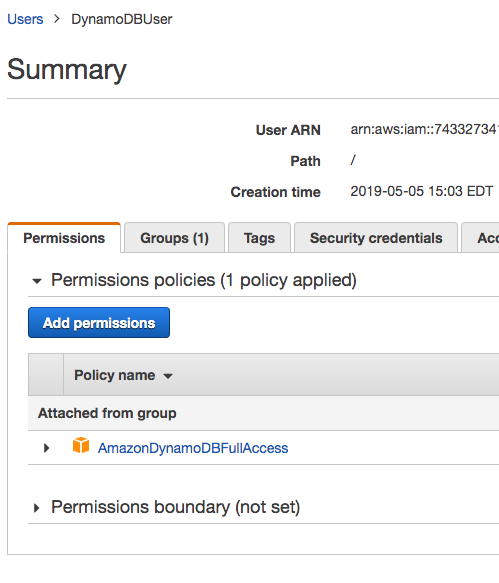
Create IAM Application User
Before beginning the Spring Boot application, we need a user with programatic access to the AWS DynamoDB API. If you are unfamiliar with IAM, the following introductory video should prove helpful. Otherwise, let’s create a user.
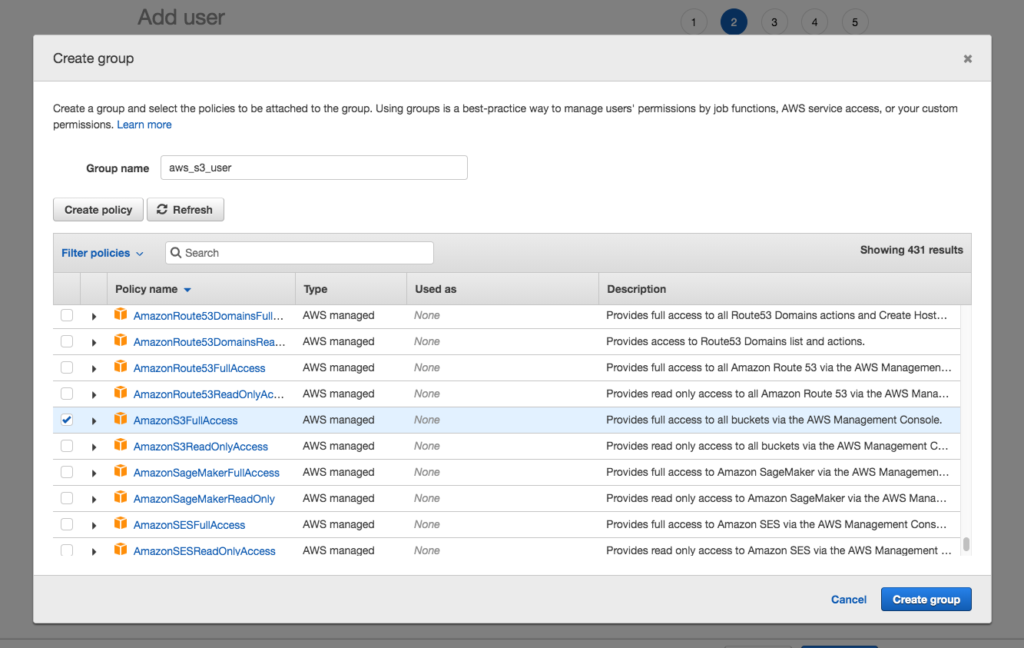
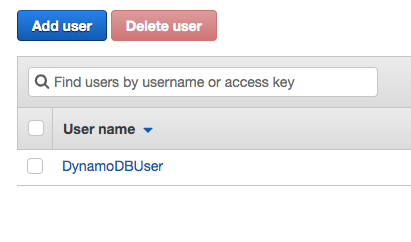
- Navigate to the IAM Console and click Add user.
- Create a new user named DynamoDBUser.
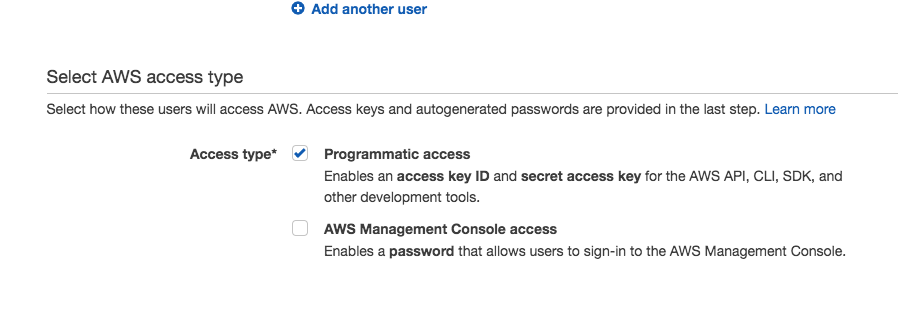
- Assign DynamoDBUser with Programmatic access.
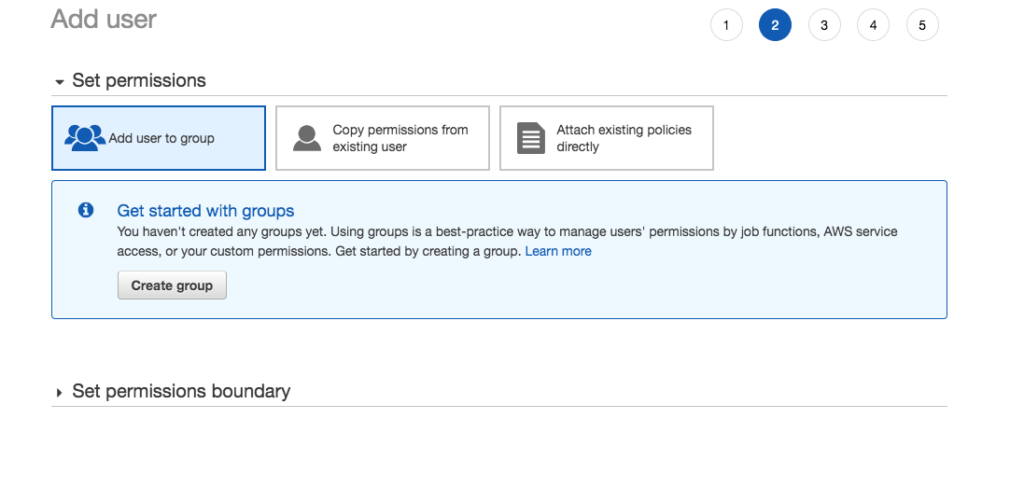
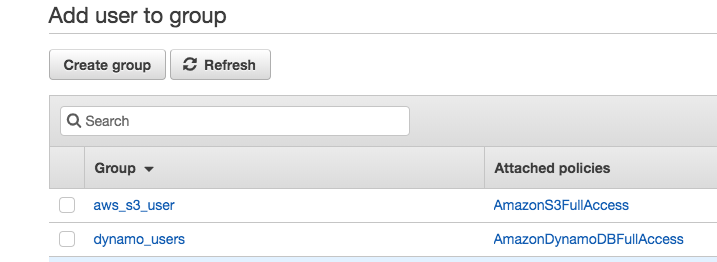
- Create a new group named dynamo_users with AmazonDynamoDBFullAccess.
- Assign DynamoDBUser to the dynamo_users group.
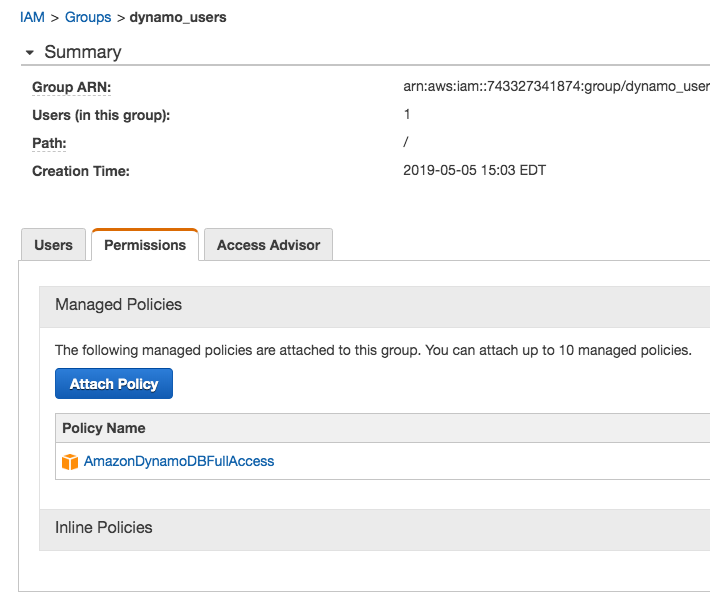
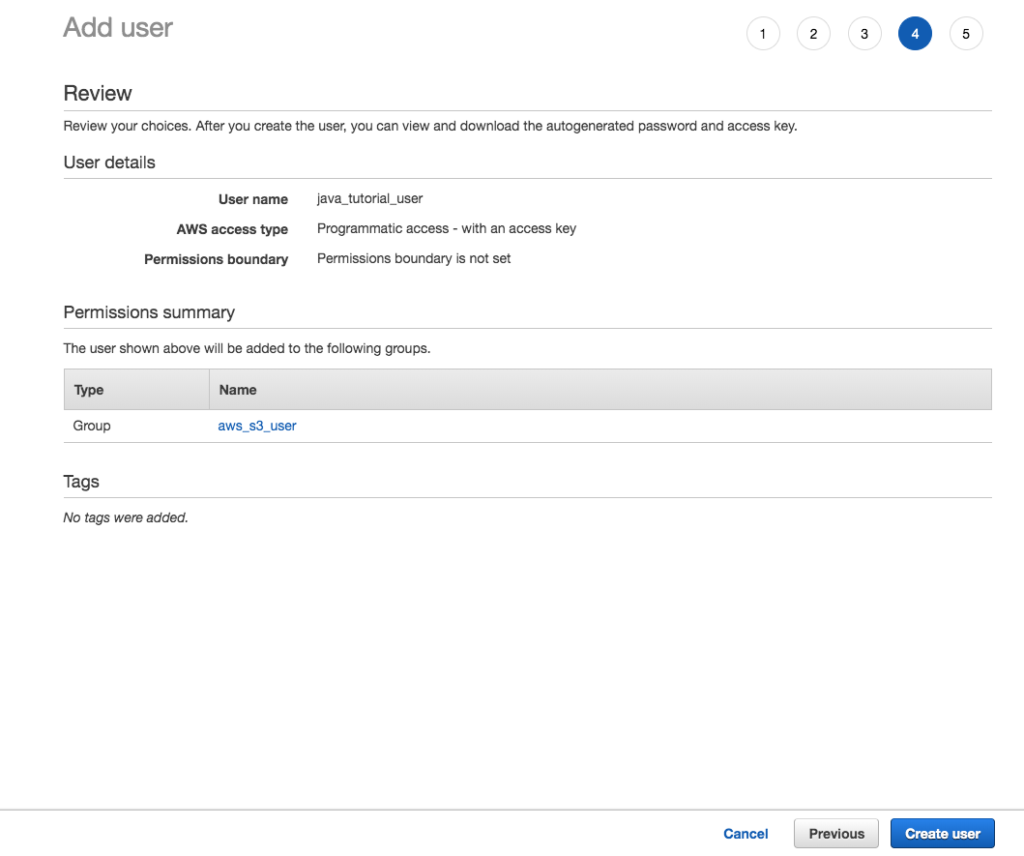
- If you created the user correctly, you should see the following Summary screen.
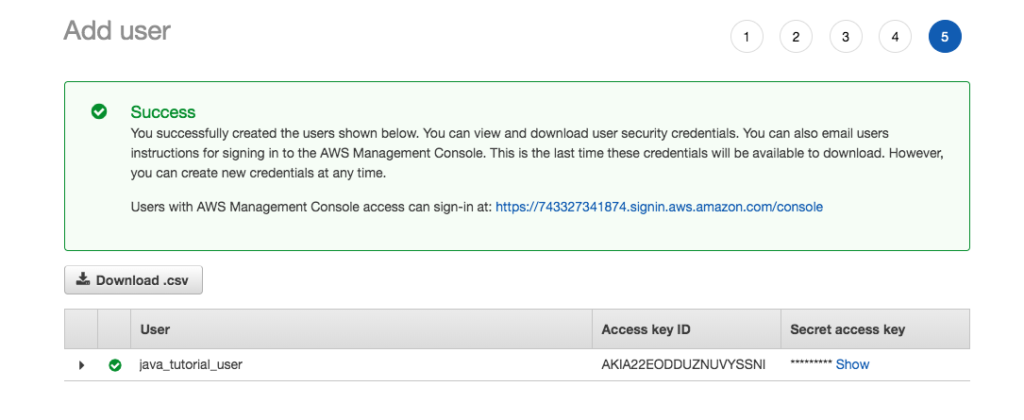
- Save the credentials file, credentials.csv, to your local hard-drive.
Spring Boot Application
Now that we have created the two needed tables and created a user we can begin the sample application. We create a Rest API for stations to save, retrieve, update, and delete observations. Not much explanation is devoted to Spring Boot, so if you have never created a Spring Boot Rest application you might consider completing a tutorial or two on Spring Boot and Rest. The following are links to two tutorials; however, there are many more on the web.
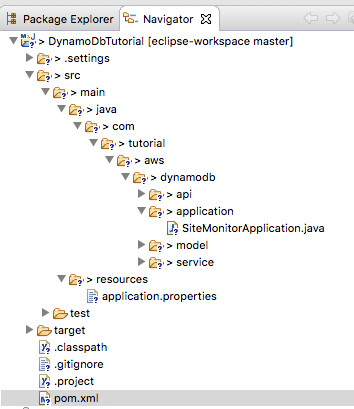
Setup Project
- Create a new Project, I used Eclipse and created a new Maven application.
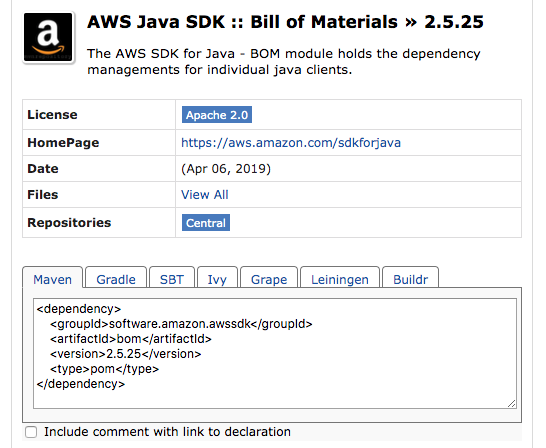
- Modify the Maven POM file to match the following POM.
<project xmlns="http://maven.apache.org/POM/4.0.0"
xmlns:xsi="http://www.w3.org/2001/XMLSchema-instance"
xsi:schemaLocation="http://maven.apache.org/POM/4.0.0 http://maven.apache.org/xsd/maven-4.0.0.xsd">
  <modelVersion>4.0.0</modelVersion>
  <groupId>com.tutorial.aws</groupId>
  <artifactId>DynamoDbTutorial</artifactId>
  <version>0.0.1-SNAPSHOT</version>
  <parent>
    <groupId>org.springframework.boot</groupId>
      <artifactId>spring-boot-starter-parent</artifactId>
      <version>2.0.5.RELEASE</version>
  </parent>
  <properties>
    <java.version>1.8</java.version>
  </properties>
  <dependencyManagement>
    <dependencies>
      <dependency>
        <groupId>software.amazon.awssdk</groupId>
	<artifactId>bom</artifactId>
	<version>2.5.25</version>
	<type>pom</type>
	<scope>import</scope>
      </dependency>
    </dependencies>
  </dependencyManagement>
  <dependencies>
    <dependency>
      <groupId>org.springframework.boot</groupId>
      <artifactId>spring-boot-starter-web</artifactId>
    </dependency>
    <dependency>
      <groupId>org.springframework.boot</groupId>
      <artifactId>spring-boot-starter-test</artifactId>
      <scope>test</scope>
    </dependency>
    <dependency>
      <groupId>com.jayway.jsonpath</groupId>
      <artifactId>json-path</artifactId>
      <scope>test</scope>
    </dependency>
    <dependency>
      <artifactId>auth</artifactId>
      <groupId>software.amazon.awssdk</groupId>
    </dependency>
    <dependency>
      <artifactId>aws-core</artifactId>
      <groupId>software.amazon.awssdk</groupId>
    </dependency>
    <dependency>
      <groupId>software.amazon.awssdk</groupId>
      <artifactId>auth</artifactId>
    </dependency>
    <dependency>
      <artifactId>dynamodb</artifactId>
      <groupId>software.amazon.awssdk</groupId>
    </dependency>
  </dependencies>
  <build>
    <plugins>
      <plugin>
        <groupId>org.springframework.boot</groupId>
	<artifactId>spring-boot-maven-plugin</artifactId>
      </plugin>
      <plugin>
        <groupId>org.apache.maven.plugins</groupId>
        <artifactId>maven-jar-plugin</artifactId>
        <version>3.1.1</version>
        <executions>
          <execution>
	    <phase>package</phase>
	    <goals>
              <goal>jar</goal>
	    </goals>
	    <configuration>
 	      <classifier>client</classifier>
	      <includes>
	        <include>**/factory/*</include>
	      </includes>
	    </configuration>
          </execution>
        </executions>
      </plugin>
    </plugins>
  </build>
</project>
In the POM we define the AWS Bill of Materials (BOM) and the required AWS libraries. Note that when using a BOM it is unnecessary to specify the library versions, as the BOM manages versions. We also define the Spring Boot libraries required.
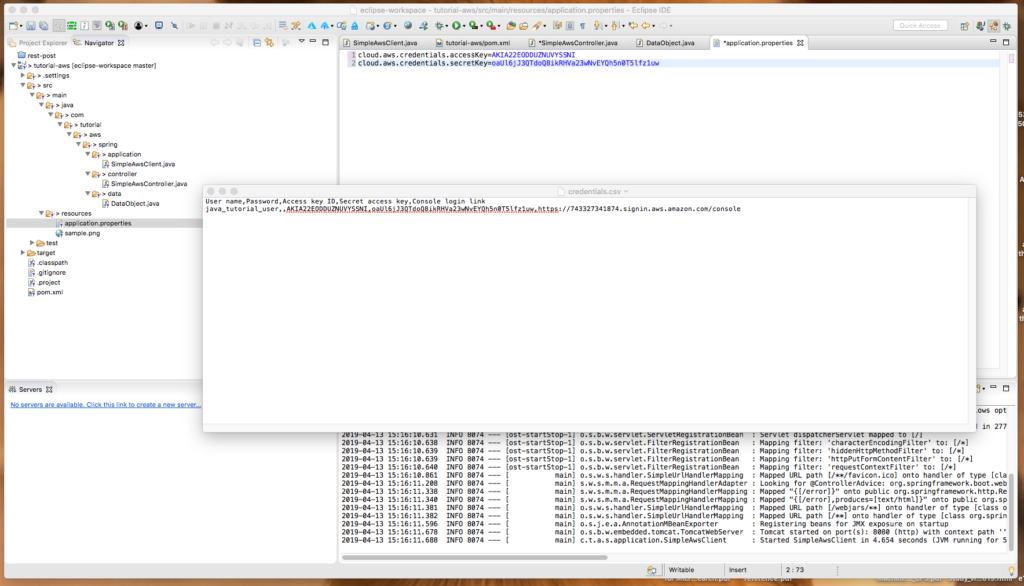
- Create an application.properties file in the resources folder. Open credentials.csv and add the credentials to the file with the following property names.
- NOTE: THIS USER WAS DELETED BEFORE PUBLISHING THIS TUTORIAL.
cloud.aws.credentials.accessKey=AK <snip> WP
cloud.aws.credentials.secretKey=yLJJ <snip> asUR
cloud.aws.region.static=us-east-1
Create Spring Boot Application Class
- Create a new class named SiteMonitorApplication in the com.tutorial.aws.dynamodb.application package.
- Annotate the class with @SpringBootApplication annotation.
- Create the main method and have it launch the Spring Boot application.
package com.tutorial.aws.dynamodb.application;

import org.springframework.boot.SpringApplication;
import org.springframework.boot.autoconfigure.SpringBootApplication;
import org.springframework.context.annotation.ComponentScan;

@SpringBootApplication
@ComponentScan({ "com.tutorial.aws.dynamodb" })
public class SiteMonitorApplication {

    public static void main(String[] args) {
        SpringApplication.run(SiteMonitorApplication.class, args);
    }
}
Create Observation Data Object
- Create a class named Observation in the com.tutorial.aws.dynamodb.model package.
- Create variables with the same names and types as in the JSON data created above.
package com.tutorial.aws.dynamodb.model;

import com.fasterxml.jackson.core.JsonProcessingException;
import com.fasterxml.jackson.databind.ObjectMapper;
import java.util.List;

public class Observation {
	private long stationid;
	private String date;
	private String time;
	private String image;
        private List<String> tags;

	public long getStationid() {
		return stationid;
	}

	public void setStationid(long stationid) {
		this.stationid = stationid;
	}

	public String getDate() {
		return date;
	}

	public void setDate(String date) {
		this.date = date;
	}


	public String getTime() {
		return time;
	}


	public void setTime(String time) {
		this.time = time;
	}

	public String getImage() {
		return image;
	}

	public void setImage(String image) {
		this.image = image;
	}

	public void setTags(List<String> tags) {
		this.tags = tags;
	}

	public List<String> getTags() {
		return this.tags;
	}

	@Override
	public String toString() {
		try {
			ObjectMapper mapper = new ObjectMapper();
			return mapper.writeValueAsString(this);
		} catch (JsonProcessingException e) {
			e.printStackTrace();
			return null;
		}
	}
}
The Observation object’s attributes are the same as in the JSON Observation document. Notice in the toString method we used an ObjectMapper from the Jackson library. We did not include this library in our POM, as the spring-boot-starter-web library includes this library.
The ObjectMapper maps JSON to Objects and Objects to JSON. It is how Spring Rest accomplishes this task. In the toString method we are telling the ObjectMapper instance to write the Observation object as a JSON string. For more on the ObjectMapper, here is a tutorial that explains the class in more depth: Jackson ObjectMapper.
Create Rest Controller
The Rest Controller provides the external API visible to Stations to send data to our application. Through the API, client applications will transmit data to the DynamoDB database. Different stations can develop its own client application in any language that supports Rest. The only requirement is that the station’s data follows the expected JSON format.
- Note: we are violating the MVC Design pattern by putting data access directly in the Controller. Suspend disbelieve and ignore this anti-pattern.
Let’s create a Rest Controller to define our application’s API.
- Create a class named ObservationApiController in the com.tutorial.aws.dynamodb.api package and annotate it with the @RestController annotation.
- Assign it a top-level path of /observations.
- Create a Rest endpoint for uploading a new Observation. Assign it the /observation mapping and name the method createObservation.
- Have the method take an Observation as the request’s body.
- Have the method print the uploaded Observation to the command-line.
package com.tutorial.aws.dynamodb.api;

import org.springframework.web.bind.annotation.PostMapping;
import org.springframework.web.bind.annotation.RequestBody;
import org.springframework.web.bind.annotation.RequestMapping;
import org.springframework.web.bind.annotation.RestController;
import com.tutorial.aws.dynamodb.model.Observation;

@RestController
@RequestMapping(value = "/observations")
public class ObservationApiController {

	@PostMapping("/observation")
	public void createObservation(@RequestBody Observation
          observation) {
	  System.out.println(observation.toString());
	}
}- Compile the application using Maven and start the application.
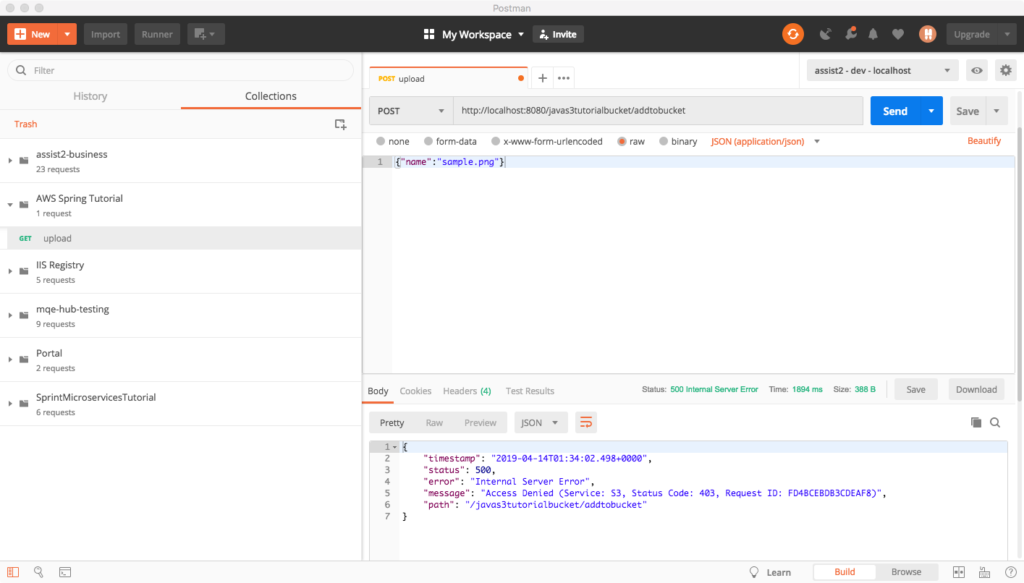
- After the application starts, we can test using Postman.
Test using Postman
Postman is a useful tool for testing JSON endpoints. If you have never used Postman, you might consider completing a couple tutorials first.
- Postman Learning Center: Getting Started.
- Create a new request named AddObservation that exercises the Rest endpoint.
http://localhost:8080/observations/observation- Place one of the observations from the previously created JSON document in the request’s Body. Assign the type as JSON (application/json).
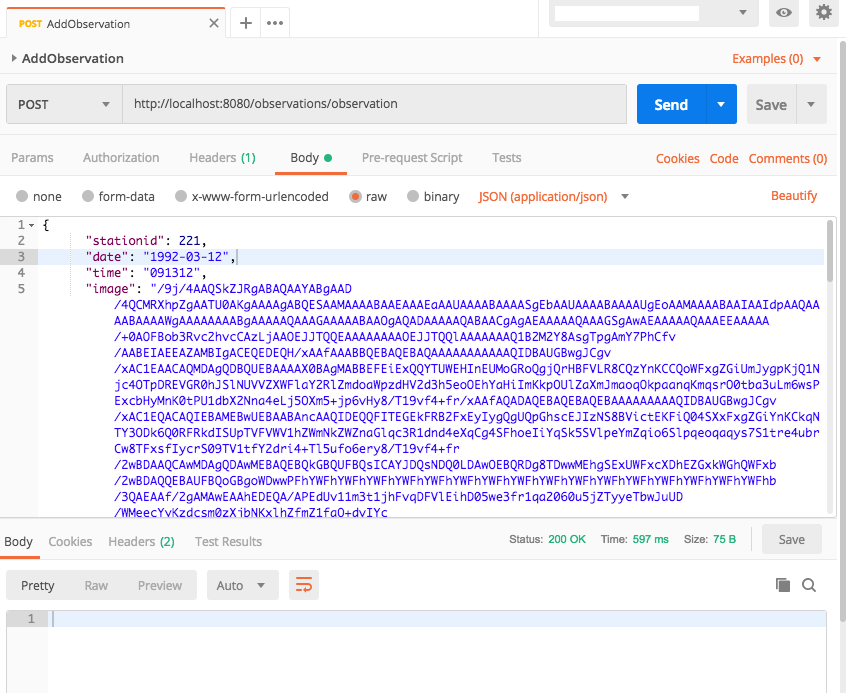
- Click Send to send the request to the Spring Rest endpoint. If everything is correct, you should see the Observation as JSON printed to the command-line.
{"stationid":221,"date":"1992-03-12", "time":"091312","image":"/9j/4AAQSkZJRgAB <snip> Wxkf/9k=","tags":null}
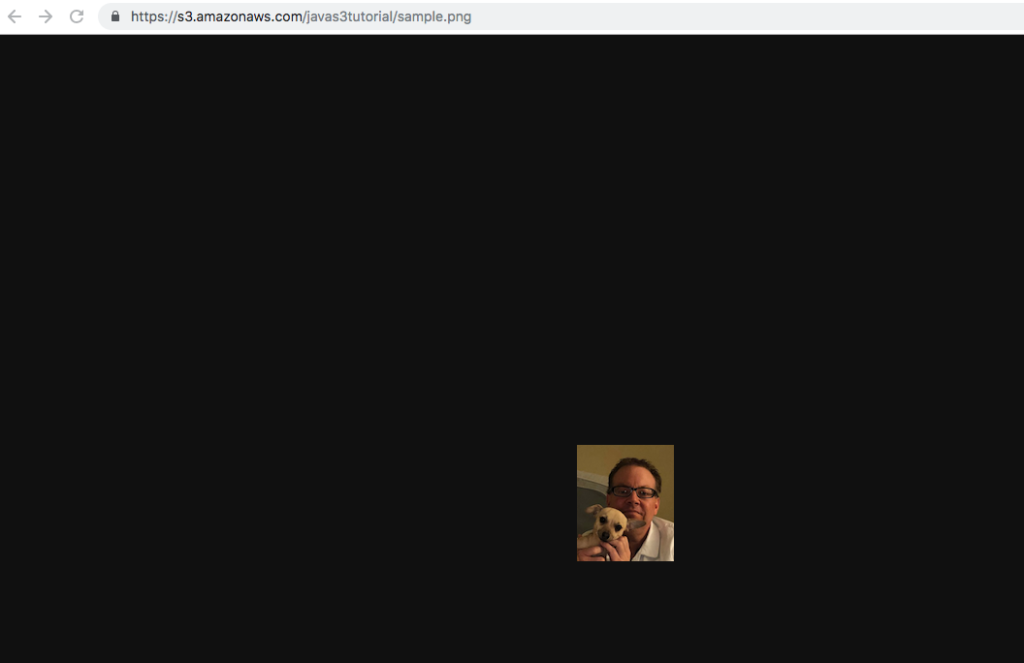
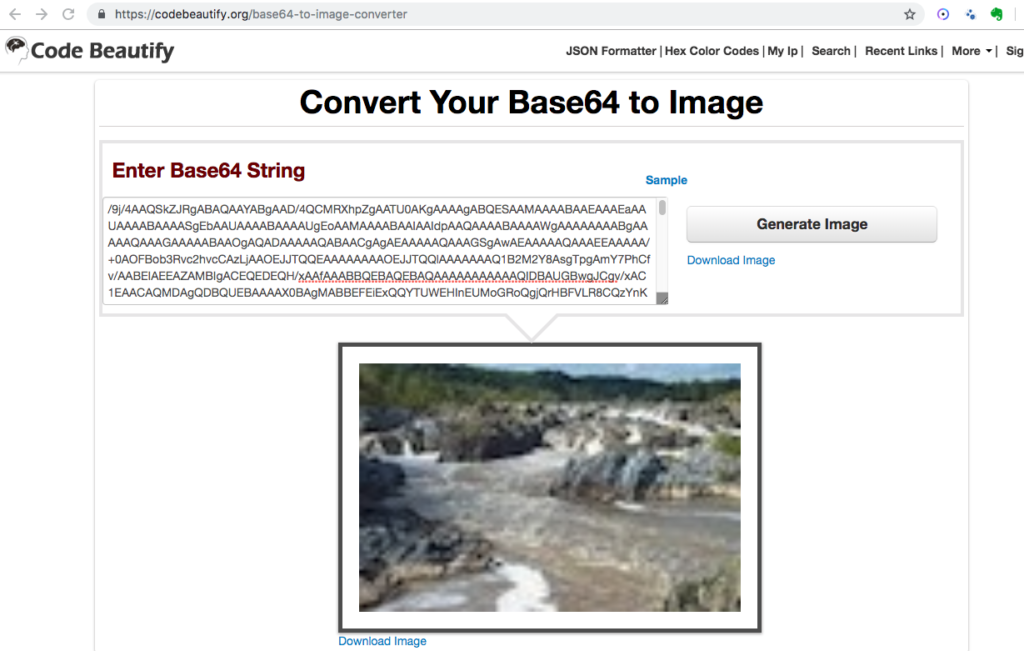
- Copy the image base64 string and navigate to the CodeBeautify website’s Convert Your Base64 to Image webpage. Paste the string in the provided textarea and click Generate Image. If the base64 string was sent correctly, you should see the same image you sent to the Rest endpoint.
Create DynamoDB Client
Now that we have the basic Spring Boot application in place, we can start building the actual API to DynamoDB. But before working with DynamoDB, we need to create a DynamoDBClient instance.
- Create a class named ObservationService in the com.tutorial.aws.dynamodb.service package.
- Add the spring @Service annotation so spring sees this class as a controller.
- Add the key and secretKey parameters and use the @Value annotation to indicate they are parameters from the application’s application.properties file (Spring Framework documentation).
- Create a @PostConstruct and @PreDestroy methods (or implement a Spring InitializingBean).
- Create a member variable entitled dynamoDbClient of type DynamoDbClient.
- Instantiate and load the credentials for dynamoDbClient in the initialize method.
- Close the dynamoDbClient in the preDestroy method.
package com.tutorial.aws.dynamodb.service;

import javax.annotation.PostConstruct;
import javax.annotation.PreDestroy;
import org.springframework.beans.factory.annotation.Value;
import org.springframework.stereotype.Service;
import com.tutorial.aws.dynamodb.model.Observation;
import software.amazon.awssdk.auth.credentials.AwsBasicCredentials;
import software.amazon.awssdk.auth.credentials.StaticCredentialsProvider;
import software.amazon.awssdk.regions.Region;
import software.amazon.awssdk.services.dynamodb.DynamoDbClient;


@Service
public class ObservationService {

  @Value("${cloud.aws.credentials.accessKey}")
  private String key;

  @Value("${cloud.aws.credentials.secretKey}")
  private String secretKey;

  private DynamoDbClient dynamoDbClient;

  @PostConstruct
  public void initialize() {
    AwsBasicCredentials awsCreds = AwsBasicCredentials.create(key, secretKey);
    DynamoDbClient client = DynamoDbClient.builder()
        .credentialsProvider(StaticCredentialsProvider.create(awsCreds))
        .region(Region.US_EAST_1).build();

    this.dynamoDbClient = client;
  }

  @PreDestroy
  public void preDestroy() {
    this.dynamoDbClient.close();
  }
}
DynamoDBClient
The DynamoDBClient provides access to the DynamoDB API. All interaction with DynamoDB is done through this class. It has methods for for reading, writing, updating, and other interactions with DynamoDB tables and Items. For more information, refer to the API documentation.
Write Observation
Let’s first write an Observation to DynamoDB. Alternatively, you could say we PUT an item to DynamoB, as we are making an HTTP Put request to DynamoDB. We do this using the DynamoDBClient putItem method combined with a PutItemRequest.
Modify Service Class
- Create a method named writeObservation that takes an Observation as a parameter.
- Create a HashMap that uses String as the key and AttributeValue as the value.
- Put each of the Observation variables into the HashMap, being sure the keys are correctly named. The keys should have exactly the same name as the JSON.
- When creating the AttributeValueBuilder for each variable, ensure the correct datatype method is used.
- Build a new PutItemRequest and then have dynamoDbClient call its putItem method to write the observation to the Observation DynamoDB table.
package com.tutorial.aws.dynamodb.service;

import java.util.HashMap;
import javax.annotation.PostConstruct;
import javax.annotation.PreDestroy;
import org.springframework.beans.factory.annotation.Value;
import org.springframework.stereotype.Service;
import com.tutorial.aws.dynamodb.model.Observation;
import software.amazon.awssdk.auth.credentials.AwsBasicCredentials;
import software.amazon.awssdk.auth.credentials.StaticCredentialsProvider;
import software.amazon.awssdk.core.SdkBytes;
import software.amazon.awssdk.regions.Region;
import software.amazon.awssdk.services.dynamodb.DynamoDbClient;
import software.amazon.awssdk.services.dynamodb.model.AttributeValue;
import software.amazon.awssdk.services.dynamodb.model.PutItemRequest;

<snip>

public void writeObservation(Observation observation) {
   HashMap<String, AttributeValue> observationMap = new HashMap<String,
       AttributeValue>();

    observationMap.put("id", AttributeValue.builder()
      .s(observation.getStationid() + observation.getDate() +
      observation.getTime()).build());

    observationMap.put("stationid", AttributeValue.builder()
      .n(Long.toString(observation.getStationid())).build());

    observationMap.put("date", AttributeValue.builder()
      .s(observation.getDate()).build());

    observationMap.put("time", AttributeValue.builder()
      .s(observation.getTime()).build());

    observationMap.put("image", AttributeValue.builder()
      .b(SdkBytes.fromUtf8String(observation.getImage())).build());

    if (observation.getTags() != null) {
      observationMap.put("tags", AttributeValue.builder()
        .ss(observation.getTags()).build());
    }

    PutItemRequest request = PutItemRequest.builder()
      .tableName("Observation").item(observationMap).build();

    this.dynamoDbClient.putItem(request);
  }
}
AttributeValue
There are four different AttributeValue classes in the DynamoDB Java API. Here we use the one in the software.amazon.awssdk.services.dynamodb.model package (api documentation). Remember, tables store items. An item is comprised of one or more attributes. An AttributeValue holds the value for an attribute. AttributeValue has a builder (api documentation) used to build an AttributeValue instance. An attribute value can be a string, number, binary data, list, or collection. You use the appropriate method corresponding to the datatype to set the AttributeValue object’s value. For instance, for a String use s(String value), binary use b(SdkBytes b), and for a collection of strings use ss(Collection ss). For a complete list, refer to the API documentation.
AttributeValue instances are placed in a Map, where the key is the attribute’s name in the database table. The Observation’s attributes are mapped using the appropriate builder methods.
- Observation.id is a String, so we use,
.s(observation.getStationid() + observation.getDate() +
observation.getTime()).build()- The image, although encoded, is binary, and so we use,
observationMap.put("image", AttributeValue.builder()
.b(SdkBytes.fromUtf8String(observation.getImage())).build());- The tags are an optional list of strings, so we wrap it in a conditional and use,
if (observation.getTags() != null) {
  observationMap.put("tags", AttributeValue.builder()
     .ss(observation.getTags()).build());
}
PutItemRequest
The PutItemRequest wraps the JSON request sent to the DynamoDBClient putItem method. A PutItemRequestBuilder builds a PutItemRequest. Above, we first added the table name, followed by the item to put. The item is a key-value map of the observation’s attributes. After building the PutItemRequest instance, the DynamoDBClient instance uses the request to write the observation to the DynamoDB Observation table.
PutItemRequest request = PutItemRequest.builder().tableName("Observation")
   .item(observationMap).build();
this.dynamoDbClient.putItem(request);
For more information, refer to the API documentation.
Create Rest Endpoint
- Auto-wire the ObservationService to ObservationApiController using the @Autowired annotation.
- Modify the saveObservation method to call the service’s writeObservation method.
package com.tutorial.aws.dynamodb.api;

import org.springframework.beans.factory.annotation.Autowired;
import org.springframework.web.bind.annotation.PostMapping;
import org.springframework.web.bind.annotation.RequestBody;
import org.springframework.web.bind.annotation.RequestMapping;
import org.springframework.web.bind.annotation.RestController;

import com.tutorial.aws.dynamodb.model.Observation;
import com.tutorial.aws.dynamodb.service.ObservationService;

@RestController
@RequestMapping(value = "/observations")
public class ObservationApiController {
  @Autowired
  ObservationService observationService;

  @PostMapping("/observation")
  public void saveObservation(@RequestBody Observation observation) {
    this.observationService.writeObservation(observation);
  }
}- Build the application and start the Spring Boot application.
Test with Postman
- Return to the request created previously in Postman and click the Send button.
- Go to the table in the AWS Console and click Items.
- If everything was done correctly, you should see two items in the Observation table.
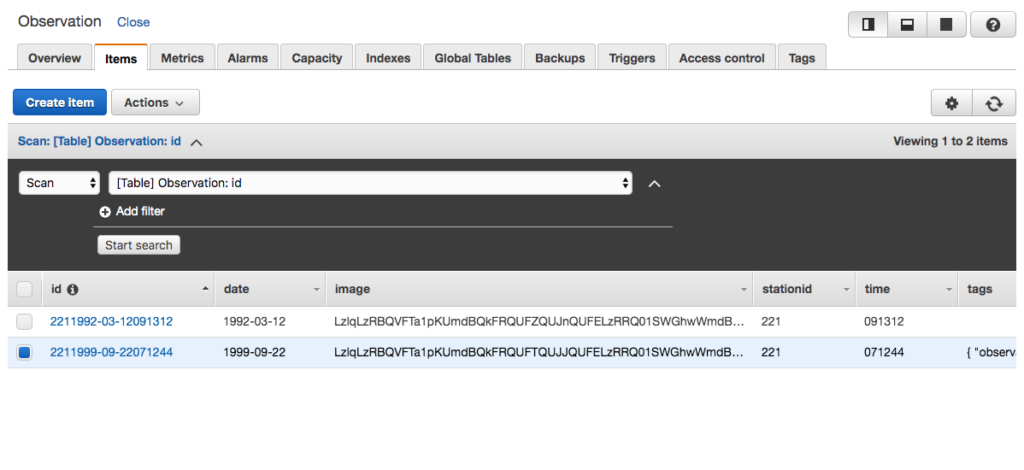
{
  "date": {
    "S": "1999-09-22"
  },
  "id": {
    "S": "2211999-09-22071244"
  },
  "image": {
    "B": "LzlqLzRBQ <snip> JRPT0="
  },
  "stationid": {
    "N": "221"
  },
  "tags": {
    "SS": [
      "observation",
      "river",
      "sample"
    ]
  },
  "time": {
    "S": "071244"
  }
}
Read Observation
Now that we have written an Observation to DynamoDB, let’s create a Rest endpoint that fetches an Observation.
Modify Service Class
- Modify ObservationService to have a getObservation method that takes an observation’s id as a parameter.
- Create a HashMap to store the AttributeValue collection. These are used to query the database.
- Add the observationId to the HashMap.
- Build a GetItemRequest, assigning the HashMap as the key.
- Get the item from the response and use its values to create a new Observation.
- As tags is a list of items, you must loop through them to add them to the Observation object instance.
public Observation getObservation(String observationId) {
  HashMap<String,AttributeValue> key = new
    HashMap<String,AttributeValue>();

  key.put("id", AttributeValue.builder().s(observationId).build());
  GetItemRequest request = GetItemRequest.builder()
    .tableName("Observation").key(key).build();

  Map<String,AttributeValue> responseItem =
  this.dynamoDbClient.getItem(request).item();

  Observation observation = new Observation();
  observation.setDate(responseItem.get("date").s());
  observation.setTime(responseItem.get("time").s());
  observation.setImage(responseItem.get("image").b().asUtf8String());
  observation.setStationid(Long.parseLong(responseItem
    .get("stationid").n()));

  if(responseItem.get("tags") != null && responseItem.get("tags")
    .ss().size() > 0) {

    HashSet<String> vals = new HashSet<>();
    responseItem.get("tags").ss().stream().forEach(x->vals.add(x));
    observation.setTags(vals);
  }
  return observation;
}
GetItemRequest
The GetItemRequest wraps a JSON Get request to DynamoDB. To fetch a particular Observation we must provide the id to the Get request. The key is a Map of AttributeValue items. In this case we added only one attribute, the id.
GetItemRequest request = GetItemRequest.builder()
    .tableName("Observation").key(key).build();
Create Rest Endpoint
- Add a method named getObservation that takes the observation’s id as a path variable.
- Call the ObservationService getObservation method and return the result.
@GetMapping("/observation/{observationid}")
public Observation getObservation(@PathVariable("observationid") String
  observationId) {

  return this.observationService.getObservation(observationId);

}
Test With Postman
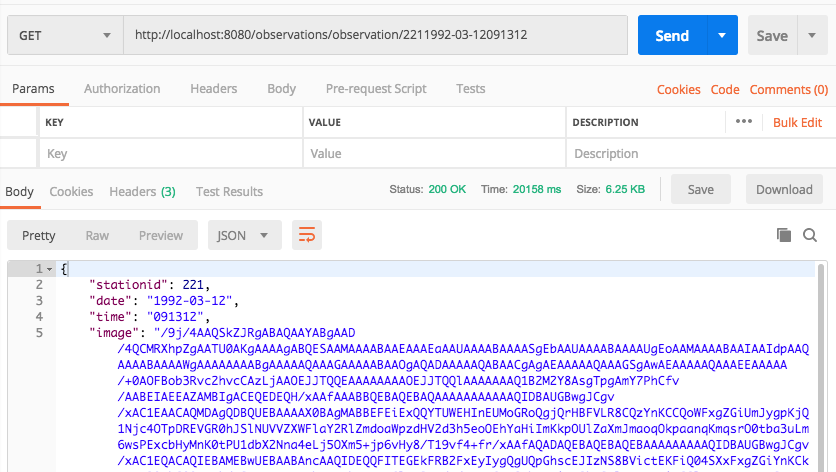
- Create a new request in Postman with the following URL.
- Add one of the ids from the observations added earlier.
http://localhost:8080/observations/observation/2211992-03-12091312- After creating the request, click Send and the following should appear as the response (if you used 211992-03-12091312) .
{
    "stationid": 221,
    "date": "1992-03-12",
    "time": "091312",
    "image": "/9j/4AA <snip> kf/9k=",
    "tags": [
        "rapids",
        "rocks",
        "observation",
        "cold"
    ]
}
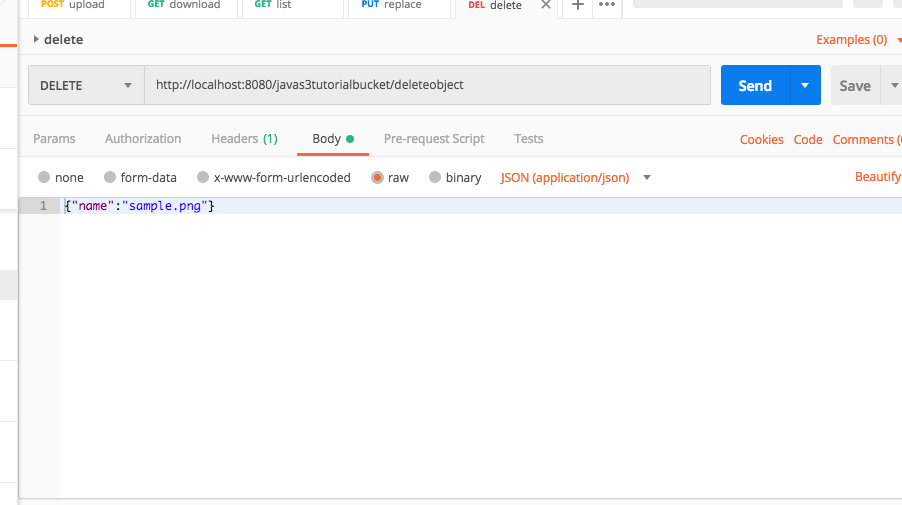
Delete Observation
So far we have added and fetched an Observation to DynamoDB. Now let’s delete an Observation.
Modify Service Class
- Add a deleteObservation method that takes an observation’s id as a parameter.
- Create a HashMap to hold the attributes.
- Build a new DeleteItemRequest and use the HashMap as the key.
- Use the dynamoDbClient to delete the observation.
public void deleteObservation(String observationId) {
  HashMap<String,AttributeValue> key = new HashMap<>();
  key.put("id", AttributeValue.builder().s(observationId).build());
  DeleteItemRequest deleteRequest = DeleteItemRequest.builder()
    .key(key).tableName("Observation").build();
  this.dynamoDbClient.deleteItem(deleteRequest);
}
DeleteItemRequest
The DeleteItemRequest wraps a JSON Delete HTTP request. As with all requests, we use a builder. The builder uses the table and the key to delete the Observation.
Create Rest Endpoint
- Create a new Rest endpoint to delete observations.
- Have the observation’s id passed to the endpoint as a path variable only add /delete after the variable.
- Call the ObservationService deleteObservation method.
@DeleteMapping("/observation/{observationid}/delete")
public void deleteObservation(@PathVariable("observationid") String
  observationId) {
  this.observationService.deleteObservation(observationId);
}
Test with Postman
- Create a new Request using Postman.
- Assign it DELETE from the dropdown to indicate it is an Http Delete request.
http://localhost:8080/observations/observation/2211992-03-12091312/delete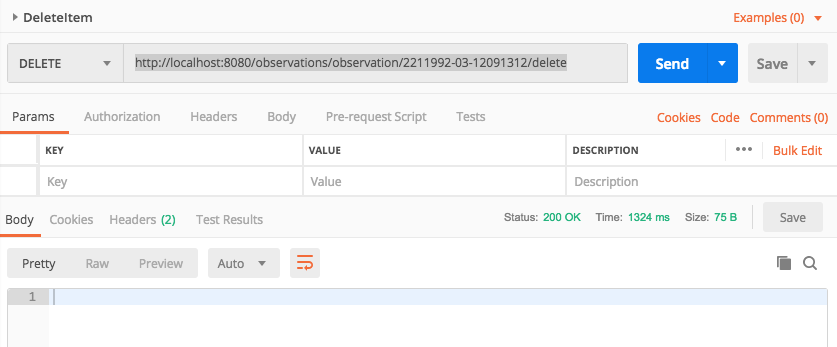
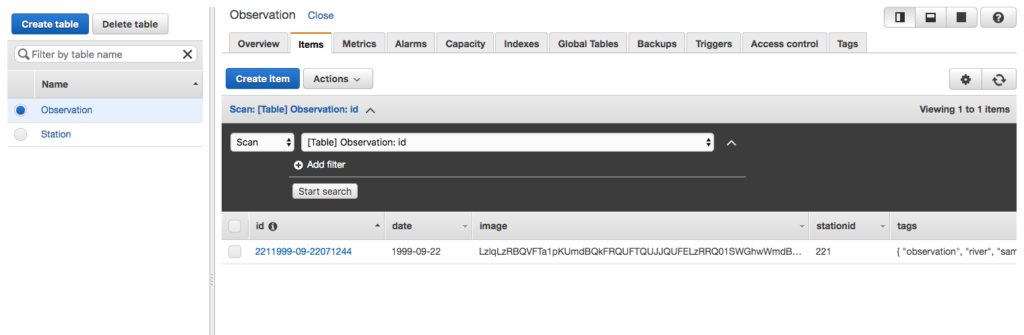
- Click Send and the record should be deleted. Navigate to the Items in the AWS Console to ensure the Observation was deleted.
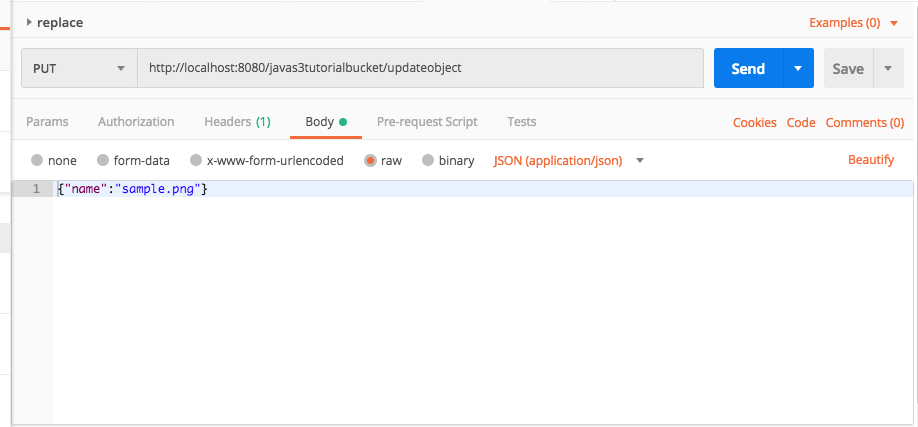
Update Observation
An Observation can have one or more tags. This is something that seems likely to be added at a later date and/or modified. Let’s create an endpoint that allows adding/modifying an observation’s tags.
Update Service Class
- Create a method named updateObservationTags that takes a list of tags and an observation id as parameters.
- Create a HashMap to hold AttributeValue objects.
- Use the AttributeBuilderValue builder to add the tags to the HashMap with :tagval as the key.
- Create a second HashMap to hold the observation’s id.
- Build an UpdateItemRequest that uses an update expression.
public void updateObservationTags(List<String> tags, String observationId) {
  HashMap<String, AttributeValue> tagMap = new HashMap<String,
    AttributeValue>();

  tagMap.put(":tagval", AttributeValue.builder().ss(tags).build());
  HashMap<String, AttributeValue> key = new HashMap<>();
  key.put("id", AttributeValue.builder().s(observationId).build());

  UpdateItemRequest request = UpdateItemRequest.builder()
    .tableName("Observation").key(key)
    .updateExpression("SET tags = :tagval")
    .expressionAttributeValues(tagMap).build();

  this.dynamoDbClient.updateItem(request);
}
UpdateItemRequest
The DynamoDBClient instance uses the UpdateItemRequest to build the request to update the item. As with fetching and deleting, it needs a key to properly select the correct item. But it also needs the values to update. You provide an update expression and then provide the attributes. Note that the key for the attribute, :tagval, matches the expression. The request then uses the key and the update expression to update the item.
Add Rest Endpoint
- Add an endpoint that takes the observation id as a path variable and a JSON array of tags as the request body.
- Call the ObservationService updateObservationTags method.
@PostMapping("/observation/{observationid}/updatetags")
public void updateObservationTags(@PathVariable("observationid") String
  observationId, @RequestBody List<String> tags) {

  this.observationService.updateObservationTags(tags, observationId);

}
Test With Postman
- Create a new Http Post Request with the following URL.
- Add the id value as a path parameter directly in the URL.
http://localhost:8080/observations/observation/2211992-03-12091312/updatetags- Add the following values as the Body and assign the type as JSON (application/json).
["observation","rocks","rapids","cold"]
- Click Send and then navigate to the AWS Console to view observations. The Observation should have the tags added.
Batch Write Observations
Sometimes multiple items must be written to a database.
Update Service Class
public void batchWriteObservations(List<Observation> observations) {
  ArrayList<WriteRequest> requests = new ArrayList<>();
  HashMap<String, AttributeValue> observationMap = new HashMap<>();
  for(Observation observation : observations) {
    observationMap.put("id", AttributeValue.builder()
      .s(observation.getStationid() + observation.getDate() +
      observation.getTime()).build());

    observationMap.put("stationid", AttributeValue.builder()
      .n(Long.toString(observation.getStationid())).build());

    observationMap.put("date", AttributeValue.builder()
      .s(observation.getDate()).build());

    observationMap.put("time", AttributeValue.builder()
      .s(observation.getTime()).build());

    observationMap.put("image", AttributeValue.builder()
      .b(SdkBytes.fromUtf8String(observation.getImage())).build());

    if (observation.getTags() != null) {
      observationMap.put("tags", AttributeValue.builder()
        .ss(observation.getTags()).build());
    }

    WriteRequest writeRequest = WriteRequest.builder()
      .putRequest(PutRequest.builder().item(observationMap)
      .build()).build();

    requests.add(writeRequest);
  }

  HashMap<String,List<WriteRequest>> batchRequests = new HashMap<>();
  batchRequests.put("Observation", requests);
  BatchWriteItemRequest request = BatchWriteItemRequest.builder()
    .requestItems(batchRequests).build();

  this.dynamoDbClient.batchWriteItem(request);
}
The DynamoDbClient batchWriteItem method takes a BatchWriteItemRequest as a parameter. The BatchWriteItem can write or delete up to 25 items at once and is limited to 16 MB of data. Note that it still makes as many calls as you have items; however, it makes these calls in parallel.
You create a List to hold the WriteRequest for each Observation. Each Observation is written to a Map as key-value pairs. The map is added to a WriteRequest, which is then added to the list until all observations are prepared as WriteRequest instances.
 WriteRequest writeRequest = WriteRequest.builder()
      .putRequest(PutRequest.builder().item(observationMap)
      .build()).build();
Each list of WriteRequest instances is added to another map. The table name is the key and the list is the values. In this way a single batch write could write to multiple tables. After creating the map of the lists of WriteRequest instances, the whole thing is used to create a BatchWriteItemRequest which is used by the DynamoDbClient batchWriteItem method.
 HashMap<String,List<WriteRequest>> batchRequests = new HashMap<>();
  batchRequests.put("Observation", requests);
  BatchWriteItemRequest request = BatchWriteItemRequest.builder()
    .requestItems(batchRequests).build();
Create Rest Endpoint
- Add a Rest endpoint that takes a list of observations as JSON in the request body.
- Call the batchWriteObservations method in the ObservationService.
@PostMapping("/observation/batch")
public void batchSaveObservation(@RequestBody List<Observation>
  observations) {

  this.observationService.batchWriteObservations(observations);

}- Build and run the application.
Test With Postman
- Create a new Post Request in Postman with the following URL.
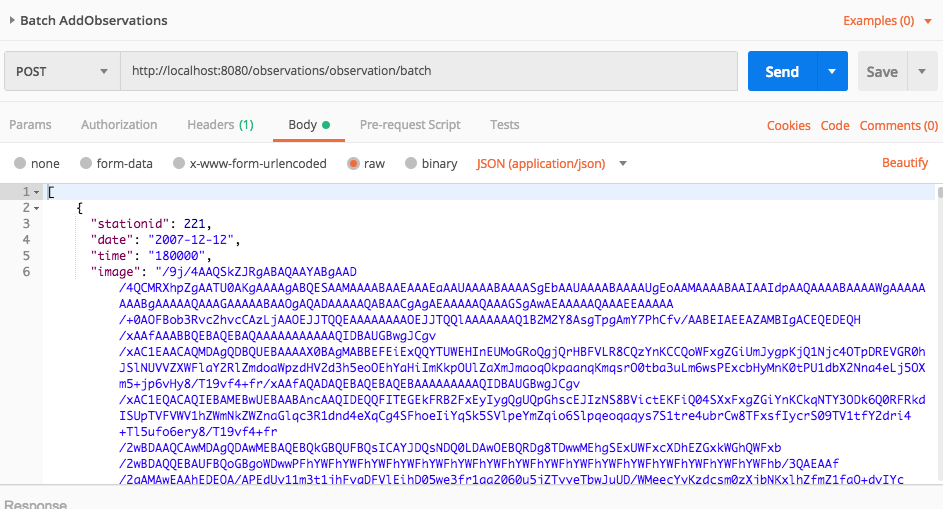
http://localhost:8080/observations/observation/batch- Add the following to the Body and assign it the type JSON (application/json).
[
    {
      "stationid": 221,
      "date": "2007-12-12",
      "time": "180000",
      "image": "/9j/4AAQSkZJRgABAQA <snip> kf/9k="
    },
    {
      "stationid": 221,
      "date": "2009-05-22",
      "time": "043455",
      "image": "/9j/4AAQSkZJRgABAQAA <snip> /8AD9KhoA//2Q=="
    },
    {
      "stationid": 234,
      "date": "2019-10-18",
      "time": "121459",
      "image": "/9j/4AAQSkZJRgABAQA <snip> VWoGf/9k="
    },
    {
      "stationid": 234,
      "date": "2017-09-22",
      "time": "093811",
      "image": "/9j/4AAQSkZJRgAB <snip> 5//2Q=="
    }
  ]
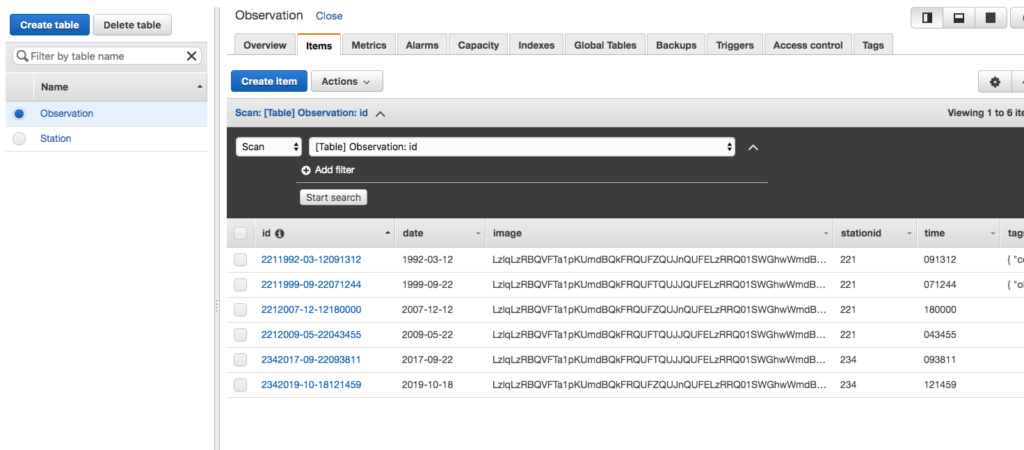
- Click Send then navigate to the AWS Console Observation table’s items and the observations should be added.
Conditionally Fetch Observations
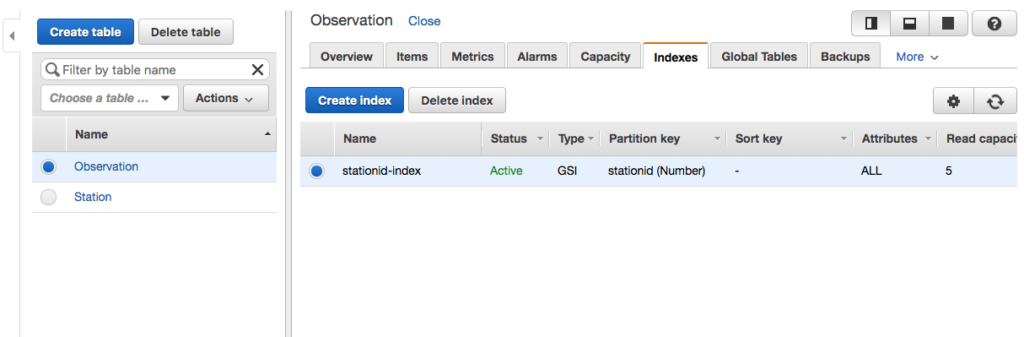
A common requirement is to fetch records based upon certain criteria. For example, suppose we wish to fetch all observations belonging to a particular station. When using DynamoDB any variable used for a query must be indexed. So before creating a query, we first create an index on the Observation table’s stationid variable.
Create Index
- Navigate to the Observation table in the AWS Console.
- Click Create Index.
- Select stationid as the index’s partition key and be certain to define it as a Number.
- Click Create Index to create the index.

Secondary Indexes
Secondary Indexes allow retrieving data from a table using an attribute other than the primary key. You retrieve data from the index rather than the table. For more on DynamoDB secondary indexes, refer to the following article by LinuxAcademy: A Quick Guide to DynamoDB Secondary Indexes.
Update Service Class
public List<Observation> getObservationsForStation(String stationId){
  ArrayList<Observation> observations = new ArrayList<>();
  Condition condition = Condition.builder()
    .comparisonOperator(ComparisonOperator.EQ)
    .attributeValueList(AttributeValue.builder()
    .n(stationId).build()).build();

  Map<String, Condition> conditions = new HashMap<String, Condition>();
  conditions.put("stationid",condition);

  QueryRequest request = QueryRequest.builder().tableName("Observation")
    .indexName("stationid-index").keyConditions(conditions).build();

  List<Map<String, AttributeValue>> results = this.dynamoDbClient
    .query(request).items();

  for(Map<String,AttributeValue> responseItem: results) {
    Observation observation = new Observation();
    observation.setDate(responseItem.get("date").s());
    observation.setTime(responseItem.get("time").s());
    observation.setImage(responseItem.get("image").b().asUtf8String());
    observation.setStationid(Long.parseLong(
      responseItem.get("stationid").n()));

    if(responseItem.get("tags") != null && responseItem.get("tags").ss()
      .size() > 0) {
      HashSet<String> vals = new HashSet<>();
      responseItem.get("tags").ss().stream().forEach(x->vals.add(x));
      observation.setTags(vals);
    }
    observations.add(observation);
  }
  return observations;
}
First we created a Condition using its associated builder. The condition is “=<the station id passed to function>”.
Condition condition = Condition.builder()
    .comparisonOperator(ComparisonOperator.EQ)
    .attributeValueList(AttributeValue.builder()
    .n(stationId).build()).build();
We then added the Condition to a map and specified stationid as the key and condition as the value. We then built the QueryRequest using its associated builder.
 QueryRequest request = QueryRequest.builder().tableName("Observation")
    .indexName("stationid-index").keyConditions(conditions).build();
Create Rest Endpoint
- Create a new Rest endpoint that specifies stationid as a path variable.
- Call the ObservationService getObservationsForStation method.
@GetMapping("/station/{stationid}")
public List<Observation> getObservations(@PathVariable("stationid") String
  stationId) {
  return this.observationService.getObservationsForStation(stationId);
}- Build and run the application.
Test With Postman
- Create a new Get request in Postman that includes a station’s id in the url.
- Click Send and the Observation items for station 221 should appear as the response body.
http://localhost:8080/observations/station/221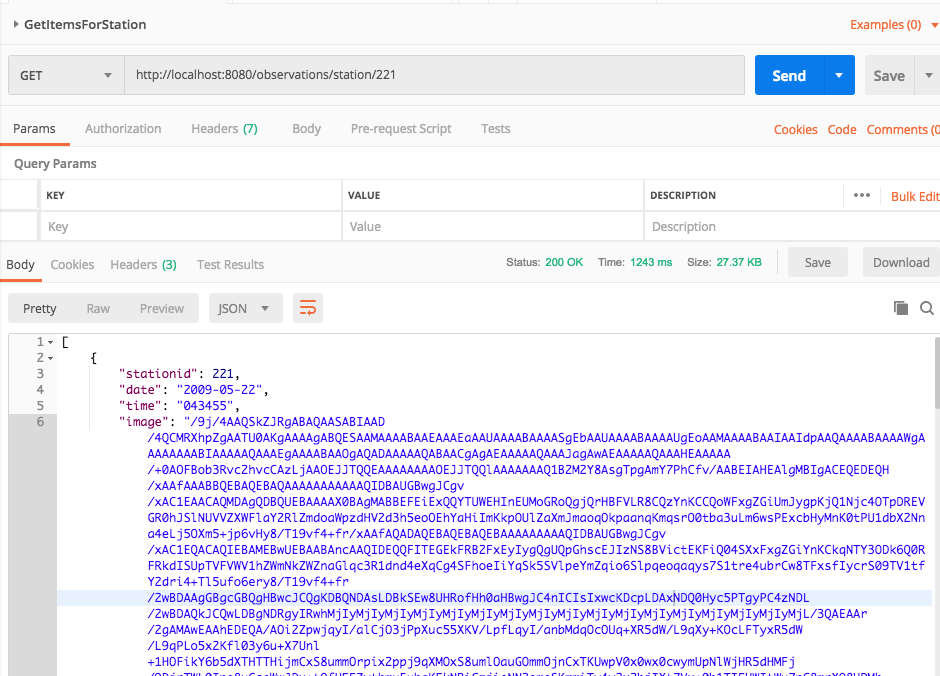
[
    {
        "stationid": 221,
        "date": "2009-05-22",
        "time": "043455",
        "image": "/9j/4AA <snip> 0/8AD9KhoA//2Q==",
        "tags": null
    },
    {
        "stationid": 221,
        "date": "2007-12-12",
        "time": "180000",
        "image": "/9j/4 <snip> /rn+q07/sHxfyNUK0Wxkf/9k=",
        "tags": null
    },
    {
        "stationid": 221,
        "date": "1992-03-12",
        "time": "091312",
        "image": "/9j/4AAQSkZJRgABAQAAYAB <snip> K0Wxkf/9k=",
        "tags": [
            "rapids",
            "rocks",
            "observation",
            "cold"
        ]
    },
    {
        "stationid": 221,
        "date": "1999-09-22",
        "time": "071244",
        "image": "/9j/4n0g27Qu <snip> A//2Q==",
        "tags": [
            "observation",
            "river",
            "sample"
        ]
    }
]
Further Topics
There are several topics not explored in this tutorial. First, you can scan a database table. When you scan the table you return all the items in the table. Second, this tutorial did not discuss conditionally updating or deleting items. However, the principles are the same as conditionally querying a table for items. Also, it is helpful to explore the command-line examples for working with DynamoDB, as they help understand the SDK. Finally, we did not cover the Java 1.1 AWS SDK.
From Java 1.1 AWS SDK to Java 2 AWS SDK
There are many more examples and tutorial on the Web using the Java 1.1 API rather than the Java 2 API. However, the primary difference between the two versions is the builder pattern. Many, if not most, of the Java 1.1 tutorials remain useful. The pattern is the same:
- create a request type
- setup the request with the desired parameters,
- pass the request to the DynamoDB client,
- obtain the result.
In the Java 1.1 SDK you perform these steps using constructors and setters and getters. In the Java 2 SDK you use builders. Practically all classes in the Java 2 AWS SDK use builders. Use this as a starting point if you have a particularly good tutorial using the Java 1.1. SDK. Although not foolproof, doing this has helped me translate many Java 1.1. examples to Java 2 SDK.
Further Resources
- TutorialPoint DynamoDB Tutorial
- Amazon Documentation
- AWS SDK for Java 2 Developer’s Guide
- API 2.5.41 Java API Reference
- More on DynamoDB design patterns.
- This tutorial, although it uses the Java 1 AWS API, is a very good introduction covering the same topics in this tutorial. Just remember, think builder, although the techniques in the API are the same, the Java 2 version of the API uses builders extensively.
Conclusion
In this tutorial we explored the lower-level API of the Java 2 SDK by using the AWS DynamoDB Java API. We wrote an item, updated an item, deleted an item, and batch uploaded items. We also explored conditionally querying items.
As with all of the SDK, it is based upon builders, requests, and the client. You build a request to pass to the DynamoDBClient which in turn returns a response. You do not create a new instance of a request and set properties via setters, but rather, you use a builder to build a request.
DynamoDB is a non-relational database and so you cannot just write a conditional query on any field. You can only use fields that are indexed in a query. This seems logical if you consider that DynamoDB is designed for massive amounts of data that is relatively unstructured.