Category Archives: Uncategorized

Code Snippet Generation – Postman Killer Feature

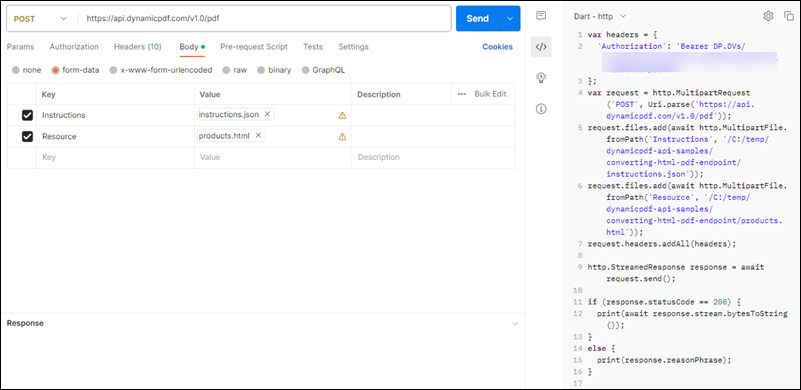
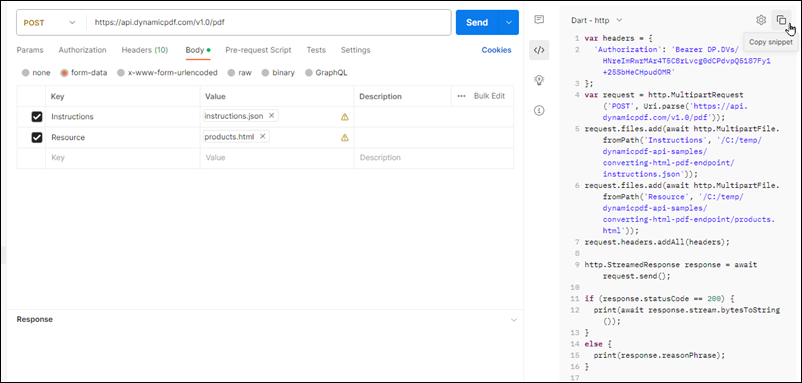
The other day I was supporting a client in my day job by helping him use Postman to generate HTTP Post requests. The problem was, that his language of choice was Dart, a language I had never heard of, much less used. I’ve worked with Postman for quite some time, but I never clicked this discrete link to the right of the request.

Imagine my surprise when I clicked that link and a code snippet showing the Dart code.

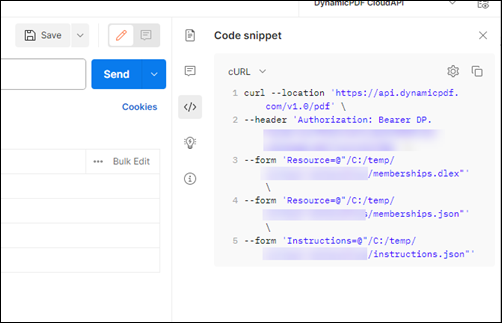
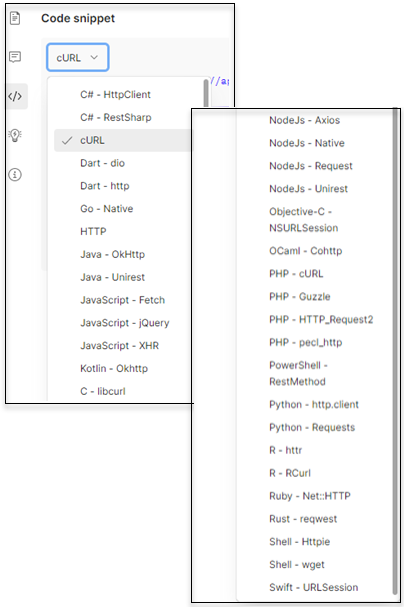
It generates cURL requests,

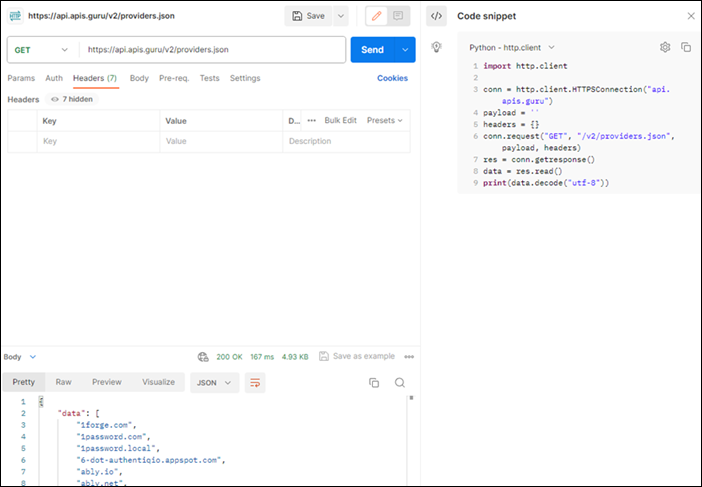
Python code snippets,

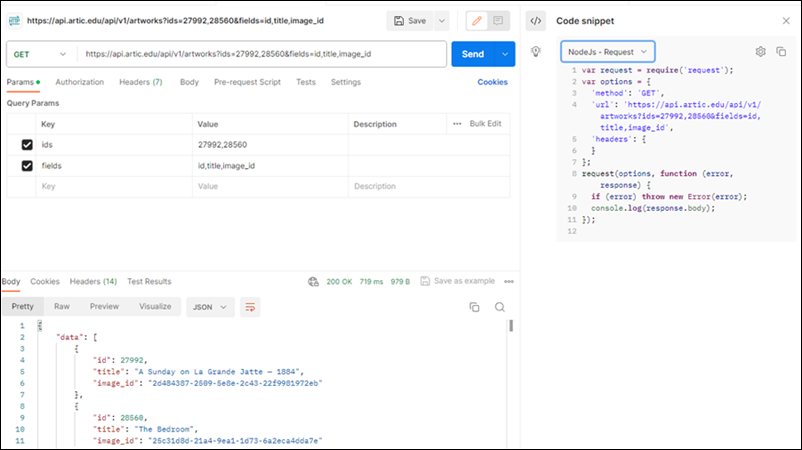
Node.js code snippets,

and many more. For example, Postman can generate snippets for over 30 different languages or frameworks.

How to Generate Python Code Snippets

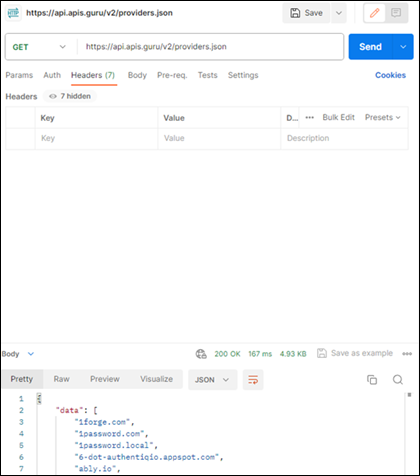
Create the request you desire, for example, the following is a simple GET request listing available APIs on the API Guru website.

  • Click the small Code generate button.
  • Select your desired language or framework.
  • Click the copy icon to copy the code snippet to your clipboard.

Here’s a video by a member of the Postman team showing how to use the code snippet generation feature.

Powerful PDF Generation Using DynamicPDF Cloud API

I’ve been working as the Developer Evangelist for DynamicPDF for some time now. As well as our desktop/server product, we offer a cloud version of our software: DynamicPDF Cloud API. It’s a powerful cloud API for creating and manipulating PDFs for your business. In this post, I outline some of its features and why you should use it if you create PDFs for your organization.

The cloud API is built on the powerful DynamicPDF Core Suite, a software platform that has been used for several decades by many of the world’s largest corporations.

The API consists of the following REST endpoints:

  • dlex-layout,
  • pdf-info,
  • pdf-xmp,
  • image-info,
  • and pdf.
ENDPOINTDOCUMENTATIONDESCRIPTION
image-infoCloud API Users Guide – image-infoReturns image metadata as a JSON document.
pdf-infoCloud API Users Guide – pdf-InfoReturns PDF metadata as a JSON document.
pdf-textCloud API Users Guide – pdf-textReturns the text from a PDF as a JSON document.
pdf-xmpCloud API Users Guide – pdf-xmpReturns XMP metadata from a PDF.
pdfCloud API Users Guide – pdfReturns a PDF after performing one of the pdf endpoint’s tasks (pagedlexhtmlwordimage) or merging.
dlex-layoutCloud API Users Guide – dlex-layoutReturns a PDF after performing one of the PDF endpoint’s tasks (pagedlexhtmlwordimage) or merging.
REST Endpoint documentation

DynamicPDF Designer Online

DynamiciPDF Cloud API also offers the following client libraries to make using the endpoints easier.

  • C#
  • Java
  • Node.js
  • PHP
  • Go
  • Python

It also offers – arguably the most powerful tool available anywhere online – DynamicPDF Designer Online, a graphical tool for creating rich PDF documents using your organization’s business data.

The API is free to try, and the documentation and support are top-notch. I should know – I wrote most the documentation, tutorials, and example code. There are tons of tutorials, and our support is great.

Spring Boot 2 Rest Security – Basic Authentication

The Spring Security framework provides declarative security for Spring applications. In this tutorial we secure a simple Rest API. We begin with a simple example, progress to using a custom UserDetailsService, and finish by adding method level security.

Spring Security is simple when it works, but can be confusing when it does not. There are differences between Spring and Spring Boot. In this tutorial we use Spring Boot 2.5 and the spring-boot-starter-parent, spring-boot-starter-web and the spring-boot-starter-security packages. These come pre-packaged with many of the dependencies for developers and frees us from worrying about dependencies in this tutorial. But a word of warning, you will find many different tutorials and many different ways to accomplish the same thing. Be certain you are using the technology discussed in the tutorial and not a variant. For instance, in this tutorial we use Spring Boot 2.5 with the Spring Boot starter jars.

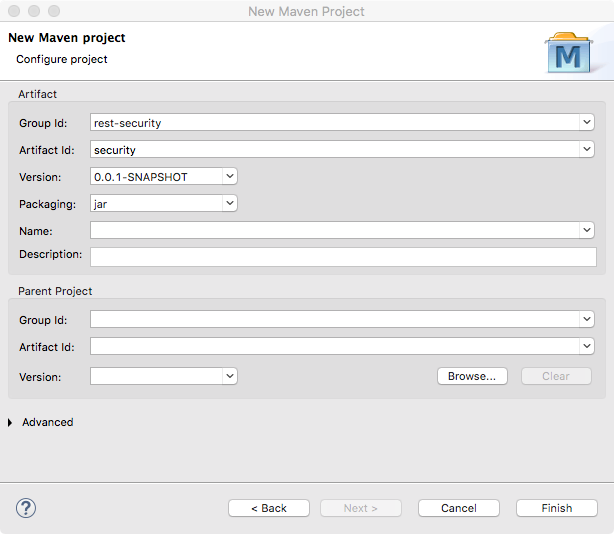
  1. Create a new Maven application with rest-security as the group id and security as the artifact id.
  1. Modify the pom.xml so it appears as follows. Note the addition of the spring-boot dependency and the spring boot starter dependencies (including security).
<project xmlns="http://maven.apache.org/POM/4.0.0"
xmlns:xsi="http://www.w3.org/2001/XMLSchema-instance"
xsi:schemaLocation="http://maven.apache.org/POM/4.0.0 
http://maven.apache.org/xsd/maven-4.0.0.xsd">
<modelVersion>4.0.0</modelVersion>
<groupId>com.tutorial</groupId>
<artifactId>rest-tutorial</artifactId>
<version>0.0.1-SNAPSHOT</version>
<parent>
<groupId>org.springframework.boot</groupId>
<artifactId>spring-boot-starter-parent</artifactId>
<version>2.0.5.RELEASE</version>
</parent>
<dependencies>
<dependency>
<groupId>org.springframework.boot</groupId>
<artifactId>spring-boot-starter-web</artifactId>
</dependency>
<dependency>
<groupId>org.springframework.boot</groupId>
<artifactId>spring-boot-starter-security</artifactId>
</dependency>
<dependency>
<groupId>org.springframework.boot</groupId>
<artifactId>spring-boot-starter-test</artifactId>
<scope>test</scope>
</dependency>
</dependencies>
<properties>
<java.version>1.8</java.version>
</properties>
<build>
<plugins>
<plugin>
<groupId>org.springframework.boot</groupId>
<artifactId>spring-boot-maven-plugin</artifactId>
</plugin>
</plugins>
</build>
</project>
  1. Create the packages, com.tutorial.spring.application and com.tutorial.spring.rest.
  2. In the com.tutorial.spring.rest package create the Hello class as follows.
package com.tutorial.spring.rest;

public class Hello {
  private String greeting;

  public String getGreeting() {
    return greeting;
  }

  public void setGreeting(String greeting) {
    this.greeting = greeting;
  }
}
  1. Create the controller class, HelloController in the com.tutorial.spring.rest package.
  2. Add one method named greeting and define it as a Rest endpoint.
package com.tutorial.spring.rest;

import org.springframework.web.bind.annotation.RequestMapping;
import org.springframework.web.bind.annotation.RequestMethod;
import org.springframework.web.bind.annotation.RestController;

@RestController
@RequestMapping(value = "/hello")
public class HelloController {

  @RequestMapping(value = "/greeting", method = RequestMethod.GET)
  public Hello greeting() {
    Hello hello = new Hello();
    hello.setGreeting("Hello there.");
    return hello;
  }
}
  1. Create the Spring Boot entry-point class in com.tutorial.spring.application package and name it TutorialApplication.
package com.tutorial.spring.application;

import org.springframework.boot.SpringApplication;
import org.springframework.boot.autoconfigure.SpringBootApplication;
import org.springframework.context.annotation.ComponentScan;

@SpringBootApplication
@ComponentScan({ "com.tutorial.spring.rest","com.tutorial.spring.application" })
public class TutorialApplication {
  public static void main(String[] args) {
    SpringApplication.run(TutorialApplication.class, args);
  }
}

If not familiar with the @SpringBootApplication or @ComponentScan annotations, refer to this tutorial, Spring Rest Using Spring Boot. This class is the runner for the application. For more on runners, refer to Spring Boot Runners.

  1. Create a class named TutorialSecurityConfiguration that extends WebSecurityConfigurerAdapter (Java Doc). Note that there is no @EnableWebSecurity (Java Doc) annotation on TutorialSecurityConfiguration. This annotation is not needed for Spring Boot applications, as it is automatically assumed. But if you are extrapolating this tutorial to a more traditional Spring application, caveat emptor.
  2. Add the configure, userDetailsService, and the passwordEncoder methods.
package com.tutorial.spring.application;

import org.springframework.context.annotation.Bean;
import org.springframework.context.annotation.Configuration;
import org.springframework.security.config.annotation.web.builders.HttpSecurity;
import org.springframework.security.config.annotation.web.configuration.WebSecurityConfigurerAdapter;
import org.springframework.security.core.userdetails.User;
import org.springframework.security.core.userdetails.UserDetailsService;
import org.springframework.security.crypto.bcrypt.BCryptPasswordEncoder;
import org.springframework.security.crypto.password.PasswordEncoder;
import org.springframework.security.provisioning.InMemoryUserDetailsManager;

@Configuration
public class TutorialSecurityConfiguration extends WebSecurityConfigurerAdapter {

  @Override
  protected void configure(HttpSecurity http) throws Exception {
    http.authorizeRequests().antMatchers("/**").authenticated()
      .and().httpBasic().and().csrf().disable();
  }

  @Bean
  public UserDetailsService userDetailsService() {
    InMemoryUserDetailsManager manager = new InMemoryUserDetailsManager();
    String encodedPassword = passwordEncoder().encode("password");
    manager.createUser(User.withUsername("james").password(encodedPassword)
      .roles("USER").build());
    return manager;
  }

  @Bean
  public PasswordEncoder passwordEncoder() {
    return new BCryptPasswordEncoder();
  }
}
  1. Start the application.
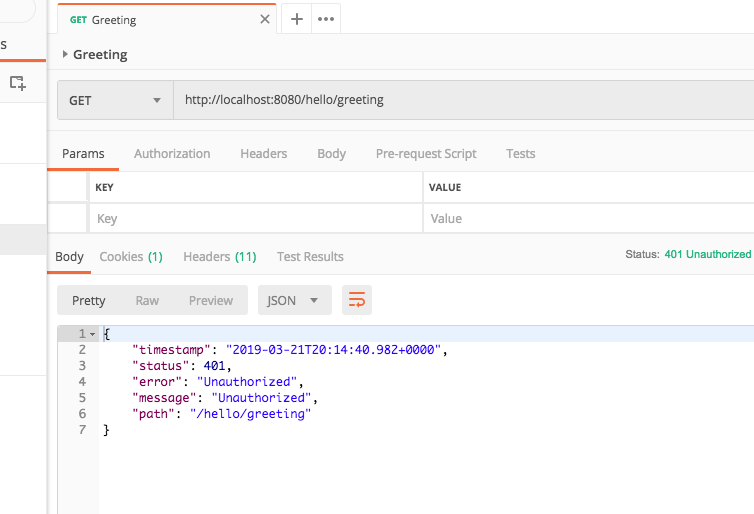
  2. Open Postman and create a request that makes a GET request.  Attempt to call the endpoint and you get an Unauthorized message. Notice the status is a 401 status code which means unauthorized.
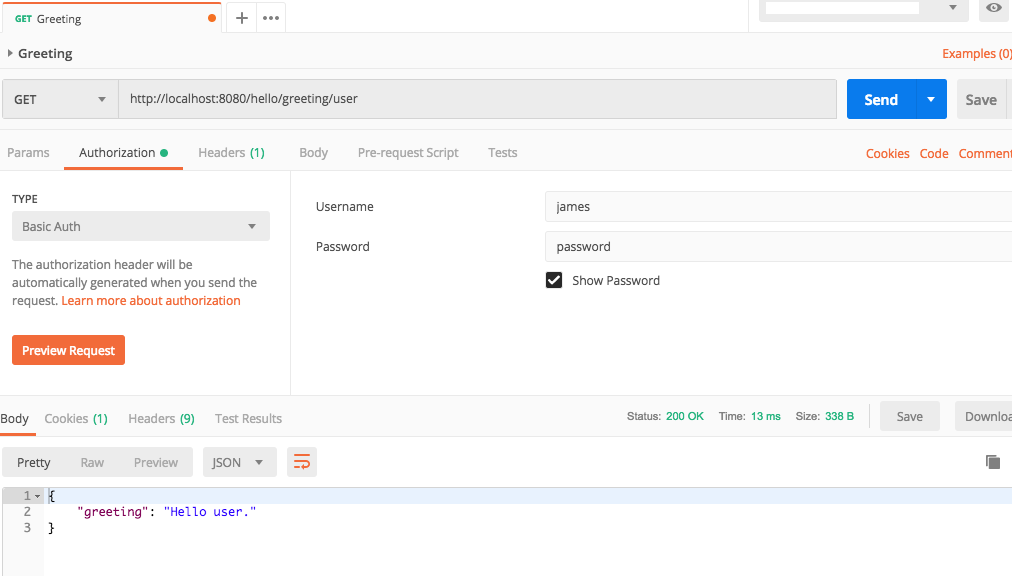
  1. Modify the Postman request by clicking the Authorization tab, selecting Basic Auth as the authorization type, and then adding the desired Username and Password.
  2. Call the endpoint and you should receive a valid response.
The TutorialSecurityConfiguration class extends Spring’s WebSecurityConfigurerAdapter class. This class is a base class that allows you to customize your security by overriding the configure(WebSecurity), configure(HttpSecurity), and configure(AuthenticationManagerBuilder) methods in your own custom class.

Http Configure

In TutorialSecurityConfiguration you override the configuration for how Http requests are secured. First, using authorizeRequests, we tell HttpSecurity (Java Doc) to allow restricting requests. We then restrict the requests to those matching the ant pattern. In TutorialSecurityConfiguration we are telling it to restrict it to all requests starting from the root path. We could have omitted antMatchers altogether if we wished. Next we tell HttpSecurity to use basic http authentication and finally to disable protection from cross-site requests (more on CSRF).

http.authorizeRequests().antMatchers("/**").authenticated()
.and().httpBasic().and().csrf().disable();

UserDetailsService

The UserDetailsService interface loads user-specific data (Java Doc). The InMemoryUserDetailsManager is a memory persistent class useful for testing and demonstration (Java Doc). It creates a map that constitute an application’s users. By adding it as a bean Spring security uses it to obtain the user to authenticate. When a user tries to log into the system, it searches for him or her using the user details service. That service can get users from a database, an LDAP server, a flat file, or in memory. See the api for more (implementations of UserDetailsService).

Modify One Endpoint

A Rest API where all endpoints have the same security restrictions is unrealistic. It is more probable that different endpoints are intended for different users. For instance, there might be a /greeting endpoint for the general public, a /greeting/user endpoint for users, and a /greeting/admin endpoint for administrators. Spring security allows adding different security restrictions on each endpoint.

  1. Modify HelloController to have two new Rest endpoints: /greeting/user and /greeting/admin implemented by the greetingUser and greetingAdmin methods respectively.
package com.tutorial.spring.rest;

import org.springframework.web.bind.annotation.RequestMapping;
import org.springframework.web.bind.annotation.RequestMethod;
import org.springframework.web.bind.annotation.RestController;

@RestController
@RequestMapping(value = "/hello")
public class HelloController {

  @RequestMapping(value = "/greeting", method = RequestMethod.GET)
  public Hello greeting() {
    Hello hello = new Hello();
    hello.setGreeting("Hello there.");
    return hello;
  }

  @RequestMapping(value = "/greeting/user", method = RequestMethod.GET)
  public Hello greetingUser() {
    Hello hello = new Hello();
    hello.setGreeting("Hello user.");
    return hello;
  }

  @RequestMapping(value = "/greeting/admin", method = RequestMethod.GET)
    public Hello greetingAdmin() {
      Hello hello = new Hello();
      hello.setGreeting("Hello administrator.");
      return hello;
  }
}
  1. Modify TutorialSecurityConfig to secure the two newly added endpoints.
  2. Add the newly created user to the userDetailsService method.
@Override
protected void configure(HttpSecurity http) throws Exception {
  http
  .authorizeRequests().antMatchers("/hello/greeting").permitAll()
  .antMatchers("/hello/greeting/admin").hasRole("ADMIN")
  .antMatchers("/hello/greeting/user").hasAnyRole("ADMIN","USER").and()
  .httpBasic().and().csrf().disable();
}

@Bean
public UserDetailsService userDetailsService() {
  InMemoryUserDetailsManager manager = new InMemoryUserDetailsManager();
  String encodedPassword = passwordEncoder().encode("password");
  manager.createUser(User.withUsername("james").password(encodedPassword)
    .roles("USER").build());
  manager.createUser(User.withUsername("john").password(encodedPassword)
    .roles("ADMIN").build());
  return manager;
}
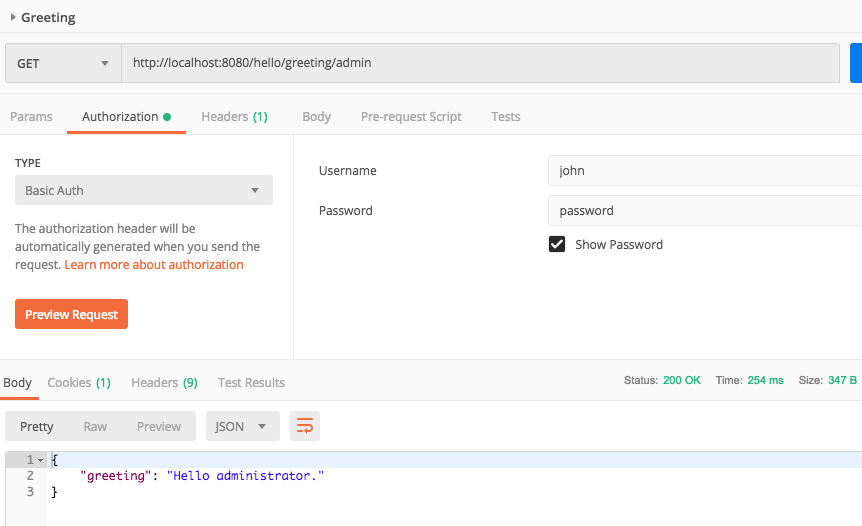
  1. Run the application. Attempt to access the admin rest endpoint with the john/password credentials and you receive the greeting.
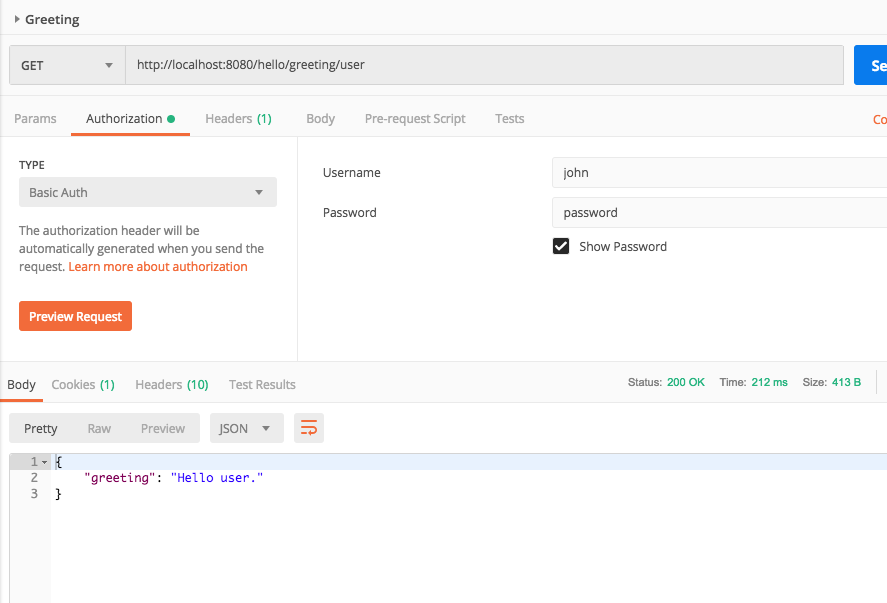
  1. Now access the user endpoint with john/password as the credentials and you receive the appropriate user greeting.
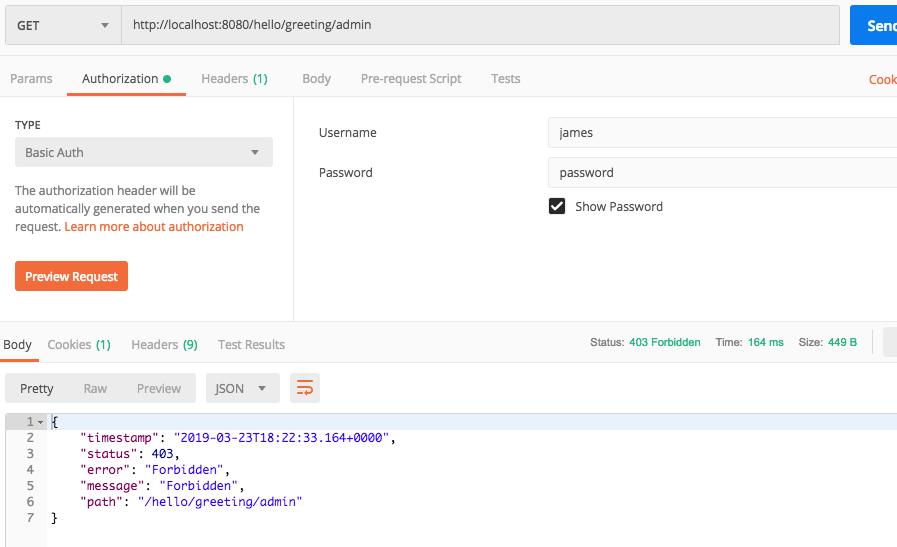
  1. Change the credentials to james/password and attempt to access the admin endpoint and you get a 403, Forbidden, status code.
Accessing User Information

After a user logs in there are many times you might wish to access details about that user. Spring Security offers an easy way to accomplish this through the UserDetails interface.

The easiest way to obtain a user’s details is through the SecurityContextHolder class. This class holds the security context, which includes the user’s details, or, to use security appropriate terminology: the principal. A principal is any entity that can be authenticated. For instance, another program could be a principal. A “user” need not be a physical person. Provided you realize user does not equal human, you can use the terms interchangeably.

UserDetails userDetails = (UserDetails) SecurityContextHolder.getContext()
  .getAuthentication().getPrincipal();

Through the SecurityContextHolder you get the context, then obtain the authenticated principal, which in turn allows you to obtain the UserDetails. The org.springframework.security.core.userdetails.UserDetails interface is implemented by a org.springframework.security.core.userdetails.User object, so you can cast the results to the UserDetails interface or the User implementation. Of course, you can create your own UserDetails implementation if you prefer, but that is outside this post’s scope.

User user = (User)SecurityContextHolder.getContext().getAuthentication()
  .getPrincipal();
  1. Modify HelloController‘s endpoints so that they append the username to the greetings. In the greetingUser method cast the results to a UserDetails interface. In the greetingAdmin method cast the results to the User class. (UserDetails and User JavaDocs).
package com.tutorial.spring.rest;

import org.springframework.security.core.context.SecurityContextHolder;
import org.springframework.security.core.userdetails.User;
import org.springframework.security.core.userdetails.UserDetails;
import org.springframework.web.bind.annotation.RequestMapping;
import org.springframework.web.bind.annotation.RequestMethod;
import org.springframework.web.bind.annotation.RestController;

@RestController
@RequestMapping(value = "/hello")
public class HelloController {

  @RequestMapping(value = "/greeting", method = RequestMethod.GET)
  public Hello greeting() {
    Hello hello = new Hello();
    hello.setGreeting("Hello there.");
    return hello;
  }

  @RequestMapping(value = "/greeting/user", method = RequestMethod.GET)
  public Hello greetingUser() {
    UserDetails userDetails = (UserDetails) SecurityContextHolder.getContext()
      .getAuthentication().getPrincipal();
    Hello hello = new Hello();
    hello.setGreeting("Hello user: " + userDetails.getUsername());
    return hello;
  }

  @RequestMapping(value = "/greeting/admin", method = RequestMethod.GET)
  public Hello greetingAdmin() {
    User user = (User)SecurityContextHolder.getContext().getAuthentication()
      .getPrincipal();
    Hello hello = new Hello();
    hello.setGreeting("Hello administrator: " + user.getUsername());
    return hello;
  }
}
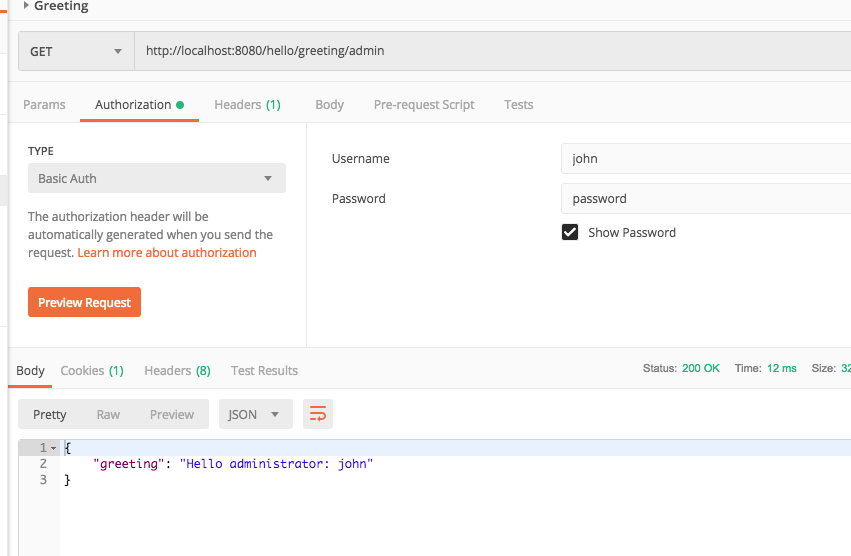
  1. Run the application and when you access the endpoint you should see the username in the JSON greeting.

Create a Custom UserDetailService

Creating a fully customized UserDetailService is outside the scope of this tutorial. Several of the Spring supplied implementations of this interface include JdbcDaoImpl (Java Doc) and LdapUserDetailsService (Java Doc), which provide ways to obtain user details via a Jdbc database source or an LDAP server, respectively. Here, however, we simply create a simple example for the sake of demonstration.

  1. Create a new class named UserDetailsServiceImpl implements the Spring UserDetailsService interface.
  2. Implement the loadByUserByUsername method so that it creates the user that accessed the endpoint.
package com.tutorial.spring.application;

import org.springframework.security.core.userdetails.User;
import org.springframework.security.core.userdetails.UserDetails;
import org.springframework.security.core.userdetails.UserDetailsService;
import org.springframework.security.core.userdetails.UsernameNotFoundException;
import org.springframework.security.crypto.bcrypt.BCryptPasswordEncoder;
import org.springframework.stereotype.Service;

@Service
public class UserDetailsServiceImpl implements UserDetailsService {

  public UserDetails loadUserByUsername(String username) throws 
    UsernameNotFoundException {
      BCryptPasswordEncoder encoder = new BCryptPasswordEncoder();
      if(username.equals("james")) {
        return User.withUsername("james").password(encoder.encode("password"))
          .roles("USER").build();
      } else if(username.equals("john")) {
        return User.withUsername("john").password(encoder.encode("password"))
          .roles("ADMIN").build();
      }
      else throw new UsernameNotFoundException("user not found"); 
  }
}
  1. Modify TutorialSecurityConfiguration to override the configure method that takes an AuthenticationMangerBuilder. Set the builder’s userDetailsService to a newly created instance of the UserDetailsServiceImpl class.
package com.tutorial.spring.application;

import org.springframework.context.annotation.Bean;
import org.springframework.context.annotation.Configuration;
import org.springframework.security.config.annotation.authentication.builders.AuthenticationManagerBuilder;
import org.springframework.security.config.annotation.web.builders.HttpSecurity;
import org.springframework.security.config.annotation.web.configuration.WebSecurityConfigurerAdapter;
import org.springframework.security.crypto.bcrypt.BCryptPasswordEncoder;
import org.springframework.security.crypto.password.PasswordEncoder;

@Configuration
public class TutorialSecurityConfiguration extends WebSecurityConfigurerAdapter {

  @Override
  protected void configure(HttpSecurity http) throws Exception {
    http.authorizeRequests().antMatchers("/hello/greeting").permitAll()
      .antMatchers("/hello/greeting/admin").hasRole("ADMIN")
      .antMatchers("/hello/greeting/user").hasAnyRole("ADMIN","USER").and()
      .httpBasic().and().csrf().disable();
}

  @Bean
  public PasswordEncoder passwordEncoder() {
    return new BCryptPasswordEncoder();
  }


  @Override
  public void configure(AuthenticationManagerBuilder builder) throws Exception {
    builder.userDetailsService(new UserDetailsServiceImpl());
  }
}
  1. Build and run the application and use Postman to access the endpoints.

Method Security

Modifying the security configuration’s configure method with every additional endpoint is error prone. Moreover, you cannot add security configuration to specific methods, but only paths. Another way to add security is through global method security.

  1. Modify TutorialSecurityConfiguration by adding the @EnableGlobalSecurity annotation.
@Configuration
@EnableGlobalMethodSecurity(prePostEnabled = true)
public class TutorialSecurityConfiguration extends WebSecurityConfigurerAdapter {
  1. Create a new endpoint with a method named greetingContractor in the HelloController for contractors.
  2. Add the @PreAuthorize annotation.
@RequestMapping(value = "/greeting/contractor", method = RequestMethod.GET)
@PreAuthorize("hasRole('CONTRACTOR')")
public Hello greetingContractor() {
  User user = (User)SecurityContextHolder.getContext().getAuthentication()
    .getPrincipal();
  Hello hello = new Hello();
  hello.setGreeting("Hello contractor: " + user.getUsername());
  return hello;
}
  1. Modify the loadUserByUsername method in UserDetailsServiceImpl to include a contractor.
public UserDetails loadUserByUsername(String username) throws 
  UsernameNotFoundException {
  BCryptPasswordEncoder encoder = new BCryptPasswordEncoder();
  if(username.equals("james")) {
    return User.withUsername("james").password(encoder.encode("password"))
      .roles("USER").build();
  } else if(username.equals("john")) {
    return User.withUsername("john").password(encoder.encode("password"))
      .roles("ADMIN").build();
  } else if(username.equals("lisa")) {
      return User.withUsername("lisa").password(encoder.encode("password"))
        .roles("CONTRACTOR").build();
  } else throw new UsernameNotFoundException("user not found"); 
}
  1. Run the application and access the contractor endpoint with the lisa/password credentials.
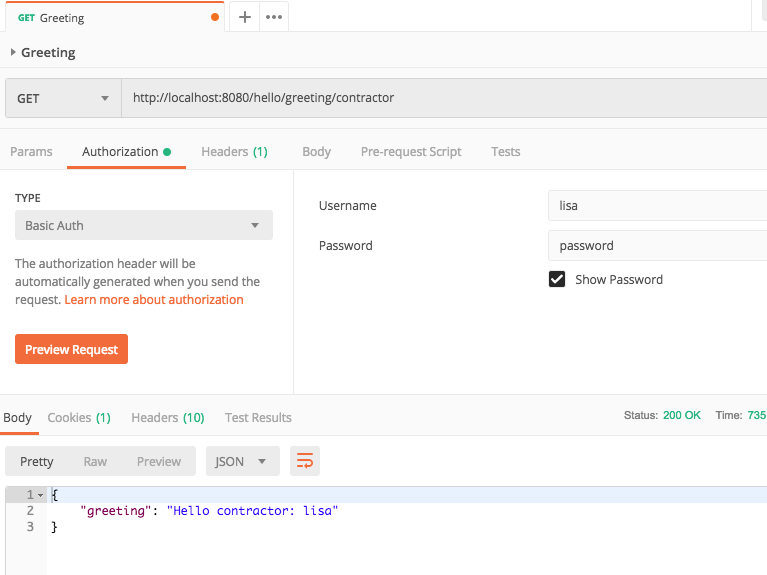
  1. Try accessing the contractor endpoint with the james/password credentials and you receive a 403, Forbidden, response code.

  1. Try accessing the contractor endpoint with the john/password credentials and you also get a 403 status code.

  1. Modify the greetingContractor method in HelloController so that it uses, hasAnyRole and includes the ADMIN role.
@RequestMapping(value = "/greeting/contractor", method = RequestMethod.GET)
@PreAuthorize("hasAnyRole('CONTRACTOR','ADMIN')")
public Hello greetingContractor() {
  1. Run the application and access the contractor endpoint with the john/password credentials and you receive the contractor greeting.

Conclusions

In this tutorial you created a simple Rest API secured by an in-memory map of users. It was purposely kept simple to illustrate basic Spring Security as it applies to Spring Boot 2.5 and Rest endpoints. Be advised there are many ways to do things in Spring Security. This tutorial showed one way to secure your API. For more information on Spring’s Security architecture, refer to Spring Security Architecture.

GitHub Repo

You can get the source code from here (Spring Boot 2 Rest Security Tutorial).
Spring Boot REST – Http Post

In a previous post, we created a simple Rest application using GET and Spring Boot. In this tutorial, we create a simple Rest application using POST. If you do not know the difference between GET and POST then you should review this material. In fact, you might wish to go through the W3Schools material prior to completing this simple tutorial. The W3School website is a venerable, yet very relevant, site that is a wealth of development material. Also, if you did not work through the previous tutorial using GET, then at least peruse that tutorial first. In this tutorial we use Spring Boot REST through Http Post.

  1. Create a new Maven project in Eclipse entitled rest-post.
  2. After creating the project replace the pom file with the following.
<project xmlns="http://maven.apache.org/POM/4.0.0" 
   xmlns:xsi="http://www.w3.org/2001/XMLSchema-instance" 
   xsi:schemaLocation="http://maven.apache.org/POM/4.0.0 
   http://maven.apache.org/xsd/maven-4.0.0.xsd">
<modelVersion>4.0.0</modelVersion>
<groupId>rest-post-tutorial</groupId>
<artifactId>rest-post</artifactId>
<version>0.0.1-SNAPSHOT</version>
<parent>
<groupId>org.springframework.boot</groupId>
<artifactId>spring-boot-starter-parent</artifactId>
<version>2.0.5.RELEASE</version>
</parent>

<dependencies>
<dependency>
<groupId>org.springframework.boot</groupId>
<artifactId>spring-boot-starter-web</artifactId>
</dependency>
<dependency>
<groupId>org.springframework.boot</groupId>
<artifactId>spring-boot-starter-test</artifactId>
<scope>test</scope>
</dependency>
<dependency>
<groupId>com.jayway.jsonpath</groupId>
<artifactId>json-path</artifactId>
<scope>test</scope>
</dependency>
</dependencies>
<properties>
<java.version>1.8</java.version>
</properties>
<build>
<plugins>
<plugin>
<groupId>org.springframework.boot</groupId>
<artifactId>spring-boot-maven-plugin</artifactId>
</plugin>
</plugins>
</build>
</project>
  1. Create the com.tutorial.spring.application and com.tutorial.spring.rest and com.tutorial.spring.rest.factory packages.
  2. Create a new class named Facility and implement it as follows.
package com.tutorial.spring.rest.factory;

import com.fasterxml.jackson.core.JsonProcessingException;
import com.fasterxml.jackson.databind.ObjectMapper;

public class Facility {

  public enum Region {
    NORTH, SOUTH, WEST, EAST
  }

  private Long id;
  private String name;
  private Long workerCount;
  private Double capacity;
  private Region region;

  public Region getRegion() {
    return region;
  }
  public void setRegion(Region region) {
    this.region = region;
  }
  public Long getId() {
    return id;
  }
  public void setId(Long id) {
    this.id = id;
  }
  public String getName() {
    return name;
  }
  public void setName(String name) {
    this.name = name;
  }
  public Long getWorkerCount() {
    return workerCount;
  }
  public void setWorkerCount(Long workerCount) {
    this.workerCount = workerCount;
  }
  public Double getCapacity() {
    return capacity;
  }
  public void setCapacity(Double capacity) {
    this.capacity = capacity;
  }

  @Override
  public String toString() {
    try {
      ObjectMapper mapper = new ObjectMapper();
      String value = mapper.writerWithDefaultPrettyPrinter().
          writeValueAsString(this);
      return value;
    } catch (JsonProcessingException e) {
      e.printStackTrace();
    }
    return null;
  }
}

Notice the toString method and using the ObjectMapper class. ObjectMapper is from the Jackson library. Jackson is a library for parsing JSON and is included with Spring Boot (Jackson on Github).

The ObjectMapper converts the class to JSON and writes it as a String.

  1. Create a class named FactoryService and mark it as a Spring service by marking it with the @Service annotation.
  2. Create a createSampleFacility method and a saveFacility method. In a real project these methods would perform much more; however, suspend disbelief and implement them simplistically as in the following code.
package com.tutorial.spring.rest;

import org.springframework.stereotype.Service;
import com.tutorial.spring.rest.factory.Facility;
import com.tutorial.spring.rest.factory.Facility.Region;

@Service
public class FactoryService {

  public Facility createSampleFacility() {
    Facility sample = new Facility();
    sample.setCapacity(2222.22);
    sample.setId((long) 100);
    sample.setName("Sample Facility");
    sample.setRegion(Region.NORTH);
    sample.setWorkerCount((long)10000);
    return sample;
  }

  public void saveFacility(Facility facility) {
    System.out.println("saving a " + facility.toString());
  }
}
  1. Create the rest controller named FactoryController.
  2. Create two methods, getFacility and createFacility, and annotate them as in the following code.
package com.tutorial.spring.rest;

import org.springframework.beans.factory.annotation.Autowired;
import org.springframework.web.bind.annotation.GetMapping;
import org.springframework.web.bind.annotation.PostMapping;
import org.springframework.web.bind.annotation.RequestBody;
import org.springframework.web.bind.annotation.RequestMapping;
import org.springframework.web.bind.annotation.RestController;
import com.tutorial.spring.rest.factory.Facility;

@RestController
@RequestMapping(value = "/factory")
public class FactoryController {

  @Autowired
  protected FactoryService service;

  @GetMapping("/facility/sample")
  public Facility getFacility() {
    return service.createSampleFacility();
  }

  @PostMapping("/facility")
  public void createFacility(@RequestBody Facility facility) {
    service.saveFacility(facility);
  }
}

Note the @GetMapping and the @PostMapping annotations. In the last tutorial we used the @RequestMapping annotation and then specified that it was either GET or POST, as in the following.

@RequestMapping(value = "/Widget", method = RequestMethod.GET)

The @GetMapping and the @PostMapping annotations are shortcuts for the @RequestMapping annotation. Both methods call the associated service method in the FactoryService marked by the @Autowired annotation.

  1. Create a new Request in PostMan that requests a sample Facility.
  2. Run the method and copy the response.

  1. Modify the response as follows.
{
"id": 200,
"name": "Heather Ridge",
"workerCount": 54000,
"capacity": 99987.34,
"region": "WEST"
}
  1. Create a new Request, ensure the method is Post, and in the Body tab, click raw, and then enter the JSON from step nine.

  1. Ensure the type is JSON (application/json) as in the following image.

  1. Ensure the method is POST, the Body has the Json string, and the method is set to JSON.

  1. Click Submit and the Json is sent to the Rest endpoint. The following is printed to the server console.
saving as a {
"id" : 200,
"name" : "Heather Ridge",
"workerCount" : 54000,
"capacity" : 99987.34,
"region" : "WEST"
}

The only thing returned to Postman is the 200 Http response code that indicated the request succeeded (response codes).

Simple tutorial illustrating converting a Java object to and from JSON.

Some Java Interview Questions (Immutability, Polymorphism, etc.)

Interview questions are so bogus. If your retention span is as bad as mine, without Google you are sunk. But, here are some questions that you will see on many interviews.

String Immutability

Strings are immutable and final in Java. You cannot change the object, but you can change the reference. Consider the following code.

package com.tutorial.junk;

public class VariousThings {
  int size;
  public static void main(String[] args) 
  {
    String a = "abc";
    String c = a;
    c = "test";

    VariousThings x = new VariousThings();
    x.size = 11;

    VariousThings y = x;
    y.size = 22;

     System.out.println(a + " " + c + " " + x.size + " " + y.size);
  }
}

Which when printed results in the following.

ab test 22 22

The a variable refers to the space in memory containing “xyz” while b refers to the “123” space.  The c variable creates a new space in memory containing “xyz” and refers to the newly created space, not the space referred to by the a variable. When c is set equal to the “test” value, only c is changed, as c does not refer to the same space as the a variable.

Contrast String behavior to the simple class VariousThings. The x variable refers to a new instance of VariousThings. Its size is set to eleven. The variable y also refers to x which in turn refers to the particular instance of VariousThings that it refers to. And the value of size is eleven. As y refers to the same object instance as x, when size is changed for y it is also changed for x.

String/Array Reversal

If you are sneaky, just use a StringBuilder’s reverse method. Or, use the ArrayUtils.reverse method from Apache Commons. However, this is rarely what the interviewer is looking for. Instead, he or she is testing if you remembered programming 101.

In the following example, we first reverse a string array. We also determine if a String is a palindrome.

package com.tutorial.junk;

public class Palindrome {

  public static void main(String[] args) {

    String z[] = {"1","2","3","4","5","6","7"};
    int right = z.length-1;            
    int left = 0;

    for(;left < z.length/2;left++} {
      String temp = z[right];
      z[right--] = z[left];
      z[left] = temp;
    }

    for(int i = 0; i < z.length; i++) {
      System.out.print(z[i] + " ");
    }

    String a = "bxxxxb";
    System.out.println(Palindrome.isPalindrome(a));

    String b = "abc";
    System.out.println(Palindrome.isPalindrome(b));
  }

  public static boolean isPalindrome(String a) {
    char[] chars = a.toCharArray();
    int right = chars.length-1;  
    int left = 0;

    for(;left <= right;left++) {
      if(chars[left] != chars[right--]) return false;
    }
    return true;
  }
}

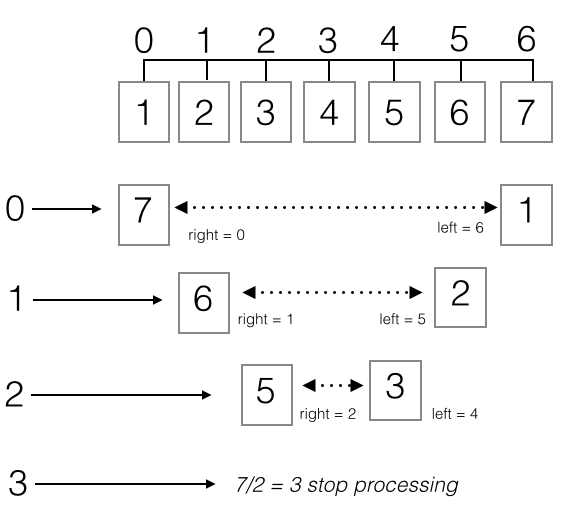
One solution to array reversal is to create a right and left index, where the right begins at the array’s length minus one while the left begins at zero. Then with each iteration, swap the value the two values at the right and left and then increment the left and decrement the right by one. Repeat until the left index reaches the array’s middle. If the array is an odd length, then the middle element remains in place, as it doesn’t switch. If even the middle two elements switch places.

A Stupid Static Question

Do not shoot the messenger. This example is the type of trivia not so skilled interviewers might ask to appear smarter than he or she really is. It’s the type of question I personally hate, but it might be asked.

package com.tutorial.junk;

public class WillCompile {

  public static String sayIt(){
    System.out.println("I compiled");
    return "test";
  }

  public static void main(String args[]){
    WillCompile objWillCompile = null;
    System.out.println(objWillCompile.sayIt());
  }
}

Which prints the following.

I compiled
Test

Why is this a trick question? The compiler sees that sayIt is a static method; therefore, it automagically the objWillCompile instance with the class WillCompile. And so the code compiles and runs even though the objWillCompile variable is null.

Polymorphism

Computer science defines polymorphism as when distinct objects can be accessed in the same way. There are two types of polymorphism, compile-time (static) and run-time (dynamic). Static polymorphism is achieved using method overloading. Dynamic polymorphism is achieved at runtime. This type of polymorphism is achieved through object inheritance. Consider each polymorphism type in turn.

Static Polymorphism

Consider a CommunicationWidget that is designed to send a simple message.

  1. Create a new class named CommunicationWidget.
  2. Create a method named communicate that takes a String.
  3. Create a method named communicate that takes a List of Strings.
  4. In the main method create a new CommunicationWidget class and call both communicate methods.
import java.util.Arrays;
import java.util.List;
import java.util.stream.Stream;

public class CommunicationWidget {
  public void communicate(String msg) {
    System.out.println(msg);
  }

  public void communicate(List<String> msgs) {
    Stream.of(msgs).forEach(x->System.out.println(x));
  }

  public static void main(String[] args) {
    CommunicationWidget widget = new CommunicationWidget();
    widget.communicate("hello");
    List<String> vals = Arrays.asList(new String[] { "A", "B", "C", "D" });
    widget.communicate(vals);
  }
}
  1. Run the program and note the output.
hello
[A, B, C, D]

The two communicate methods have different signatures. When the code is compiled, the compiler recognizes which method is supposed to be called based on the signature. This occurs at compile time and becomes a fixed part of the program.

Dynamic Polymorphism

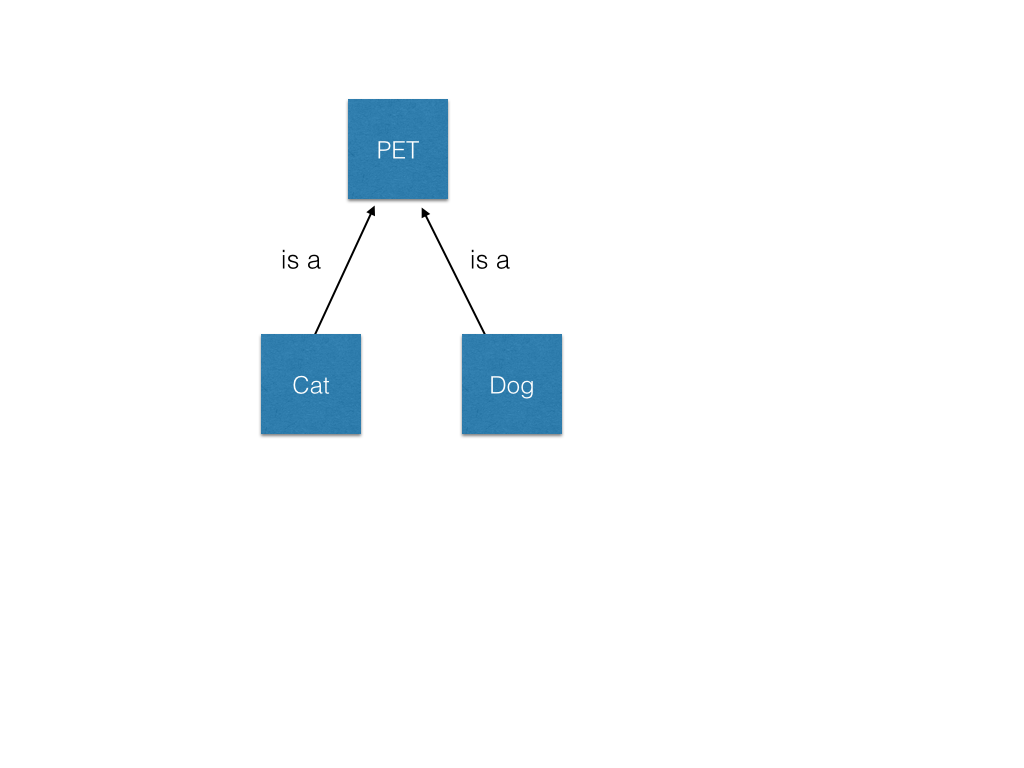
Polymorphism occurs at run-time rather than compile-time. It is accomplished through inheritance. Run-time polymorphism is when an object can be subclassed by objects and the behavior of the sub-object can override the parent’s behavior. For example, consider a pet, all pets make noise. However, cats purr while dogs bark.

A dog is a pet. A cat is a pet. You can represent this relationship through the following simple class diagram.

Let’s illustrate runtime polymorphism through a simple example.

  1. Create a new class named Pet and add a method named makeNoise.
package com.tutorial.junk;

public class Pet {
  public void makeNoise() {
    System.out.println("grunt");
  }
}
  1. Create a new class named Cat and have it extend Pet. In Java when a child class builds upon a parent class you say it extends the parent.
  2. Implement the makeNoise method, where the noise it makes is to purr.
package com.tutorial.junk;

public class Cat extends Pet {
  @Override
  public void makeNoise() {
    System.out.println("purr");
  }
}
  1. Create a Dog class that extends Pet.
  2. Create a makeNoise method where the noise it makes is to bark.
package com.tutorial.junk;

public class Dog extends Pet {
  @Override
  public void makeNoise() {
    System.out.println("bark");
  }
}
  1. Now create a class named RuntimePoly with a main method.
  2. Create a static method named causeNoise that takes a Pet as an argument and calls the Pet class’s makeNoise method.
  3. Create a new instance of a Dog and pass it to the causeNoise method.
  4. Create a new instance of a Cat and pass it to the causeNoise method.
  5. Create a new instance of Pet and pass it to the causeNoise method.
  6. Set the Pet instance to the Cat instance and pass it to the causeNoise method.
  7. Set the Pet instance to the Dog instance and pass it to the causeNoise method.
package com.tutorial.junk;

public class RuntimePoly {

  public static void causeNoise(Pet pet) {
    pet.makeNoise();
  }

  public static void main(String[] args) {
    Dog a = new Dog();
    RuntimePoly.causeNoise(a);
    Cat b = new Cat();
    RuntimePoly.causeNoise(b);
    Pet c = new Pet();
    c.makeNoise();
    c = a;
    c.makeNoise();
    c = b;
    c.makeNoise();}
  }
}
  1. Compile and run the program.
bark
purr
grunt
bark
purr

The causeNoise method takes a Pet. But a Dog is a Pet and so the code compiles. Moreover, the Dog makeNoise method overRides the Pet makeNoise method. The same is true for Cat when it is passed to the makeNoise method.

The causeNoise method takes any object that subclasses Pet. This is one aspect of dynamic polymorphism. In the main method, the new instance of Pet is assigned to the Dog instance (remember the variable c is a reference to an instance of Pet). Because c references a Pet, it can be changed to reference a Dog or a Cat and the appropriate makeNoise method is called. The correct makeNoise method is determined at runtime and is not precompiled statically.

Algorithms – Computer Programming’s Foundation

To many, computer programming seems an arcane topic, particularly when first introduced to it. Students learn variables, constants, conditionals, control flow, and numerous other topics. What is often lost – especially in these neophyte to guru in twelve weeks or less boot-camps – is what actually underlies all the arcane symbols comprising a computer language.*see note below

“Computer science is no more about computers than astronomy is about telescopes.”
Edsger W. Dijkstra

Edsger W. Dijkstra

Computer science, and by extension computer programming, is about problem solving. By itself, a computer is a particularly dumb conglomeration of silicon, wires, and aluminum. It does nothing but store and transport electrical charges from one location to another internally. It is not until a human, through his or her intellectual labors, harness the flow of the charges to perform some task that a computer does anything particularly interesting.  But getting computers to do something interesting require a systematic approach to performing tasks. Every step must be specified in detail and you must ensure not to overlook steps. You must devise a detailed procedure for the computer to follow to perform a task. That is computer programming’s essence: write procedures that dictate how a computer solves a  particular task.

So if computer science is not necessarily computer programming, then what exactly is computer science?  Of course, computer programming is an element of computer science, but what is computer science? The following video by “Art of the Problem” on YouTube explains.

Computer science is the science of computation. How to get computers to solve problems. The math behind pushing the boundaries of what computers can and cannot do is staggering. But this is the theoretical side to computer science. Consider the practical. A computer language is a set of instructions that humans can write to have a computer perform tasks. But as computers are dumb, those instructions must be explicit and accurate. Writing accurate instructions to perform a task require an accurate underlying algorithm.

Algorithms

Webster’s dictionary defines an algorithm as “a step-by-step procedure for solving a problem or accomplishing some end especially by a computer <cite here>.”  Here’s a humorous, yet insightful, video clip from “The Big Bang Theory” illustrating an algorithm.

A clip from “Terminator Two: Judgement Day” provides another more graphic, yet still humorous, example of an algorithm.

In the above clip, the Terminator uses one or more algorithms to obtain clothing. From visual input, he calculates the attributes of features such as height, weight, and foot size to determine the probability a person is a match. If not a match, he moves to the next person. If a match, he persuades the person to remove his or her clothes.

Computer programming is formalizing algorithms into a form usable by a computer. Algorithms are the solution to a task/problem. Code is the instructions performing the algorithm. The following video by “Art of the Problem” on YouTube introduces algorithms.

The above video assumes some knowledge of looping and conditional logic. However, if you are reading this as a supplement to “Think Java” then this post only assumes familiarity through chapter four of the book. This chapter introduces you to methods that do not return a value. You have not been introduced to methods that return values, looping, or conditional logic. So let’s consider another algorithm, purposely ignoring concepts not yet covered in “Think Java.”

Consider the task of boiling water. The following steps outline a basic algorithm.

  1. Get pot from cabinet.
  2. Take pot to the sink.
  3. Turn on water facet.
  4. Place water in pot.
  5. Turn off water facet.
  6. Place pot on stove.
  7. Turn on stove burner.
  8. Heat water until boiling.

The steps seem easy enough, but remember, computers are very dumb. These instructions are not explicit enough. For instance, consider the sub-steps involved in obtaining a pot from the cabinet.

  1. Walk over to cabinet.
  2. Open the cabinet.
  3. Reach into the cabinet.
  4. Grasp pot handle.
  5. Lift pot and take it out of the cabinet.

But of course, computers are too dumb to even understand these instructions. For instance, consider the sub-steps involved physically perform the first step, first sub-step.

  1. Turn body in direction of cabinet.
  2. Take alternating right and left steps until cabinet is reached.

But even still the computer is clueless, as these sub-sub-steps remain ambiguous. We could continue to break the steps down to the most fundamental level. For instance, instructions on how to move each muscle when walking to the cabinet.

Understanding muscular contractions is obviously taking our algorithm to a level too fundamental to be useful. Thankfully, algorithms build upon previously solved algorithms, which can be reused as a “black box.” But before considering algorithm reuse, first consider how to decompose an algorithm into more manageable sub-tasks through a process called functional decomposition.

Functional Decomposition

Functional decomposition is explained well by the following.

Societal Impact

There is a downside to our rush to formalize all problems into formal algorithms. We use computers to decide everything from product

Sometimes a computer’s formalization leads us to eschew common sense. And think about this last clip. Politics aside, I leave you with this vision of our near future. It’s not science fiction, it will be reality within a few decades at most.

* This post is particularly directed towards students that have completed chapters one through four of the book “Think Java.” by Allen B. Downey & Chris Mayfield.Note in this post I specifically avoid discussing repetition and conditional algorithms, preferring to keep this post simple. I also avoid discussing Object-Oriented analysis and design. Here, I focus on simple algorithms and functions. It is my personal belief, that understanding simple functional programming helps transition to Object-Oriented programming.

SSH, AWS, and The Cloud for the Layman


Cloud computing is the future of computing. Amazon Web Services (AWS) currently provides the most comprehensive cloud computing solution. To the layman, cloud computing probably sounds like just more computer jargon best left to nerds. But it’s not; all educated adults should understand cloud computing – at least on a non-technical level.

I have three servers – all three of which used to dramatically raise my monthly electricity bill – sitting in my closet. But now they sit there with the power button switched off. Instead I use AWS. AWS saves me money in electricity and is easily accessible over the Internet from anywhere. I couldn’t access the three servers sitting in my closet from anywhere outside my own personal network; the security risks were too great and the configuration details to big of a pain in the butt. Not so with AWS, now I can access my virtual server(s) residing on AWS from anywhere in the world.


In fact, I use AWS to provide a uniform computing environment for students in my introduction to programming class. On AWS I have a virtual server that is one of many residing on one of Amazon’s physical computers. I access that virtual server as if it was a physical computer via the command-line on my local computer. The communication between my personal computer and the server is accomplished using SSH over the Internet. I created accounts on the virtual server for each student. Each student uses ssh over the Internet from his or her personal computer to connect to the virtual server. The student then interacts with his or her account on the virtual server via the command-line. The actual programs the student writes, the software tools used to write and compile the programs, and the file system used to store the student’s work all reside on the virtual server residing in one of Amazon’s physical servers. This is but one use of cloud computing.

In this post I discuss the technologies behind using a virtual server on AWS. Let us explore each of the technologies involved in using a virtual server residing on AWS from a personal computer. This post is not a comprehensive technical tutorial on each technology, but rather, a layman’s introduction.

The Internet

How does one explain how the Internet functions to someone with little to no technical background?  This video does a good job explaining how the Internet works on a non-technical level.

Amazon’s servers are connected to the Internet.  This allows communicating with them. However, hackers lurk everywhere and so communication must be secure and so typically you use a secure shell (ssh) to communicate with the server from your personal computer. But understanding ssh requires understanding the command-line.

Command-line

If you already know what the command-line is and why you might use it, skip to the next section. Otherwise, you should watch the following video before continuing. Before the fancy graphics on your computer were standard, there was the command-line. Users interacted with computers via a simple text interface. Even today, that simple text interface is how most users communicate with a remote server.  Let’s explore the history of the user interface so you have a better understanding of the command-line.

Secure Shell

Just as a browser on your computer can connect to a remote computer through the Internet and display web pages, your computer can also connect to a remote server through the Internet using Secure Shell (SSH) and display text input and output. This video explains how SSH works on a non-technical level.

Cloud Computing

Okay, but what about Amazon Web Services, Cloud Computing, and all that nonsense? Why the fuss?  Let’s take a step back and get a 5 minute non-technical history of computing and cloud computing narrated by none other than Stephen Fry.

Now, remote physical servers, accessed from anywhere in the world is nothing new. Moreover, having space for your website – for example housing your site on a provider such as GoDaddy – is not new. But cloud computing is more than simply providing space on a server to house you webpage. Cloud computing gives you unprecedented access to that remote server’s computing power. Moreover, it provides that access securely and ensures your work doesn’t impact other users also using that server. To understand how, you must understand something called virtualization. Virtualization provided over the Internet is what allows ubiquitous computing power to everyone…well, everyone that can pay for it (but that’s a different blog post).

Virtualization

A virtual machine is a “pretend computer” that runs on a physical computer. For instance, a Mac user might use VMware Fusion to run Windows or Linux on his or her physical Macintosh computer. That same technology allows a physical server to run multiple “pretend servers” on its hardware.

So a few years ago, some enterprising employee noticed that much of Amazon’s vast computing power went unused. Yet Amazon was still paying for that unused computing power. Why not rent that power out? Enter the virtual machine. Amazon would allow folks to create their own virtual machines on Amazon’s physical computers and pay only for the computing power actually used – essentially “renting” the computer. This simple idea has spawned an entirely new business for Amazon that is arguably poised to make more profit than even their online marketplace. Entire corporations can throw away their physical servers and instead “rent” space on Amazon’s physical servers that run virtual machines.

Amazon Web Services

Here is a video explaining Amazon Web Services for non-technical folks. Keep in mind, behind the strange lingo and explanation, fundamentally you can explain cloud computing quite simply. As already discussed earlier, instead of owning the computer you run software, you rent space on Amazon’s server and it runs the software. But you are not simply renting space, you are running your own computer on Amazon’s computer using virtualization.

And another video by Amazon on cloud computing using AWS.

Conclusion

Cloud computing allows a lowly adjunct instructor at a community college (me!) to offer his students the same computing power that an MIT or Carnegie Mellon could offer its students. In less than an hour, while sitting in my study on a Sunday night, I was able to accomplish what would have taken days several years ago.


And rather than relying upon the college to house and maintain costly physical servers on campus, I will pay less than five dollars for enough computing power for an entire semester of approximately twenty-five students writing and compiling homework assignments. That is powerful stuff right there. It’s game changing.