In a previous post, we created a simple Rest application using GET and Spring Boot. In this tutorial, we create a simple Rest application using POST. If you do not know the difference between GET and POST then you should review this material. In fact, you might wish to go through the W3Schools material prior to completing this simple tutorial. The W3School website is a venerable, yet very relevant, site that is a wealth of development material. Also, if you did not work through the previous tutorial using GET, then at least peruse that tutorial first. In this tutorial we use Spring Boot REST through Http Post.
Create a new Maven project in Eclipse entitled rest-post.
After creating the project replace the pom file with the following.
Create the com.tutorial.spring.application and com.tutorial.spring.rest and com.tutorial.spring.rest.factory packages.
Create a new class named Facility and implement it as follows.
package com.tutorial.spring.rest.factory;

import com.fasterxml.jackson.core.JsonProcessingException;
import com.fasterxml.jackson.databind.ObjectMapper;

public class Facility {

  public enum Region {
    NORTH, SOUTH, WEST, EAST
  }

  private Long id;
  private String name;
  private Long workerCount;
  private Double capacity;
  private Region region;

  public Region getRegion() {
    return region;
  }
  public void setRegion(Region region) {
    this.region = region;
  }
  public Long getId() {
    return id;
  }
  public void setId(Long id) {
    this.id = id;
  }
  public String getName() {
    return name;
  }
  public void setName(String name) {
    this.name = name;
  }
  public Long getWorkerCount() {
    return workerCount;
  }
  public void setWorkerCount(Long workerCount) {
    this.workerCount = workerCount;
  }
  public Double getCapacity() {
    return capacity;
  }
  public void setCapacity(Double capacity) {
    this.capacity = capacity;
  }

  @Override
  public String toString() {
    try {
      ObjectMapper mapper = new ObjectMapper();
      String value = mapper.writerWithDefaultPrettyPrinter().
          writeValueAsString(this);
      return value;
    } catch (JsonProcessingException e) {
      e.printStackTrace();
    }
    return null;
  }
}
Notice the toString method and using the ObjectMapper class. ObjectMapper is from the Jackson library. Jackson is a library for parsing JSON and is included with Spring Boot (Jackson on Github).
The ObjectMapper converts the class to JSON and writes it as a String.
Create a class named FactoryService and mark it as a Spring service by marking it with the @Service annotation.
Create a createSampleFacility method and a saveFacility method. In a real project these methods would perform much more; however, suspend disbelief and implement them simplistically as in the following code.
package com.tutorial.spring.rest;

import org.springframework.stereotype.Service;
import com.tutorial.spring.rest.factory.Facility;
import com.tutorial.spring.rest.factory.Facility.Region;

@Service
public class FactoryService {

  public Facility createSampleFacility() {
    Facility sample = new Facility();
    sample.setCapacity(2222.22);
    sample.setId((long) 100);
    sample.setName("Sample Facility");
    sample.setRegion(Region.NORTH);
    sample.setWorkerCount((long)10000);
    return sample;
  }

  public void saveFacility(Facility facility) {
    System.out.println("saving a " + facility.toString());
  }
}
Create the rest controller named FactoryController.
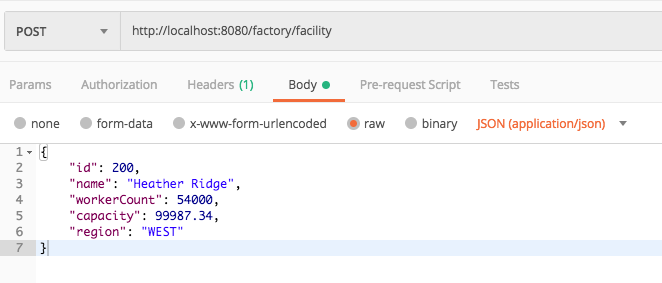
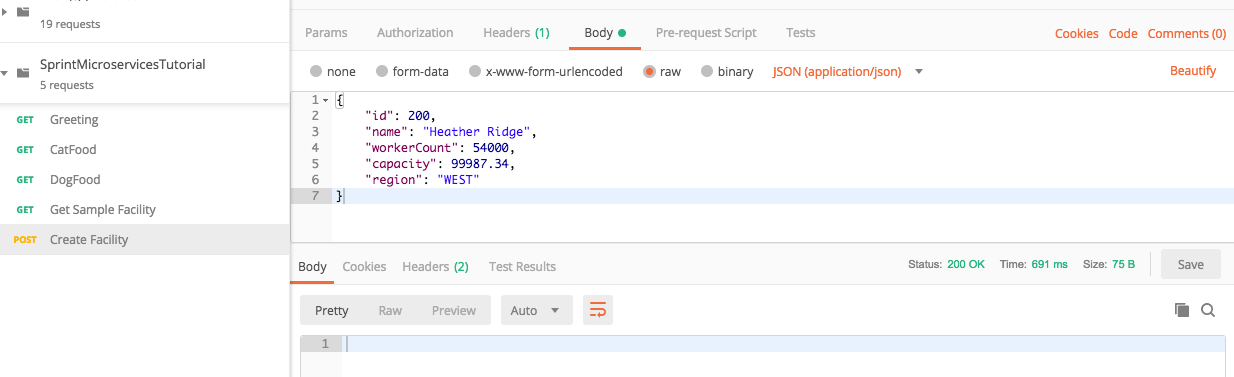
Create two methods, getFacility and createFacility, and annotate them as in the following code.
Note the @GetMapping and the @PostMapping annotations. In the last tutorial we used the @RequestMapping annotation and then specified that it was either GET or POST, as in the following.
The @GetMapping and the @PostMapping annotations are shortcuts for the @RequestMapping annotation. Both methods call the associated service method in the FactoryService marked by the @Autowired annotation.
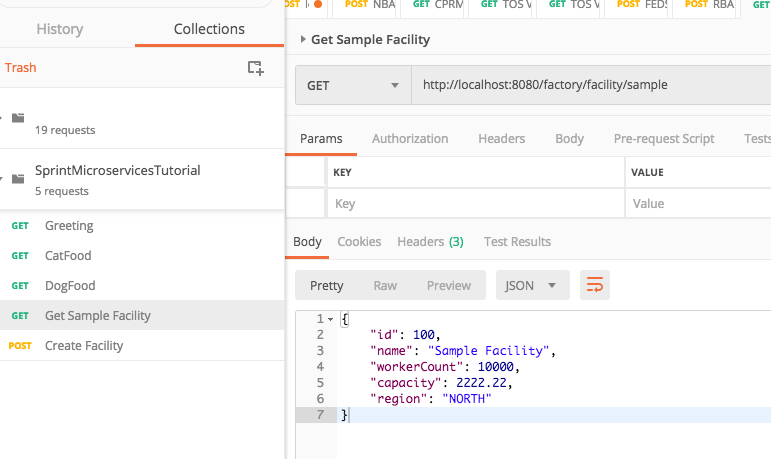
Create a new Request in PostMan that requests a sample Facility.
In the next few posts I will be exploring implementing microservices using REST, messaging, and finally Amazon Web Services (AWS) Lambda. Although the tutorials are largely written in a step-by-step format, we also explore the underlying theory of microservice architecture. In this tutorial we explore REST using Spring Boot.
In this first tutorial, I assume Eclipse, Maven, and Postman. If new to Java then you are strongly recommended to begin by first going through this book, Think Java, along with my accompanying tutorials. There are also many links to excellent YouTube tutorials that accompany the step-by-step tutorials provided. If you are new to Maven and/or Eclipse, then here are two introductory tutorials on Maven and Eclipse.
Let’s begin by building a simple Hello World REST endpoint using Spring Boot. Spring boot is an easy way to create Spring applications without requiring web server installation, Spring configuration files, and other necessities of standing a Spring application. You can quickly create and run a Spring application. Although useful for tutorials, and it is used in production, if you do not understand more traditional Spring applications, you should also learn the details of more traditional Spring application configuration before going to a job interview. But in this and the next several tutorials, I assume Spring Boot.
Create a new Maven project named rest-tutorial. If you have never created a Maven application in Eclipse, refer to this tutorial.
Create the following two packages: com.tutorial.spring.application and com.tutorial.spring.rest in the rest-tutorialproject. (how to create a package)
Create the class Hello.java in the com.tutorial.spring.rest package. (how to create a class)
package com.tutorial.spring.rest;

public class Hello {

  private String greeting;

  public String getGreeting() {
    return greeting;
  }

  public void setGreeting(String greeting) {
    this.greeting = greeting;
  }
}
Create a class with a main method named TutorialApplication in the com.tutorial.spring.application package.
Add the @SpringBootApplication and @ComponentScan annotations to the class.
package com.tutorial.spring.application;

import org.springframework.boot.SpringApplication;
import org.springframework.boot.autoconfigure.SpringBootApplication;
import org.springframework.context.annotation.ComponentScan;

@SpringBootApplication
@ComponentScan({ "com.tutorial.spring.rest" })
public class TutorialApplication {

  public static void main(String[] args) {
    SpringApplication.run(TutorialApplication.class, args);
  }
}
An annotation is metadata that provides more information to the compiler and that can be interpreted at runtime (introduction to annotations). Spring Boot uses the @SpringBootApplication annotation to signify that a class is the starting point for a Spring Boot application. It also provides default values for the @Configuration, @EnableAutoConfiguration, and @ComponentScan Spring annotations. However, notice we also use the @ComponentScan annotation because we do not wish using the provided default value. Instead, we explicitly instruct Spring to scan for Spring classes in the com.tutorial.spring.rest package.
Create another class named HelloController in the com.tutorial.spring.application.rest package.
Add the @RestController and @RequestMapping annotations to the class.
package com.tutorial.spring.rest;

import org.springframework.web.bind.annotation.RequestMapping;
import org.springframework.web.bind.annotation.RestController;
import org.springframework.web.bind.annotation.RequestMethod;

@RestController
@RequestMapping(value="/hello")
public class HelloController {

  @RequestMapping(value = "/greeting", method = RequestMethod.GET)
  public Hello greeting() {
    Hello hello = new Hello();
    hello.setGreeting("Hello there.");
    return hello;
  }
}
The @RequestController annotation serves two purposes, it defines the class as a Spring controller and as a REST endpoint (more on @RequestController and @Controller). The first @RequestMappinguse defines the hello endpoint or http://localhost:8080/hello. The second defines the greeting endpoint and is used with the previous endpoint to form http://localhost/hello/greeting. It defines the HTTP method as GET (more on GET and POST).
Build and run the application in Eclipse. You should see log messages from the Spring Boot embedded web server in the Eclipse Console. Note the line that confirms the greeting endpoint was mapped to the method developed.
019-02-24 16:11:52.675 INFO 3491 --- [ main]
s.w.s.m.m.a.RequestMappingHandlerMapping : Mapped
"{[/hello/greeting],methods=[GET]}" onto public com.tutorial.spring.rest.Hello
com.tutorial.spring.rest.HelloController.greeting()
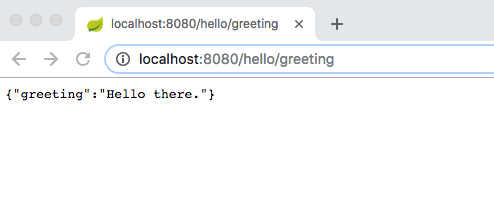
Open a web browser and type http:localhost:8080/hello/greeting in as the address to navigate to the endpoint. You should see the following.
But a web browser is intended for results viable for consumption by an end-user. For instance, an HTML page renders in a web browser and is visible to the viewer. A Rest service, in contrast, is intended to be used by another application. Moreover, the endpoint’s purpose is to provide data and not display the data. Or,
REST, or REpresentational State Transfer, is an architectural style for providing standards between computer systems on the web, making it easier for systems to communicate with each other. REST-compliant systems, often called RESTful systems, are characterized by how they are stateless and separate the concerns of client and server. We will go into what these terms mean and why they are beneficial characteristics for services on the Web (code academy).
Moreover, note the displayed results. The results are displayed using JavaScript Object Notation (JSON). This notation is for easy communication between programs rather than human end-user consumption (more on JSON).
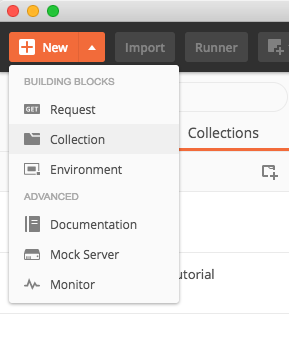
Instead of using a browser, let’s use a free tool named Postman. It is designed specifically for Rest developers. Download and install Postman if you do not already have it installed. You can obtain it here. For more information on Postman refer to the many tutorials provided.
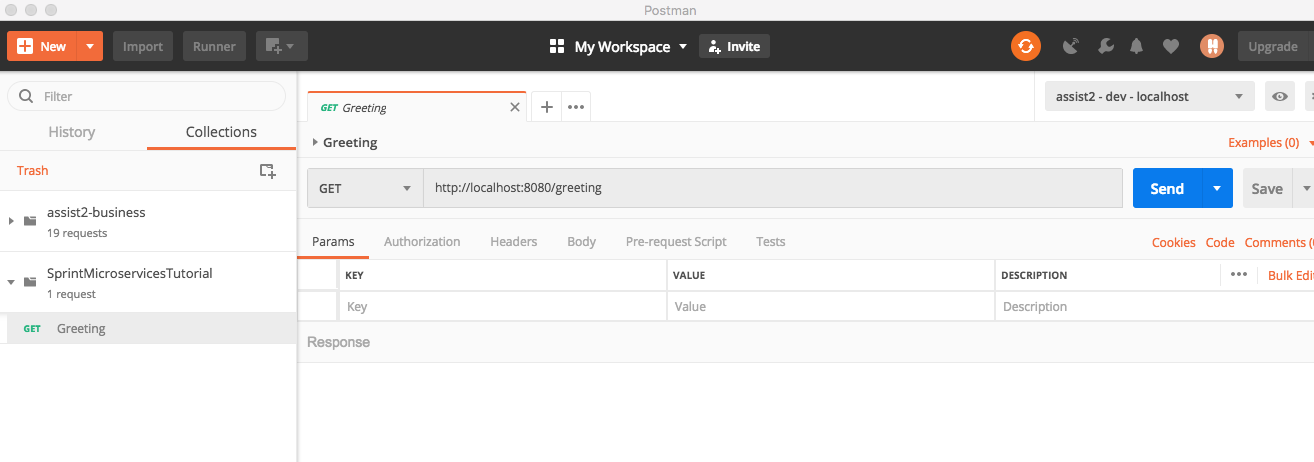
Start Postman and create a new Collection named SprintMicroservicesTutorial.
Create a new Request named Greeting. Ensure the method is GET and has the following URL http://localhost:8080/greeting (creating a GET request).
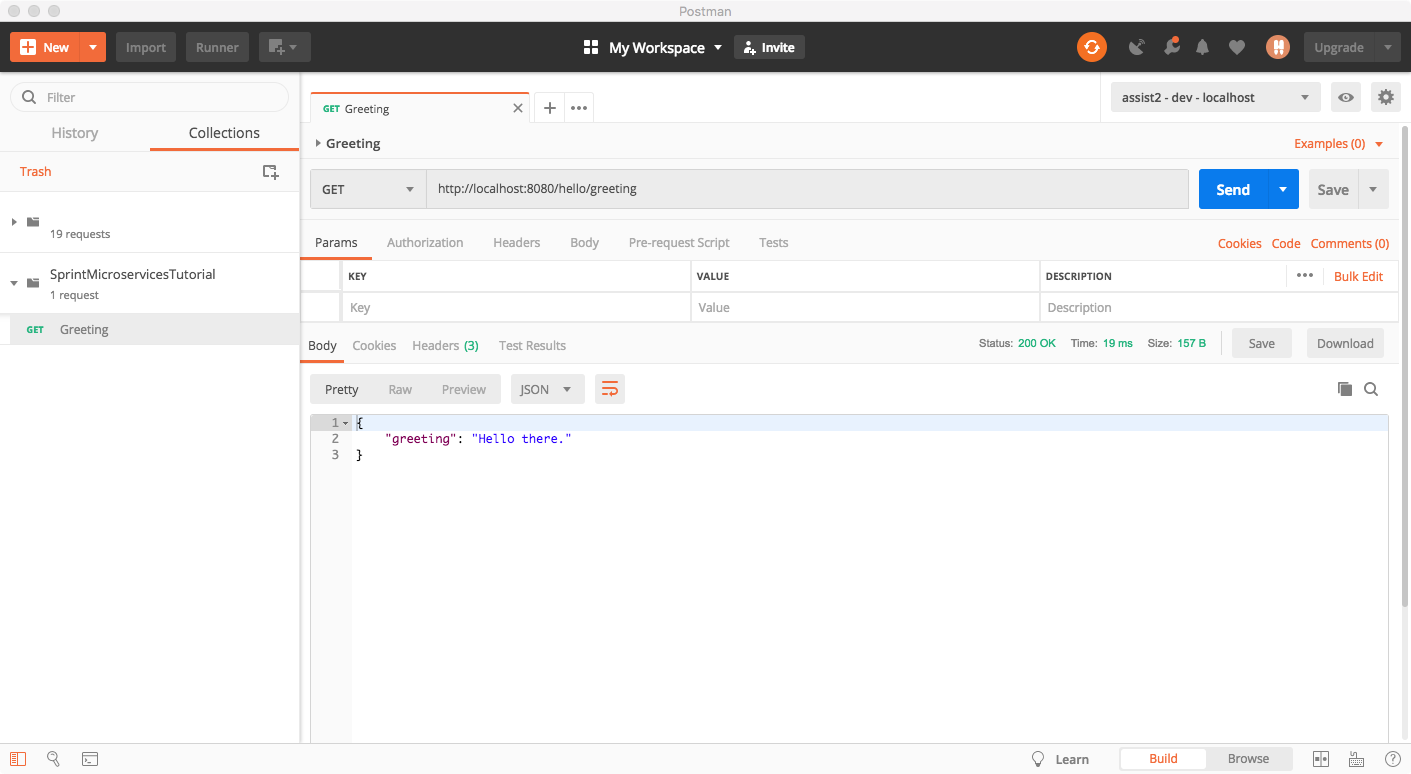
Click Send and the following should appear as the response.
{
"greeting": "Hello there."
}
Congratulations, you created your first Rest web service.
API Design
REST is designed like webpages, except with computers as the consumers. Just as you would almost never navigate to a page conceptually represented by a verb you should never represent a REST endpoint by such. Use nouns. Endpoints, like webpages, are resources.
REST endpoints are also designed to be layered into hierarchies, the same as webpages. Suspend disbelief and let’s assume we have a simple endpoint to a dogfood and catfood database. Obviously, the example is greatly simplified.
The endpoint is food. The API provides information on food for two species: dogs and cats. Each species has thousands of possible breeds. And each food has three possible sizes: small, medium, and large.
For purposes of illustration, we chose to make dog and cat two separate endpoints. And because there are thousands of potential breeds, we make them what are called path parameters. Finally, we choose a query parameter to represent the food size.
Path and Query Parameters
Parameters that are part of an endpoint path are termed path parameters. They are distinguished by curly braces. For example,
http://www.president.com/{president}
represents an endpoint where the client replaces the president with the name of the specific president.
A query string parameter are represented after the endpoint by using a question mark to offset the query string.
http://ww.president.com/{president}?age=<age>
Create a new com.tutorial.spring.rest.petfood package. Create three new classes named Food, DogFood, and CatFood. Create enumerations for the species and size properties.
package com.tutorial.spring.rest.petfood;

public class Food {

  public enum Species {DOG, CAT}
  public enum Size {SMALL, MEDIUM, LARGE}

  private String brand;
  private Double price;
  private Size size;
  private Species species;
  private String enteredBreed;

  public String getEnteredBreed() {
    return enteredBreed;
  }
  public void setEnteredBreed(String enteredBreed) {
    this.enteredBreed = enteredBreed;
  }
  public Species getSpecies() {
    return species;
  }
  public void setSpecies(Species species) {
    this.species = species;
  }
  public Size getSize() {
    return size;
  }
  public void setSize(Size size) {
    this.size = size;
  }
  public String getBrand() {
    return brand;
  }
  public void setBrand(String brand) {
    this.brand = brand;
  }
  public Double getPrice() {
    return price;
  }
  public void setPrice(Double price) {
    this.price = price;
 }
}
package com.tutorial.spring.rest.petfood;

public class DogFood extends Food {
}
package com.tutorial.spring.rest.petfood;

public class CatFood extends Food {
}
Create a class named FoodController. Provide it with a @RestController annotation and a top-level @RequestMapping for the /food endpoint.
Create two endpoint methods, one for the /dog endpoint and one for the /cat endpoint.
The {breed} combined with the @PathVariable annotation is how you define a path parameter. The @RequestParam annotation is how you define a parameter bound to a query parameter.
Create a new class named FoodService and add simple methods to create a list containing cat food and a list containing dog food.
Annotate the class with the @Service annotation.
package com.tutorial.spring.rest.petfood;

import java.util.ArrayList;
import java.util.List;
import org.springframework.stereotype.Service;
import com.tutorial.spring.rest.petfood.Food.Size;
import com.tutorial.spring.rest.petfood.Food.Species;

@Service
public class FoodService {

  public List<CatFood> createCatFood(String breed, Size size)
  {
    List<CatFood> food = new ArrayList<CatFood>();
    CatFood a = new CatFood();
    a.setBrand("Purina");
    a.setPrice(13.12);
    a.setSize(size);
    a.setSpecies(Species.CAT);
    a.setEnteredBreed(breed);
    food.add(a);

    CatFood b = new CatFood();
    b.setBrand("Science Diet");
    b.setPrice(10.00);
    b.setSize(size);
    b.setSpecies(Species.CAT);
    b.setEnteredBreed(breed);
    food.add(b);

    return food;
  }

  public List<DogFood> createDogFood(String breed, Size size)
  {
    List<DogFood> food = new ArrayList<DogFood>();

    DogFood a = new DogFood();
    a.setBrand("Purina");
    a.setPrice(33.22);
    a.setSize(size);
    a.setSpecies(Species.DOG);
    a.setEnteredBreed(breed);
    food.add(a);

    DogFood b = new DogFood();
    b.setBrand("Science Diet");
    b.setPrice(12.22);
    b.setSize(size);
    b.setSpecies(Species.DOG);
    b.setEnteredBreed(breed);
    food.add(b);

    return food;
  }
}
The annotation causes the class to be scanned by Spring when performing classpath scanning. Spring registers the class as a service. An instance of this class is then available to other classes without explicit instantiation using a constructor. You then auto-wire it to other classes using the @Autowired annotation.
The @Autowired annotation marks an object as automatically injected using Spring’s dependency injection. An instance of the FoodService class is annotated with @Service and so is loaded by Spring and subsequently injected into the FoodController instance. The FoodController instance can then use the Foodservice instance as if it had explicitly created it using a constructor.
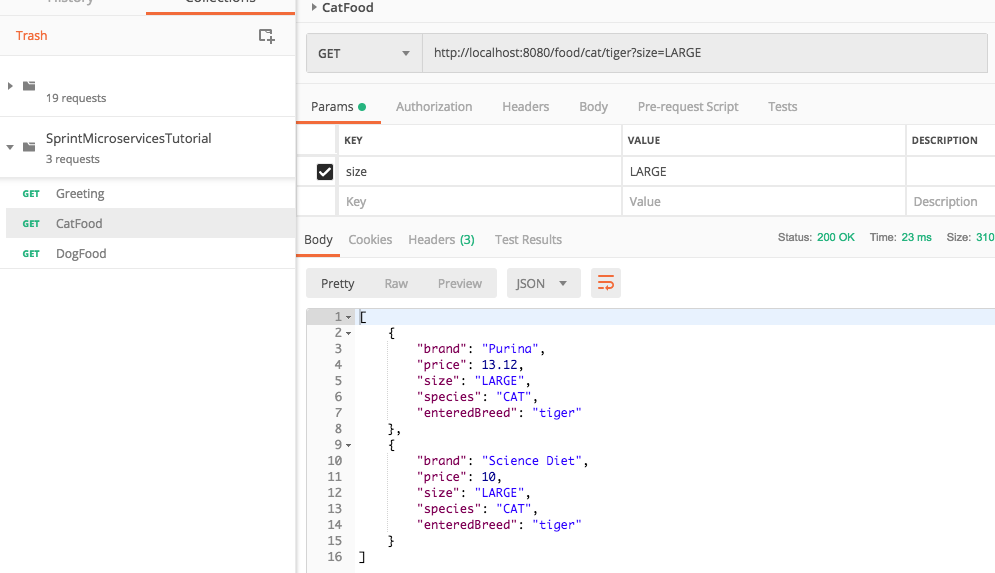
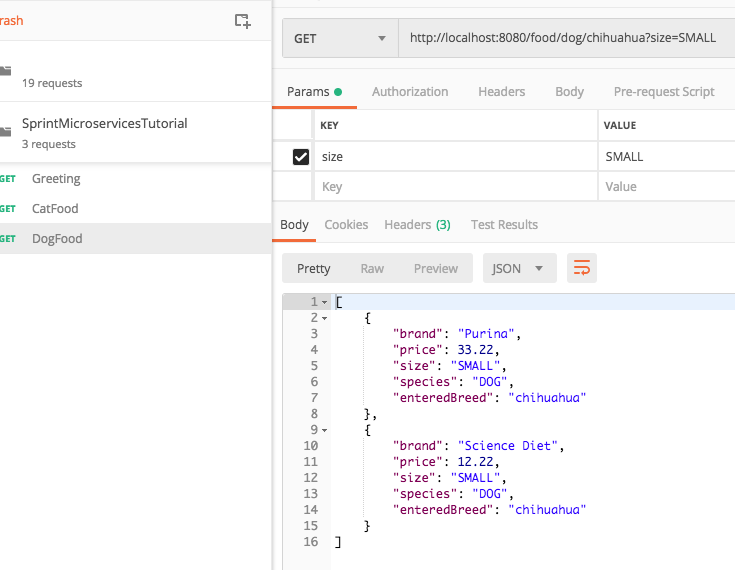
Create two new GET requests in Postman. One for cat food and one for dog food.
For the cat endpoint enter tiger as breed and LARGE as size.
For the dog endpoint enter chihuahua as breed and SMALL as size.
What is returned is an array of cat foods and a list of dog foods (JSON arrays).
In this tutorial we explored REST using Spring Boot. We used Spring Boot to create several Rest endpoints. You learned a little of the reasoning behind the idea of a Restful API.
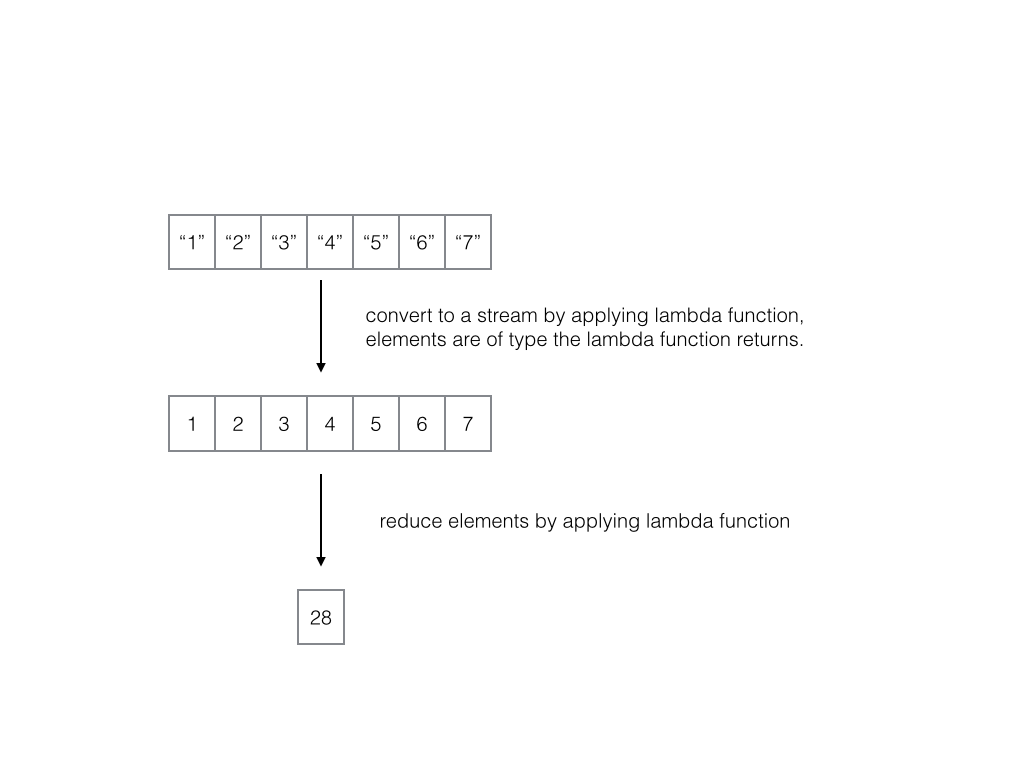
In this tutorial, you convert a List of Strings to a List of Integers using the MapReduce programming paradigm inherent in Java Streams. Every class that implements the java.util.Collection interface has a stream method. This method converts the collection into a Stream.
Java Streams are a much more convenient and efficient way to work with collections using functional programming. Rather than beginning by describing Functional Programming, I begin by showing you why you might consider incorporating functional programming into your everyday coding. In this simple example using the MapReduce programming paradigm. Let’s jump in with an example, and then return to the theory of Java Streams and MapReduce after completing the example.
A good overview of Java Streams on YouTube that I would recommend watching prior to completing this tutorial is Java Streams Filter, Map, Reduce by Joe James.
Open Eclipse and create a new Java project. Name the project functional.
Create a top-level package by right-clicking on the src folder, selecting New, and then Package from the menu.
Name the package com.functional.example and note the created package structure.
Create a new class named MapReduceExample in the functional package. Do not forget to add a main method to the class.
Create a static method named oldWay that takes a List of Strings and returns an Integer List. Be certain to import the java.util.List package.
Create a List variable named convertedList and initialize it as an ArrayList. Import the java.util.ArrayList package.
List<Integer> convertedList = new ArrayList<>();
Create a for loop that iterates over the stringValues List, converts each element, adds the converted element to the convertedList variable and then returns the converted list.
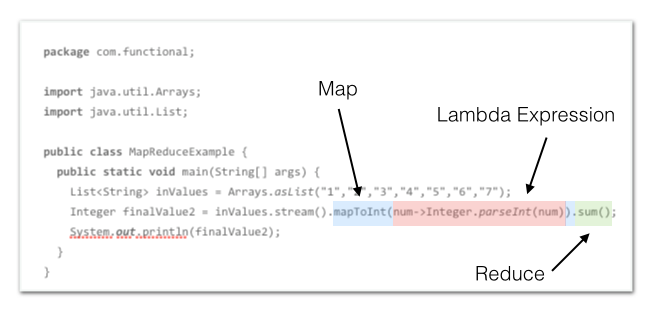
The mapToInt method takes a lambda expression as the function it applies to the list elements. The mapToInt method returns an IntStream. The IntStream’s sum method is a reducer, as it reduces the elements to a single Integer value.
Replace the List creation with the Stream.of method.
Rewrite the function using the Stream’s map function and reduce function.
The map function takes a lambda function that is applied to the list elements. The result is a Stream of Integers. The reduce method then applies the provided lambda function to reduce the stream, here an Integer containing the sum of the values. The Integer::sum is called an accumulator because it accumulates the values. Note that :: is a method reference telling the compiler to use the sum method from Integer.
Rewrite the function, but instead of using the :: method reference, provide a different lambda expression to the map method.
Change the sum method to the reduce method as follows.
Note that in the above code we used Stream.of rather than creating a data structure and then streaming it to a stream. Remember, a Stream is not a data structure and does not modify the underlying data source, the Stream streams the elements in the underlying collection. We could have also used the Stream.builder method to create a stream.
Mapping
The mapToInt and map Stream methods are mapping operations. The map function applies the supplied function to a stream’s elements to convert into a stream of a different type. For instance,
myStream.map(num->Integer.parseInt(num))
converts the stream, myStream, that contains Strings to a stream containing Integers. It does this using the mapper. A mapper is a stateless lambda expression applied to each of a stream’s elements.
num->Integer.parseInt(num)
The mapToInt method returns an IntStream. Other mapping methods include mapToLong, mapToDouble, and flatMap, flatMapToLong, flatMapToInt, and flatMapToDouble. Flatmap is covered in another post and is not discussed here.
Lambda Expressions
A lambda expression is a function that is not tied to a class. It can be passed to methods as if it were an object, and it can be executed upon demand. A lambda expression’s syntax is as follows,
lambda operator -> body
A lambda operator is can contain zero or more parameters. Lambda expressions are covered in a later tutorial. However, note here that the following two expressions are lambda expressions.
num->Integer.parseInt(num) // apply the parseInt method to num and return result.
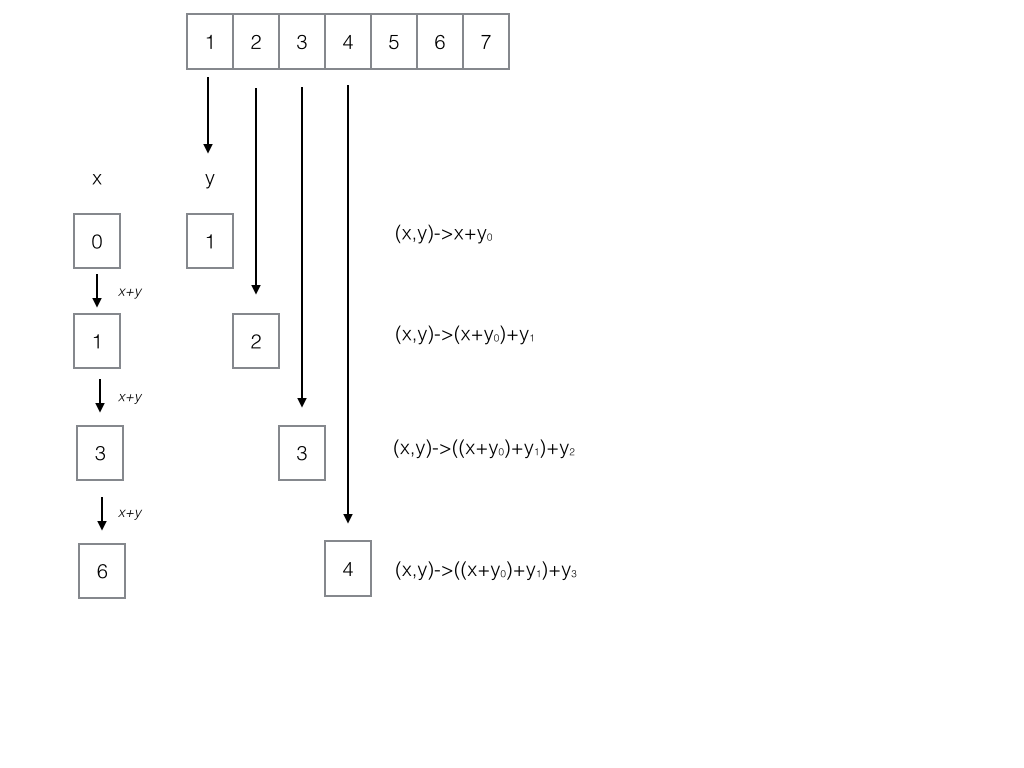
(x,y) -> x+y // supply x, and y and return the result.
The first expression parses the integer value of the supplied element. The second expression takes two elements and sums them. Note that it is used in the reduce method recursively. The first element is the sum, the second element, y, is the new element of the stream. So with each iteration x increases while the value of y varies according to the current element.
Filters
Filters are a convenient way to remove unwanted values. The Stream interface declares a filter method that applies a predicate to a Stream and returns a Stream of only the elements that match the predicate. A predicate is a functional method that returns true or false.
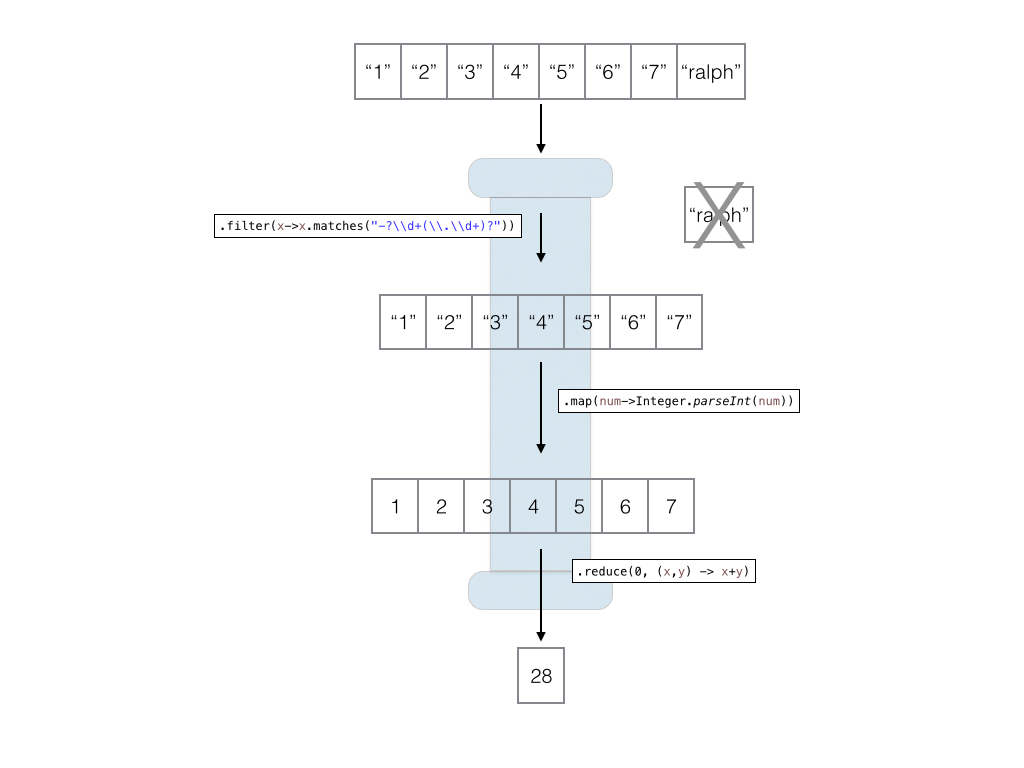
Add a new element to the Strings with the value “Ralph.”
Run the program and note the exception. This is obviously because “Ralph” cannot be parsed into an integer.
Exception in thread "main" java.lang.NumberFormatException: For input string: "Ralph"
at java.lang.NumberFormatException.forInputString(NumberFormatException.java:65)
at java.lang.Integer.parseInt(Integer.java:580)
at java.lang.Integer.parseInt(Integer.java:615)
at com.functional.MapReduceExample.lambda$0(MapReduceExample.java:33)
at java.util.stream.ReferencePipeline$3$1.accept(ReferencePipeline.java:193)
at java.util.Spliterators$ArraySpliterator.forEachRemaining(Spliterators.java:948)
at java.util.stream.AbstractPipeline.copyInto(AbstractPipeline.java:481)
at java.util.stream.AbstractPipeline.wrapAndCopyInto(AbstractPipeline.java:471)
at java.util.stream.ReduceOps$ReduceOp.evaluateSequential(ReduceOps.java:708)
at java.util.stream.AbstractPipeline.evaluate(AbstractPipeline.java:234)
at java.util.stream.ReferencePipeline.reduce(ReferencePipeline.java:474)
at com.functional.MapReduceExample.main(MapReduceExample.java:33)
Add the filter method to myStream before the map method to filter any non-strings from the resulting Stream.
A Stream is immutable, and cannot be modified. For intermediate methods, the result of each processing step is a new Stream with the transformation applied. This allows the convenient transformation “pipelining.”
Each function applied to a Stream returns a new Stream. This allows chaining the operations together into a series of processing steps. There are two types of transformations when processing a Stream, intermediate and terminal operations. An intermediate operation returns another Stream. A terminal operation returns a final value, terminating the pipeline.
Modify the program by adding another map transformation.
You can chain as many intermediate methods together to form a processing pipeline. Note that intermediate operations that reduce a stream’s size should be executed before elements applied to each element. For instance, it makes little sense to perform the following,
myStream.map(x->x*2).filter(x->x%2==0)
as you would multiply every number in a stream by 2 only to take the resultant stream and half its size by discarding odd numbers.
Collectors
Sometimes you do not wish to reduce a stream to a single variable. Instead, you might wish to transform a collection to another collection, performing processing steps along the way. An easy way to collect a stream into a collection is through Collectors. Let’s consider a typical data processing task developers face daily.
Create a new class named Widget and provide an id and a color property of the enum type Color.
Create an enumeration for Color.
package com.functional;
enum Color {red,blue,green,yellow,orange};
public class Widget {
  private int id;
  private Color color;

  public int getId() { return this.id;}
  public Color getColor() {return this.color;}
}
Create a constructor that takes an int and Color as parameters.
package com.functional;

enum Color {red,blue,green,yellow,orange};

public class Widget {
  private int id;
  private Color color;

  public int getId() { return this.id;}
  public Color getColor() {return this.color;}

  public Widget(int id, Color color) {
    this.id = id;
    this.color = color;
  }
}
Suspend disbelief and assume the Widget class represents a business entity in your software. In a typical program, much code is written dedicated to storing multiple instances of an object in a collection, iterating over the collection’s elements, transforming them, and aggregating the results into another collection.
Add a method to Widget named getRedIds that returns a list of ids for red widgets. The code should look familiar; certainly, you have written code like this countless times.
Run the program and the string, [1, 4, 5] is printed to the console.
The above is typical boilerplate code, familiar to most developers. Again, suspend disbelief and focus on the processing and not the reality of the business object. But armed with our acquired functional programming knowledge we can discard the getRedIds method and replace it with a single line of code.
Add the following two lines to the end of the main method.
Run the program and the following two lines are printed to the console.
[1, 4, 5]
[1, 4, 5]
The complete class follows.
package com.functional;
import java.util.ArrayList;
import java.util.List;
import java.util.stream.Collectors;
enum Color {red,blue,green,yellow,orange};
public class Widget {
private int id;
private Color color;
public Widget(int id, Color color)
{
this.id = id;
this.color = color;
}
public int getId() { return this.id;}
public Color getColor() {return this.color;}
public static List<Integer> getRedIds(List<Widget> widgets){
List<Integer> ids = new ArrayList<>();
for(Widget aWidget:widgets){
if(aWidget.color == Color.red) {
ids.add(aWidget.id);
}
}
return ids;
}
public static void main(String[] args) {
List<Widget> widgets = new ArrayList<>();
widgets.add(new Widget(1, Color.red));
widgets.add(new Widget(2, Color.blue));
widgets.add(new Widget(3, Color.green));
widgets.add(new Widget(4, Color.red));
widgets.add(new Widget(5, Color.red));
List<Integer> ids = Widget.getRedIds(widgets);
System.out.println(ids);
ids = widgets.stream().filter(x->x.getColor()==Color.red).map(x->x.getId())
     .collect(Collectors.toList());
System.out.println(ids);
}
}
The terminal method is the stream’s collect method. We provide this method the Collectors toList method which returns a new list.
forEach and Consumer
The forEach method is a useful terminal operation that you can use to apply a lambda function to all elements in a stream.
Create a new class named ForEachExample, be certain to add a main method.
Add a new class to the class named AddTen that returns an Integer.
package com.functional;

import java.util.Arrays;
import java.util.List;

class ForEachExample {
  public Integer addTen(Integer val) {
    val+=10;
    return val;
  }
  public static void main(String[] args) {
  }
}
In main, create a ForEachExample instance, and a list of Integers.
Stream the list and create a forEach statement and supply it with a lambda expression that calls the addTen method and then prints the results.
Stream the list again and print each element, just to prove that the integers in values are truly immutable.
package com.functional;

import java.util.Arrays;
import java.util.List;

class ForEachExample {

  public Integer addTen(Integer val) {
    val+=10;
    return val;
  }

  public static void main(String[] args) {
    ForEachExample example = new ForEachExample();
    List<Integer> values = Arrays.asList(1, 2, 3, 4, 5);
    values.stream().forEach((x)->{System.out.println(example.addTen(x));});
    values.stream().forEach(System.out::println);
  }
}
Run the program and the following is printed to the console.
11
12
13
14
15
1
2
3
4
5
The code,
(x)->{System.out.println(example.addTen(x));}
is a lambda expression. The actual argument for forEach is a Consumer. A consumer is a functional interface that allows you to define a lambda expression to apply to the input but returns no value.
Modify the main method by removing the lambda function from forEach and creating a new Consumer instance.
Supply the forEach with the consumer instance.
Run the program and the results are the same as before.
public static void main(String[] args) {
  ForEachExample example = new ForEachExample();
  List<Integer> values = Arrays.asList(1, 2, 3, 4, 5);
  Consumer<Integer> action = x->{System.out.println(example.addTen(x));};
  values.stream().forEach(action);
  values.stream().forEach(System.out::println);
}
In practice, you rarely require creating a Consumer and then applying it to the forEach method. But, you could if you had a complex lambda expression. Although in that situation I would personally probably create a separate method.
Conclusion
In this tutorial, we explored how Java Streams simplify working with Collections. Be aware that lambdas, Streams, and functional programming are a rich and complex topic. However, like Java generics, integrating these concepts into your everyday coding does not require a deep topic mastery. As this tutorial demonstrates, integrating Java Streams into your everyday coding allows you to write more concise code that is easier to read and test. The stream’s MapReduce programming paradigm literally allows you to replace entire methods of boilerplate code with a single line of code. That line can contain as many intermediate transformations as necessary.
If new to Java, consider the book Think Java by Allen Downey and Chris Mayfield. Also consider supplementary material presented on this website (Java tutorial).
In a previous post I presented algorithms and functional decomposition. Here, we explore how to write an algorithm and then create working Java code from that algorithm. This post’s purpose is not to present a realistic computer program. Moreover, this post omits many fundamental programming topics. But these omissions are by design. Instead suspend disbelief and focus on the simple process of turning a task into a computer program’s skeletal structure. Here we are using functional decomposition to go from a general real world task to the beginnings of a computer program.*see below
Sketti – Redneck Bolgnese
A recipe I remember from my childhood, sketti, went viral when Mama June made sketti on the The Learning Channel’s show Here Comes Honey Boo Boo. The recipe is simple: spaghetti noodles, hamburger, ketchup, and butter. But let Mama June demonstrate.
Mama June makes sketti by frying hamburger, boiling spaghetti noodles, microwaving a mixture of ketchup and margarine in a bowl, and then combining the ingredients in the pot used to boil the noodles (after draining the water first).
Observation to Algorithm
When you have a process you wish turning into a computer program, do not begin by writing code. You should first formalize the tasks involved. Start by writing the steps involved in making sketti. Focus on the broad steps, not the details.
gather ingredients
boil noodles
fry hamburger
mix ingredients
microwave sauce mixture
combine ingredients
serve and enjoy
These are the seven steps I get from observing Mama June make sketti. But, these steps are much too broad. And so let’s decompose these steps into more detailed sub-steps. As I’m a redneck, I wanna keep it realistic – so lets get the dishes from a dish-drainer rack rather than the cupboard. Oh, it’s also a fridge not a refrigerator – details are important.
gather ingredients
get hamburger from fridge
get noodles from cabinet
get pot from rack
get pan from rack
get microwavable bowl from rack
get ketchup from fridge
get butter from fridge
boil noodles
put water in pot
bring water to a boil
add noodles
cook noodles
throw noodles, three, against cabinet
drain noodles
fry hamburger
put meat in pan
fry meat
drain fat (optional)
make sauce
put margarine in bowl
put ketchup in bowl
mix
microwave sauce
combine ingredients
add meat to noodles
add sauce to noodles
stir
And there you have a top-level outline detailing making sketti. We can now use this outline to create the beginnings of a working Java program.
Algorithm to Java Code
Now let’s use the outline above to write the skeleton of a simple Java program that uses simple methods that do not return values. Again, suspend disbelieve, the purpose here is to demonstrate translating an outline to a simple program.
First I create a simple class named Sketti with a main method.
public class Sketti {
	public static void main(String[] args) {
	}
}
I then create methods from the top level outline methods. Note I am adding no logic to perform these tasks.
public class Sketti {
	public static void main(String[] args) {
	}
	public static void gatherIngredients(){
	}
	public static void boilNoodles(){
	}
	public static void fryHamburger(){
	}
	public static void makeSauce(){
	}
	public static void combineIngredients(){
	}
}
Now, one of my pet-peeves is placing any logic in the main method. The main method is the program’s entry point, it should not be used for any logic. Therefore, I add a top-level method named makeSketti. This method will orchestrate the sketti making tasks.
public class Sketti {
	public static void main(String[] args) {
	}
	public static void gatherIngredients(){
	}
	public static void boilNoodles(){
	}
	public static void fryHamburger(){
	}
	public static void makeSauce(){
	}
	public static void combineIngredients(){
	}
	public static void makeSketti(){
	}
}
Now that I have the primary tasks, I can orchestrate these tasks into making sketti.
public class Sketti {
	public static void main(String[] args) {
		makeSketti();
	}
	public static void gatherIngredients(){
	}
	public static void boilNoodles(){
	}
	public static void fryHamburger(){
	}
	public static void makeSauce(){
	}
	public static void combineIngredients(){
	}
	public static void makeSketti(){
		gatherIngredients();
		boilNoodles();
		fryHamburger();
		makeSauce();
		combineIngredients();
	}
}
I like to start with a running program, no matter how simplistic, therefore let’s add println statements to each function.
public class Sketti {
	public static void main(String[] args) {
		makeSketti();
	}
	public static void gatherIngredients(){
		System.out.println("gatherIngredients");
	}
	public static void boilNoodles(){
		System.out.println("boilNoodles");
	}
	public static void fryHamburger(){
		System.out.println("fryHamburger");
	}
	public static void makeSauce(){
		System.out.println("makeSauce");
	}
	public static void combineIngredients(){
		System.out.println("combineIngredients");
	}
	public static void makeSketti(){
		System.out.println("making sketti");
		gatherIngredients();
		boilNoodles();
		fryHamburger();
		makeSauce();
		combineIngredients();
		System.out.println("done making sketti");
	}
}
When ran the program writes the following output.
making sketti
gatherIngredients
boilNoodles
fryHamburger
makeSauce
combineIngredients
done making sketti
Now create methods for each sub-step involved in gathering ingredients. Then have the gatheringIngredients method orchestrate its sub-steps. The following code illustrates.
	public static void gatherIngredients(){
		System.out.println("gatherIngredients");
		getBurger();
		getNoodles();
		getPot();
		getPan();
		getKetchup();
		getButter();
	}

	public static void getBurger(){
		System.out.println("\tgetBurger");
	}
	public static void getNoodles(){
		System.out.println("\tgetNoodles");
	}

	public static void getPot(){
		System.out.println("\tgetPot");
	}

	public static void getPan(){
		System.out.println("\tgetPan");
	}

	public static void getKetchup(){
		System.out.println("\tgetKetchup");
	}

	public static void getButter(){
		System.out.println("\tgetButter");
	}
Repeat creating sub-steps and orchestration for each major step.
public class Sketti {
	public static void main(String[] args) {
		makeSketti();
	}
	public static void gatherIngredients(){
		System.out.println("gatherIngredients");
		getBurger();
		getNoodles();
		getPot();
		getPan();
		getKetchup();
		getButter();
	}
	public static void getBurger(){
		System.out.println("\tgetBurger");
	}
	public static void getNoodles(){
		System.out.println("\tgetNoodles");
	}
	public static void getPot(){
		System.out.println("\tgetPot");
	}
	public static void getPan(){
		System.out.println("\tgetPan");
	}
	public static void getKetchup(){
		System.out.println("\tgetKetchup");
	}
	public static void getButter(){
		System.out.println("\tgetButter");
	}
	public static void boilNoodles(){
		System.out.println("boilNoodles");
		pourWater();
		boilWater();
		addNoodles();
		cookNoodles();
		throwNoodles();
		drainNoodles();
	}
	public static void pourWater(){
		System.out.println("\tpourWater");
	}
	public static void boilWater(){
		System.out.println("\tgetButter");
	}
	public static void addNoodles(){
		System.out.println("\taddNoodles");
	}
	public static void cookNoodles(){
		System.out.println("\tcookNoodles");
	}
	public static void throwNoodles(){
		System.out.println("\tthrowNoodles");
	}
	public static void drainNoodles(){
		System.out.println("\tdrainNoodles");
	}
	public static void fryHamburger(){
		System.out.println("fryHamburger");
		placeMeat();
		fryMeat();
		drainFat();
	}
	public static void placeMeat(){
		System.out.println("\tplaceMeats");
	}
	public static void fryMeat(){
		System.out.println("\tfryMeat");
	}
	public static void drainFat(){
		System.out.println("\tdrainFat");
	}
	public static void makeSauce(){
		System.out.println("makeSauce");
		addMargarine();
		addKetchup();
		mix();
		microwaveSauce();
	}
	public static void addMargarine(){
		System.out.println("\taddMargarine");
	}
	public static void addKetchup(){
		System.out.println("\taddKetchup");
	}
	public static void mix(){
		System.out.println("\tmix");
	}
	public static void microwaveSauce(){
		System.out.println("\tmicrowave");
	}

	public static void combineIngredients(){
		System.out.println("combineIngredients");
		addMeat();
		addSauce();
		stir();
	}

	public static void addMeat(){
		System.out.println("\taddMeat");
	}
	public static void addSauce(){
		System.out.println("\taddSauce");
	}

	public static void stir(){
		System.out.println("\tstir");
	}

	public static void makeSketti(){
		System.out.println("Mama June's making sketti");
		System.out.println("=========================");
		gatherIngredients();
		boilNoodles();
		fryHamburger();
		makeSauce();
		combineIngredients();
		System.out.println("done making sketti");
	}
}
When you run the program, you obtain the following output.
And there you have it, you have used functional decomposition to write a simple program that makes sketti. Admittedly, this is not a realistic program. But it illustrates functional decomposition.
Conclusion
Computer programming is problem solving. Computers require instructions to do anything interesting. Those instructions must be detailed. Think of writing a computer program to perform some task as similar to writing a term paper. Before writing, you decompose your paper’s topics into an outline. That outline becomes your term paper’s structure. The same is true for programming. When programming, your outline becomes your program’s skeleton.If you strip functional decomposition from all other tasks involved in writing a computer program, suddenly writing a reasonably detailed algorithm becomes remarkably simple. It used to be common knowledge that writing algorithms was considered a fundamental programming skill. Somehow, this skill has gotten lost in the newer generation of programmers and the plethora of coding boot-camps that teach syntax but not programming. But If you learn this one simple skill it will place you in the top-tier of computer programmers. Your problem solving ability and systematic thinking in other endeavors will also improve. You just might start applying algorithmic thinking to your everyday life.
This post is geared towards students reading the book Think Java through chapter four. It purposely avoids Object-Oriented design, variable passing, and other topics so as to focus solely on functional decomposition.
The other day at Barnes and Nobles bookstore my 15-year-old daughter, in a hushed whisper, told me “dad, that guy behind us, he was applying for a job.” I replied “so, what’s so strange about that?” She looked at me and said “he told them he just got a psychology degree and couldn’t find a job.”
It reminded me of when I came to Washington DC, fresh with an Anthropology degree in hand and expectations that surely I could find a job somewhere. I did, first as the graveyard shift clerk at a 7-Eleven in Manassas Virginia and second as a banquet setup supervisor at a Marriott near Dulles airport. Even though I had defied the odds and escaped my humble trailer-park upbringing and went to college, I still faced no prospects of a good job. My work-life was one of coffee carafes, pastry trays, and disgruntled meeting attendees.
Once, I was late to my banquet setup job, probably by no more than ten minutes or so – but it might as well of been an hour as far as the hotel manager was concerned. He chastised me, threatened to fire me, and told me the most important quality in my position was punctuality. And to be fair, he was probably right. But still…it was then that I decided to study computer programming at night.
I am so thankful for that fateful decision for I stumbled upon a career where you think for a living, enjoy (well mostly enjoy) what you do, and are never want for a job (usually). And if you are good, nobody is chastising you for arriving ten minutes late to work. And, after two or three years of experience, the dilemma is never one of if you can find a job, but rather, if it’s a job you want and at the rate you want. Sure, you might stumble upon the odd story of the IT professional who works at Walmart because he or she cannot find gainful employment. But I assure you, dig a little deeper, and you will find extenuating circumstances. Perhaps they stopped learning and stagnated, perhaps they were never very good, to begin with. IT changes rapidly, people that find a job in one technology and then fail to learn new technologies rapidly find themselves outdated and expendable. Simply put, if you are not willing to devote time to life-long learning, then IT is not for you. But if you devote a modicum of time to stay current in one or more technologies, you will find a job – usually within a couple of months. And even more importantly, if you want a raise and your current employer won’t fulfill your request, you can easily find the rate you desire elsewhere.
It is hard to impress upon folks just how lucrative IT is as a career. While every career is taking massive hits, and the educated, well-paid, career professional is rapidly becoming extinct, there is one career choice that is growing dramatically – anything related to Information Technology. So how to explain this to the average person, someone that has worked in a “job” his or her whole life? How do you explain the difference IT can make?
Information Technology offers you a career rather than a job. Unsure of the difference? Chris Rock explains it best.
Computer Science Career Prospects
Before I discuss the gloomy prospects for most humans on earth in the twenty-first century, let’s start by exploring a particularly lucrative career, computer programming. Then, as we review the grim prospects, remember that we will readdress this career and the takeaway you should have from this post.
Not all jobs in computers are as programmers. Networks require administering. Software must be tested. Networks, hardware, and software must all be secured. There is a spectrum of tasks supporting the software revolution, so if you don’t like programming it doesn’t mean you cannot go into Information Technology.
Technological Unemployment
Now for the doom and gloom. The career prospects are grim for most humans. If you have a college degree and find yourself working at Starbucks, you are not alone. You did not throw away your life on a “worthless degree.” In the past, there was a large demand for well-educated college graduates regardless of major. But now, things are changing, it is harder to find a job, and a college degree just isn’t the employment guarantee it once was. If even graduates in engineering have difficulty finding entry-level jobs, how are graduates in a subject like Classical Civilization going to find jobs?
I’m not trying to make this political, but the demand for human labor – both skilled and unskilled – is decreasing while the population is increasing. Blame the Democrats, Republicans, or even blame the Easter Bunny, it doesn’t matter who’s at fault…as computers continue to increase efficiency the demand for labor will continue to decrease. And you can take that statement as fact.
Superstars and Jobs
Maybe you are a snowflake. Maybe you are the next Justin Bieber, The Weekend, or Skrillex to start from humble beginnings on YouTube to international stardom. Perhaps, but consider this, even the music industry has seen many jobs simply vanish. Gone are the days of the well-paid backup musician, the rock band, or the symphony playing movie scores. Instead you have the single DJ/Producer or electronic musician. And the one or two solo artists who manage to rise to the top and reap all the rewards are the exception not the norm.
But maybe you are going to write the next Angry Birds and sell it on the App Store. Or perhaps, just perhaps, you will be the next YouTube image-consultant star with your podcast like Dante Nero or Alpha M or Bradley Martyn. You will tape yourself buying a Ferrari and post it for the world to see, thus ensuring YouTube stardom. But for every successful YouTube star there are countless more that never make it. Certainly I agree a lofty goal like YouTube stardom is, by all means, impressive – go for it – but just be certain to have a backup plan. Or better yet, learn how to make your backup plan part of your dream (see the link to a Harvard Business Review article below).
Here’s a good video explaining the economics behind the Winner Take All Economy. But it’s not that difficult to noodle it through: if 200 years ago you had to physically go to a theatre to watch actors perform while today you can watch actors perform from the comfort of your living room, then the demand for actors today must be less than it was then, as not every town needs its theatre and acting troop.
Wow, so that’s pretty grim. Not only are computers taking our jobs, mass-communication means that consumers can select the best and leave the second-best to mop floors. So perhaps a strategy of being the CEO, the star, or the professional athlete isn’t the wisest career plan.
Working for a Living
Finally, we need to talk about work. Old fashioned American hard work. Perhaps, just perhaps, you were misled by our recent popular culture regarding jobs/work. Sure Steve Jobs tells you to “follow your passion,” but is it practical? Moreover, earlier I presented a video clip of Chris Rock extolling the virtues of a career compared to a job. But he was talking about unskilled labor. Skilled labor isn’t necessarily a j.o.b. that makes one loath to arise in the morning. Many white-collar careers are also a j.o.b. to the person in the position. In America, over the last few decades we started equating anything involving labor as a job and anything pushing paper as a career. I find that strange, as I feel a managerial position where I “plan stuff” all day would be about as appealing as scraping shrimp off plates at Red Lobster.
IT is hard work. I find it more akin to the blue-collar work of yesteryear than to white-collar paper pushing. Industry hype aside, you will find managers have about as much respect for IT folk as they do a kid working a drive-through window. Maybe IT wasn’t your passion and how you envisioned your life…but it’s an opportunity. Isn’t it possible to shape your passion for the situation you find yourself in? Listen to Mike Rowe talk about passion and opportunity.
There are jobs, albeit not enough to counteract technological unemployment. Somebody has to work the computerized mechanical monsters, albeit, instead of fifty people only one person might be needed. If you can be that one person…
If you are in IT, and you resolve yourself to constant, lifelong learning, then you will be needed in the new economy. Still not convinced?
The Age of Abundance
Here is a video explaining the fourth industrial revolution. While watching it, take particular note to the people in the video. Without exception, regardless of the person’s career, he or she incorporates IT into their career.
Information Technology Career
A perfect storm is brewing. Computers are rapidly replacing many of the traditional jobs. And not just menial jobs, jobs that traditionally required substantial education. At the same time, our culture denigrates hard work culturally. IT is more akin to the blue-collar worker of yesterday than the stereotypical manager of yesterday. System administrators, cybersecurity analysts, programmers, all do something beyond go to meetings, schedule things, and drink coffee.
But forget all the high-faluting nonsense, let us keep it simple.
Careers deemed “menial” or “trade” or “blue-collar” somehow became undesirable over the past several decades, even rewarding ones that require considerable skill and pay handsomely.
In the United States, Information Technology was taught as a science rather than a learnable skill, leading to large sectors of our population believing it was a career beyond his or her reach.
Computers are taking jobs, even “smart” jobs, at an alarming rate.
Hundreds of thousands of Information Technology jobs will go unfilled.
If you are willing to become skilled in this career – all of the above means you have a job, a good job, even if the economy does go south for most other college graduates.
It doesn’t matter what you consider the source of the world’s current woes. It also doesn’t matter what you consider the solution to those woes. Rest assured, information technology will be a part of the solution (unless we bomb ourselves back to the stone-age, in which case discount my previous pontification). If you even suspect you might like a career in computing, you owe it to yourself to explore all facets of the industry. Explore computer programming, system administration, testing, cyber-security analysis, and other aspects of the career.
You might not be the next Steve Jobs, Mark Zuckerberg, or IT billionaire, but you will have a six-figure salary for a relatively low upfront educational investment. And if you dedicate yourself to lifelong learning, or find that coding is your passion? Well, the sky’s the limit.
As an aside, I’m getting up there in years…it took me a long time to learn the lesson in this Harvard Business Review article. Although the article is directed at those in their midlife, it is equally applicable to those just starting and trying to balance their dreams with the realities of his or her current situation. Yes, it requires reading (gasp !) rather than watching a YouTube video…but there is so much truth in this article. It is exactly what Mike Rowe is saying on a higher level. I plan on sending the link to him and/or his Facebook page.